Log InCartCall Now: (616) 667-7297

What Type of Grooming Do You Do?

Quote ThisMy educational team recently visited a local grooming salon. When they came back, they shared a comment made by the staff of the salon.

“We don’t do show grooms, it’s not what our customers want.”

I thought to myself, “Okay, but I don’t do ‘show grooms,’ either.” I never have. Nor do I teach show grooming. Very few of my products showcase show grooming – not the books, the Distance Learning Program, The Salon Mentoring Program, or the on-site programs taught at the Paragon School of Pet Grooming. None of them focus on show grooming. 90% of the videos from Learn2GroomDogs.com showcases every day grooming jobs – from shave downs to highly stylized pet trims.

…But the comment got me thinking. What determines the type of grooming we do? It boils down to one thing: the needs and demands of our clients.

Our clients will either make us strive to new heights or allow us to settle into a less demanding routine. I see this play out clearly between two of my companies.

When I started the Paragon School of Pet Grooming in the early 90’s, the Jenison community was a perfect fit for a school. At the time, I was running a fleet of six mobile vans. We catered to the upper echelon of the community. Our prices were higher than average salon prices for the premium front door service. That clientele appreciated and was willing to pay for this type of service.

Pet GroomThe Jenison market was on the outer edge of our service area. Occasionally, we would dip our toes into that market. We quickly learned that the Jenison market valued economy. They wanted short, no-nonsense haircuts. They were amazingly frugal – and they were always on the lookout for a deal!

The Jenison market was a perfect place for a grooming school with discounted grooming prices and basic trims! For 27 years, The Paragon School has been in this location. This community takes excellent care of its pets, but it doesn’t step far outside the realms of fancy haircuts. Short, low maintenance trim styles are what this clientele wants.

The other side of town has a totally different story. When we first started talking about opening a luxury pet resort, I knew exactly where we needed to go: right to the heart of where most of our mobile clientele lived. In 2007, we opened Whiskers Resort and Pet Spa.

Our first groomers at the resort were high-end pet stylists. They were Certified Master Groomers and awarding-wining contest stylists. They set the stage for a high-end thriving grooming department. The trims were more upscale and so was the average price. Upscale grooming comes at an upscale price.

Today, Whiskers has seven grooming stations and business is booming. Rarely do we see a short, low maintenance all-trim come through the doors.

At Whiskers, the team specializes in more complex haircuts. The team does lots of breed profile trimming using pet grooming techniques. They use special products to accentuate the coat type. They hand strip. They hand scissor. They do pet trims. They even do a few show grooms. They see oodles of Doodles and lots of “designer dogs.” Don’t get me wrong, about half of the grooming jobs are still bath and brush dogs. They handle plenty of Labs and Golden Retrievers! Plus, the Whiskers grooming department sees the new, different, and unusual when it comes to breeds. This team must be on their toes. Our stylists need to be up-to-date and highly educated to meet the needs of the clientele. They do a lot of fancy haircuts!

Both businesses cater to a different clientele. They are on different career paths both for the people within the teams as well as the businesses themselves. Both businesses are successful.

Most pet grooming businesses do a bit of a crossover between no frills, low maintenance haircuts and the fuller, fancier trim styles. The personal motivation of the salon owner, local competition, as well as the clientele will ultimately dictate the type of grooming styles leaving each business.

I know many salons that specialize in low maintenance, easy trims combined with bath and brush type pets. Even though they don’t do fancy trims, they are still highly successful.

Other salons cater to a more discerning clientele. They need to have a higher skill set to stay competitive and thrive in that setting. The more knowledgeable and skillful they are, the more likely they can satisfy their clients.

Other stylists cross over into the show world where the understanding and application of structure and movement combined with sculpting the coat is critical to being in the ribbons.

Regardless of where you fall on the scale, if you are a professional pet groomer/stylist, grooming is a career. It’s not a hobby to you. You might be doing low maintenance trims that don’t require a whole lot of advance study – that’s okay! Not everybody has to do fancy trims. Each grooming business will have a signature style.

You might be at a salon where if you’re going to thrive, you need to be able to satisfy a more demanding client. You have clients who are educated and know what their dogs are supposed to look like – or WANT them to look like! Being able to apply pet grooming techniques to enhance a particular breed or an individual dog is just good business.

It’s important to remember that owners have pets for different reasons. Not all owners want a “show dog” look. They simply want a handsome family pet that is clean and well-groomed. Sometimes that means a no-frills type trim – other times, it’s a much fancier haircut.

Whatever YOUR signature style is – do it to the best of your ability with kindness and respect for the pet. It’s our job to assist the owner to care for their pet in a manner suiting the pet and their lifestyle.

Happy trimming!

Melissa

 MVpaw_no_Inner_whiteWhat does your clientele want? Jump on the Learn2GroomDogs.com Facebook page and tell us about it.


How to Scissor a Leg in Under 2 Minutes

autopilot-buttonGrooming systems allow us to go on autopilot. When we’re on autopilot, we can focus on the thing that matters the most – pets!

Think about the things you do every day. I’m sure you use systems all the time. I know I do.

I have a system for making coffee. I have a system for doing my makeup. I have a routine I follow when I exercise. I have a system when I get into the car to go somewhere. I have a routine I follow every night before I go to bed.

I bet you have a lot of routines, too.

When I follow my systems and routines, I don’t have the think about what I’m doing – I just do it. The beauty about routines is they become automated – and efficient.

How does it feel when you don’t follow your routine? What happens when you get interrupted? Do you lose your place? Do you have to stop and think about where you left off? Do you feel lost? What happens to your time?

I know when I’m interrupted, I lose my place. I get off track. I lose precious time. If it continues to happen, I get frustrated.

My guess is you’re just as busy as I am. We have places to go and things to do. Wasting time drives me nuts. How about you?

So, how do you apply this concept to dog grooming? Each phase of the grooming process can be broken down, systematically. For now, let’s talk about a routine for scissoring a leg in less than two minutes.

Now, I’m not talking about an 80-pound Doodle. I’m not talking about a dog you haven’t seen for months. I’m not talking about a dog that comes in matted to the hilt. I’m talking about average, everyday regular clients. Small and medium sized pets that have a bit of style to the haircut.

To become highly efficient with scissoring legs, there’s a secret.

It’s all in the set up BEFORE you pick up your shears.

Let’s break this down.

Let’s say you have a Shih Tzu that comes in every six weeks. It’s heavy coated and gets a medium guard comb on the body with fuller legs and a round head style. When it’s done, it’s so cute it looks like it should be a stuffed animal. The entire trim, prep, bath, fluff dry, and haircut should take 60 minutes or less.

First things first. The set up before you pick up your shears is critical. You’ll give yourself a huge head start if you do a few things beforehand.

All equipment needs to be sharp. Your blades need to be able to glide through the coat like a hot knife through butter. Your shears need to cut effortlessly with precision. Your thinners should run smoothly, without catching. Your Greyhound comb as well as your favorite slicker brush should be within easy reach.

Here’s my basic grooming routine on all my six-week or less clients who get a fuller styled leg trim.

  1. trim nails and clean ears
  2. bath
  3. towel dry
  4. hi-velocity fluff drying
  5. double-check coat for any mats or tangles prior to beginning the haircut
  6. trim the pads and round the feet at the same time with a #40 blade*
  7. Sani-work with a #10 (eyes, tummy, and under tail)
  8. guard comb work on the body*
  9. scissor the legs
  10. style the head
  11. style the ears
  12. style the tail
  13. apply bows and cologne based on client preference

I rarely break from this routine. This system allows me to go on to autopilot and focus on the pet and the quality of my work.

Notice the two stars in that list of 13 steps (6 and 8). Those are key areas when setting in the haircut to get legs done in less than two minutes. Those are your “cheat” areas.

What do I mean by “cheat”? Use your clippers. The clipper will remove the bulk of the hair. Any time you can remove excess coat with a clipper, you’re ahead of the game. It minimizes how much you must think about what you are doing while reducing the risk to the dog. #10’s, #40’s or guard combs rarely nick the body of the dog. Scissors? That’s another story. If you’re working with a quality pair of shears, they’re razor-sharp. It only takes one miscalculated move – one tug from the dog – and you have a potential injury that might require stitches. That’s not something any of us want.

Here is my step-by-step guide for this style of haircut focusing on the steps.

(Note: I always work around the dog in the circle.)

 Body:

  1. I brush downward over the leg and the foot with a slicker brush. With my less dominant hand, I slide my hand down the leg, with my finger and thumb closest to the table. When I get close to the foot, I gently ask the dog to lift its foot. I lightly clip the pads with a #40 blade (a #30 blade will work, too).
  2. Once the pads are clipped, I let my hand slide over the foot with my fingers wrapping around the edge of the dog’s foot. Any coat hanging over the edge of the foot, I quickly remove with my #40 blade. I repeat this process on all four feet.
  3. Once the pads and feet are trimmed, I turn my attention to the guard comb work on the body. In the pattern transition areas, I let my guard comb skim off the longer hair on the thighs, rump, and the shoulders. I’m thinking about parallel lines.
  4. When I stand back and look, I want the lines to drop from the widest points on the shoulders and hips to the table. Since the feet have already been trimmed, once you blend the coat at the transition areas, there’s very little left to hand scissor. Normally it’s just an area between 2-3 inches wide.
  5. Once my clipper work is done on the body and I have smoothly transitioned the short coat into the longer fur on the legs – I’m ready to pick up my shears.

Legs:

(In this scenario, I’m starting with the front leg and moving to a rear leg but you can use whatever order works best for you – or the dog. As I work around the dog, I complete each leg before moving to the next one.)

  1. I start with the front legs. I fluff the coat up, gently holding the dog’s foot in my fingers then give the leg a little bit of a shake. The leg is positioned as close to the table top as I can while still elevating it slightly. With straight shears, I box the outside and inside leg lines. (Creating a box is much easier than trying to create a cylinder when setting in the lines.)
  2. Next, I let the dog stand naturally in a square position. I trim a straight line from the elbow to the table with the dog standing squarely. While the dog is standing, I eyeball the front of the front leg making a mental note how much coat needs to come off to create a straight line.
  3. I recomb the entire leg, give it a little shake, and begin my final scissoring. With the dog standing, remove the corners and any longer hair falling over the boxed-in area, creating a nice straight cylinder. I then pick up the foot and detail the cylinder shape.
  4. I quickly give the leg another comb-up and do the final detailing with my thinning shears. I remove any of the high spots or rough patches.
  5. As I get close to finishing shaping the leg, I slide my fingers in around the top of the elbow, and give a gentle squeeze. This hold stabilizes the dog and naturally makes them point their toes so I can focus on the foot. I give the foot a quick fluff with my comb. Picking up my thinners, I remove any rough edges falling outside of the nice rounded foot blending into the sidelines on the leg. I never cut on the underside of the foot from this position.
  6. I put the foot down and let the dog stand naturally. I double-check my work between the large pad of the foot and the stopper pad. I re-trim that area if it needs it.
  7. To double-check the pad area, I brush the coat down and trim any stray hairs with small detail shears – always working around the outside area of the foot pad.
  8. I double-check all my work before I move on to the rear leg.

The rear leg will be the same (with a few variances) to help establish the angles of the rear assembly. When doing the guard comb work, I sweep the clipper over the hip and rump area and feather off towards the stifle. This helps establish the angulation on the rear leg.

  1. On the rear legs, I fluff the coat up. Gently holding the dog’s foot in my fingers, I give the leg a little bit of a shake. With the dog standing squarely, I scissor the outside of the leg in a straight, parallel line to the table.
  2. Next, while standing directly behind the dog, I scissor a straight parallel line on the inside of the leg.
  3. I re-fluff the leg and let the dog stand naturally. I scissor in the front of the rear leg, accentuating the curved angle from the stifle to the hock and then straight down to the rounded foot. I will often switch to curved shears for this section.
  4. Finally, I fluff the rear portion of the leg. Using curved shears, I scissor in the angles over the rump and down the rear section of the back leg, accentuating the angulation.
  5. I quickly give the leg another comb-up and remove any of the high spots or rough patches with thinners.
  6. I slide my hand around the thigh, lifting the foot slightly off the table, focusing now on the foot. I give it a quick fluff with my comb and pick up my thinners to remove any rough edges falling outside the lines of the nice rounded foot. I blend the foot into the sidelines on the leg. I set the leg down and double-check the hock.
  7. I fluff the leg one more time and do one of two things:
    1. Lift the dog so it is standing on its hind legs. With the dog lifted in this manner, I get a clear view of the inside of the rear legs. I look for rough spots needing to be smoothed out – or –
    2. Gently pick up the one of the rear legs. Lift it only as high as the dog is comfortable (most of the time allowing the dog to bring its leg into its body a bit). I double-check the inside of the rear leg and smooth out any rough spots with thinners.
  8. To double-check the pad area, I brush the coat down and trim any stray hairs with small detail shears, always working around the outside area of the foot pad.
  9. I double-check all my work before I move on to the next leg.

Have you ever timed yourself? If you haven’t, I encourage you to do so. You can’t improve what you don’t track. It’s important to know how long each step of the grooming process takes you. If you are not being able to get legs scissored on a relatively simple trim quickly, I encourage you to grab a timer or watch the clock. Play the time game with yourself. It’s fun. If you work on the system, you will be able to complete a leg in under two minutes.

When grooming pets, I love to automate what I do. It allows me to give the client a consistent haircut every time. It allows me to be efficient. It allows me to minimize the amount of time I spend on each task. I love how having systems in place allows me the freedom to focus on what is important – the pet.

Being efficient allows you to do more pets per day while enjoying your job. It doesn’t mean that you’re working harder, it just means you’re being productive. Think about all the things you do where you have a system or a routine in place. Thorough systems and routines allow you to get through the process effortlessly. And who doesn’t like that?

Creating routines and systems will also increase your revenue generation. I have yet to find anybody who does not appreciate being able to earn more money without having to work harder for it.

 MVpaw_no_Inner_whiteJump on the Learn2GroomDogs.com Facebook page and tell us your tricks and tips for scissoring legs and saving time.


Do I Need More Clients?

dog in curlersHave you ever sat down and thought about what your clients are worth to you?

Go beyond each individual appointment.

Sure, the individual price for the grooming is important. If you are doing six pets a day at $50 a groom, it starts to add up. $300 in sales not including tips – that’s not bad! Bump it up to eight dogs or more a day and it gets even better. Or raise the price a little bit higher than $50 per groom. Both scenarios raise your bottom line.

But let me ask you this…

  • Can you consistently maintain 6 or 8 dogs a day?
  • Do you know what it costs you to get a new client?
  • Do you enjoy working with dogs that aren’t in the best condition?
  • Do you always know how much time to set aside for each new pet?

Bottom line – constantly working with new clients can be trying, time-consuming – and expensive.

There is a better way.

Instead of looking for more clients, why not concentrate on getting more out of the clients you already have? It all starts with having a great conversation on the importance of proper pet hygiene.

Back It Up with Stats

There are an estimated 183.9 million dogs and cats in the United States. Over 68% (107 million!) of all households have at least one pet. In 2017, about $6.1 billion will be spent on services like grooming and boarding.*

830253d559a127d1869e9486a317b56aOver 62% of owners consider their pets family. At one time, dogs had a purpose to make our lives easier. They kept our livestock safe. They brought the flocks in to the barnyard. They helped us hunt and retrieve game for a table. They guarded our property. They were on varmint patrol. Most of these dogs spent much of their time outdoors. They were not the pampered house pet of today.

As their roles changed, so did their grooming needs. Today, most of our four-footed clients share their lives, homes, and even beds with their owners. As we invited dogs indoors to share homes, their grooming needs increased.

Keeping them well-groomed on a regular basis is crucial to making them enjoyable companions.

So how does this translate into creating a thriving grooming business?

Focus on grooming frequency.

Check this out. I’ve factored in two weeks’ vacation time for you. I’ve also bumped the client up so they get primped for all holiday festivities (wink).

Here’s how the math works if all your clients go 6 weeks between appointments:

math 4
A busy groomer working full-time doing 6 dogs a day only needs 167 pets to keep their books full. Whoa! That’s not a lot of clients. Most of us could find that many clients just through friends and family!

But let’s take it a bit further. Let’s figure out the value of a client.

If you educate your clients (while providing quality service), you’ll keep them coming back. Repeat business is the heart of a thriving business. Don’t look at each pet as just a $50 appointment ($50 is just an example – use whatever price tag is best for you and your salon). It’s better to see the larger picture. Look at the value over a year, then push it out even further by looking at the value of a client over the lifetime of the pet.

Example:

Times per Year Annual @ $50.00 each Visit Over 10 Years
13 4-week client = $650.00 $6,500.00
10 5-week client = $500.00 $5,000.00
9 6-week client = $450.00 $4,500.00
7 7-week client = $350.00 $3,500.00
6 8-week client = $300.00 $3,000.00

Wow, right? With each weekly bump-up in frequency, you get to pocket an extra $50! Who wouldn’t want to work on a 6-week pet versus an 8-week one? Or a 4-week client over a 6-week client? Not only is it good for your bottom line, the grooming gets easier and easier on the pet. Plus, the more often it’s groomed, the pet is cleaner and more enjoyable for the family.Let’s kick this out even further. Let’s look as what happens if you increase the frequency while REDUCING the cost. I call this our Coat Maintenance Program. 

Coat Maintenance Program
17 @ $40.00 3-week client = $680.00 $6,800.00
26 @ $28.00 2-week client = $728.00 $7,280.00
50 @ $22.00 1-week client = $1,100.00 $11,000.00

Earning NEW clients always costs more than maintaining existing customers. Simply boosting the grooming frequency of your current clientele solves light booking issues and grows your sales.

Over 60% of owners think of their pets as family. What people love, they take care of. It’s up to you as the professional to educate your clientele about the hygiene needs of each individual pet based on their lifestyle.

The value of any grooming business is not in how large the client file is. It is in frequency level clients rebook their pets next appointment. And remember, sometimes having a higher average ticket price isn’t the best solution. Lowering the price and increasing the frequency helps everybody – the pet, the owner, … and the groomer.

Happy trimming!

~Melissa

MVpaw_no_Inner_whiteP.S. Has this helped? Let us know if there are other topics you’d like us to explore.  Jump on the Learn2GroomDogs.com Facebook page and tell us what would help you.

*2017-2018 National Pet Owners Survey, The American Pet Products Association (APPA)


I Want a “Puppy Cut”

Don’t you love it when an owner walks into a salon and ask for this trim by name? They actually think this is a universal standard trim that all groomers and pet stylists should know how to do. When we start asking them questions, they get all huffy, thinking we don’t know how to do our jobs. Frustrating!! You and I know there isn’t a consistent right way to do a “puppy cut.” There are many – many variations!

The puppy cut is one of the most popular haircuts. It works well on a wide variety of pets. From Shih Tzus to Doodles. From Pomeranians to Bichons. Almost any breed that grows longer coat can be done in this easy-to-care for style.

Yet, the puppy cut is also the most misunderstood haircut in grooming salons around the country. Why? There are no clear directions of what this trim actually is or how it should be done. It’s left up to individual personal interpretation by owners, groomers, or talented pet stylists.

The puppy cut started out as a trim style for Poodles. The puppy cut is a specific trim used on young Poodles in the dog show world. Once the puppy turns a year-old, they are put into the elaborate adult haircut for the conformation ring.

Today, the term “puppy cut” is used very loosely. It can apply to a wide variety of different breeds. It’s highly adaptable to any size of dog. Coats can be curly, wavy, or straight. Almost any purebred or mixed breed that grows hair looks appealing in a “puppy cut.”

quote 2 Many owners love this style of trim. It can be very cute. It’s easy to care for. It’s highly versatile. That’s a win-win-win for any busy family! The dog does not drag in dirt and debris from outdoors. Their ears do not drag in the food or water dish. The need for brushing between grooming appointments is minimized. And on smaller pets, bathing between grooming appointments is a breeze. When done well, it can be extremely attractive, to boot.

So what is it?

Essentially, the puppy cut is one length all over. The most common length is between 1-2 inches over the body, legs, tail, head, and ears. Typically, it’s done with a clipper fitted with a long guard comb over the blade. There should not be any clipper marks, uneven coat, or sharp edges left in the fur. Next to a powerful clipper, high quality blenders are your best friends when doing this trim. Everything is soft and plush, like a fluffy puppy.

The term “puppy cut” can be tricky. In some circles the puppy cut can also be known as the “teddy bear trim”, “summer cut”, or “kennel cut.” I’ve even seen some salons turn their version of the trim into their “signature haircut.” So the puppy cut becomes “The Posh Pet Special” (brilliant marketing by the way!) Generally, the only things that change between theses trims are the names and the length of coat.

It’s important to keep this in mind, too: one person’s interpretation of a puppy cut might be that of a smooth-coated puppy. Think Boxer, Pug, or Beagle. Another person’s interpretation would be that of a fluffier breed like a Shih Tzu, Bichon, or Poodle. There’s also a big difference between a four-week old puppy and a ten-week old puppy in terms of coat growth.

With all these interpretations, there is a wide variance of what each individual dog will look like and what each owner expects their dog to look like. If an owner is requesting this trim for the first time, be prepared to discuss the trim in detail with the owner. DO NOT ASSUME YOU ARE BOTH ON THE SAME PAGE! Communication is the key to a happy customer.

Here is a great tip to remember when talking with clients: whoever is asking the questions controls the conversation. As groomers and pet stylists, we are problem solvers. Uncover the problems in five simple steps.

  1. Observe the pet as the client walks through the door. Let common sense guide your line of questions.
  2. Find the problem. Ask basic questions like, “Were you thinking of a short and smooth style or something a bit fluffier?” Letting the client talk will help uncover problem areas.
  3. Gather clues from what the client tells you and what you observe.
  4. Offer limited choices as you help the client solve the problem.
  5. Guide the questions in five areas of the pet: overall body – head – ears – legs/feet – tail.

Here is a list of talking points when a new client request a “puppy cut.”

  • In general, what is the look they are hoping for? Something smooth and sleek so it’s easy to care for? Or something that makes the dog look slightly fluffy, plush, and super cute?
  • What is the lifestyle of the dog? Active? Sedentary? City dweller? Enjoys outdoor activities?
  • What is the texture and coat density of the dog? Fine, thin coats will looks shorter than dense coated dogs even with the same length clipper blade.
  • How much length do they want left on the body? What about on the legs? Feet?
  • What type of head style would they prefer?
  • Depending on the pet’s ear set, ear styles can change dramatically (dropped ear or pricked and pointed). How do they want them styled? Long? Short? In-between?
  • Do they want a long coat left on the tail or trimmed down to match the body? Or something in-between?

It’s important to have a thorough conversation with the owner when considering this haircut. There are so many variances with a puppy cut. Simply having the client state they want one is not specific enough.

Advise the client about trim options that would work best for their dog. Based on the condition of the coat and your pet’s body structure, you will be able to offer some valuable suggestions. A skilled pet professional will know how to make minor changes to the trim enhancing the pet’s appeal. Maybe the pet’s coat is too tangled to do the longer trim today. You’ll be able to suggest alternatives on how to modify a trim that works best as you discuss options for future trims.

Educating clients on proper pet hygiene is a valuable service most salon offer for free to their clients. In order to keep the dog looking its best, you can advise the client on how to best maintain this haircut between grooming appointments. At home brushing and bathing can make a big difference in how they look and smell, too. You can also make suggestions on how often the trim should be done based on the pet’s life style and coat texture. Maybe you suggest they get a full haircut every 4-6 weeks. Or maybe a maintenance program would be better suited for the client when you see them for weekly or bi weekly appointments.

Always remember, your clients are the lifeblood of your business. Taking a little extra time up front for a warm and welcoming pet consultation will go a long way toward building a solid relationship with them.

There is a good reason why the “puppy cut” is one of the most popular trims in grooming salons around the country. There are many – many variations!

What is YOUR first thought when you hear this term? How do you address this issue?  Jump over to the Learn2GroomDogs.com Facebook page and tell us about it!
Happy trimming,

~Melissa

P.S. You can make this and ALL grooming conversations easier and more successful.

This is a great tool tool for getting the conversation started in a way that is easy for you to explain and for the client to understand. The photos and drawings make it even simpler! Try it the next time you talk to your guests. Even better? Use this as a teaching/training tool for your staff so you are all consistent in the ways you speak to your clients. Once everyone on your team knows how to discuss the essential parts of the pet, they’ll sound more knowledgeable, your clients will feel more comfortable, and you’ll waste less time (and possibly profits) correcting “guess work!”

How to Get the Most from a Hands-On Grooming Clinic

Blog PicEDITEDAttending a hands-on clinic is still one of the best ways to learn. These events often feature stylists that have proven their skill level around the globe. Despite their busy workshop travel schedules, celebrity pet stylists can still be found at their grooming tables every day, just like you, grooming regular clients.

Have you ever had the opportunity to train with a celebrity pet stylist? It’s a great way to improve your skills and get super energized!

Many top professional pet stylists love to help the next generation of groomers. Some of these teaching opportunities may be demonstrations or lectures. Others might be workshops where you supply the dog or cat (as well as the grooming tools) and have the opportunity to be personally coached as you work.

So, how do you get the most out of one of these coaching sessions?

1. Make sure your core/foundation skills are strong.

 Core or foundation skills include:

Proper coat preparation
  •  bathing
  • drying
  • nails trimmed
  • ears cleaned
  • 100% tangle free coat
knowledge of basic anatomy
basic (and correct) usage of tools: brushes, combs, clippers, scissors, carding tools, and stripping knives

2. Make sure to bring a quality practice pet. 

If you do not come to the session with an adequate pet to work on, you only hurt yourself.

  • select a dog or cat with enough coat to demonstrate your skills
  • the pet must have an appropriate temperament
  • the pet should be a good representative of the breed

There are a wide variety of very accomplished pet stylists. Many specialize in a certain breed, grooming technique, or topic.  The better prepared you are to participate in the hands-on workshop, the more you’re going to get out of it. Step into the session with a very open mind.

If you are young and fresh to the industry, the information shared in these clinics can be almost overwhelming. Be the driest sponge that you can be – soak up every bit of knowledge that you can.

As your knowledge and skills develop, the clinics won’t be intimidating. They will become a great tweaking session for your skills. They will keep you abreast of advanced grooming skills and trends. Plus, these types of functions are a great way to invigorate your career.

These principles remain valid for many forms of advanced learning in the pet grooming industry. If you aren’t able to attend a hands-on training session, there are other ways to learn from the experts. Be part of the audience at a trade show or pet grooming competition. Watch a grooming video lesson featuring one of these top stylists. The better you can execute the core skills with your everyday grooming, the easier it will be to successfully transfer their lessons to your own grooming table.

If you are not as accomplished as these award-winning and highly successful pet groomers, keep at it. You can learn a lot from observing their well-developed skills. Learning new skills, tips, and tricks make grooming pets all that more fun!

Happy Trimming!

~ Melissa

P.S. Did I miss any tricks? Tell me what works for you.  Jump on the Learn2GroomDogs.com Facebook page and tell us about it.

clinicSpend the day with Melissa

Melissa Verplank will be in the Tampa, Florida area on Sunday, March 19, 2017 for an all day seminar.  Melissa will present four of her most popular lectures that are sure to help you and your business!

Click here for more information and to reserve your seat.


How to Use Anatomy to Groom the English Setter

Anatomy is the Foundation of All Grooming 

You’ve heard me say this before:

All dogs – whether a Yorkshire Terrier, a Great Dane, a Bulldog, or a Dachshund – possess identical bone and muscle structure. Fundamentally, they all are the same.

Excellent grooming starts always starts with a firm understating of canine anatomy. It is the FOUNDATION of all grooming.

Basic pattern lines are set based on the muscle and bone structure.

Depending on how physically active a dog is, the muscle structure may be very prominent. It could be lurking under a layer of fat. It may also be poorly developed due to age or lack of physical activity.

Nonetheless, those muscles are there. They will help you set symmetrical and correct pattern lines.

The bones are there, too. Whether the dog is anatomically correct when compared to the breed standard is something else altogether when we are dealing with pet dogs. Understanding what a physically sound dog is will help you immensely. When you know the difference between good and bad structure, you’ll be able to hide many faults.

When we combine all the layers of the dog – the bones, muscles, the skin and the fur – we will be able to mold and shape the coat to highlight the dog’s best features and downplay the others. If the bone structure is a little less than perfect, you can use the hair to camouflage those defects.

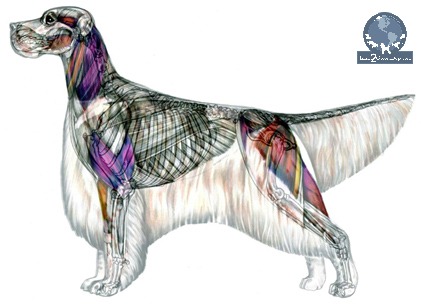
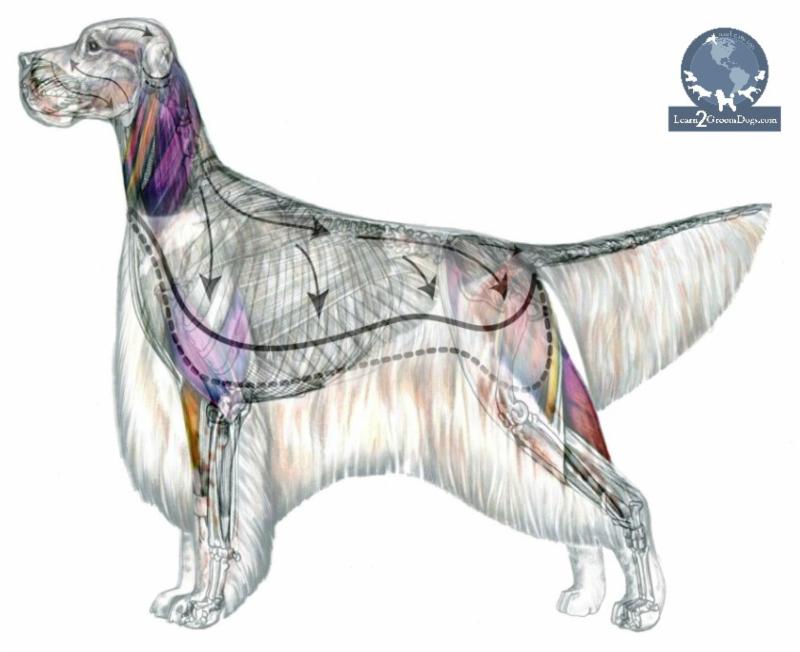
Before you begin grooming any dog, get your hands on them! Close your eyes. Feel the structure under the coat. Sink your fingers deep in the fur. Pay close attention to the muscle groups highlighted in color in these diagrams.

The Essence of the Breed

Before you start grooming any dog, you need to familiarize yourself with the breed and understand its essence.

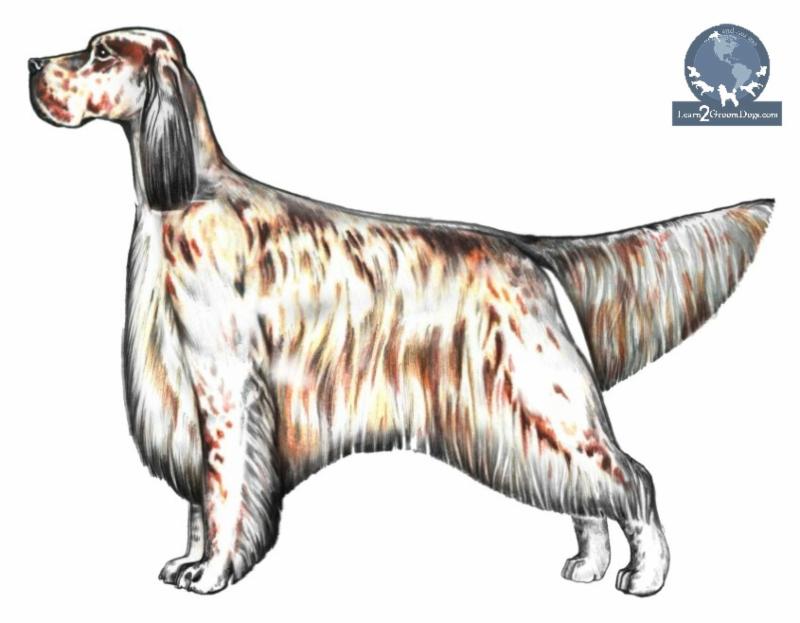
The English Setter is a Sporting dog of great style. It should be physically fit and structurally sound to work long hours in the field flushing game. The general outline of the English Setter will be rectangular. The shoulder lay back and the angles of both the front and rear assemblies should allow for adequate reach and drive.

The coat is silky, flat, and should lay close to the body. English Setters have longer feathering on the ears, chest, abdomen, underside of thighs, back of all legs, and on the tail. The longer coat should not be so long as to hide the true lines of the dogs, movement, or the function of field hunting.

Landmarks for Grooming & Styling

When it comes to grooming, let’s work around the dog using its anatomy as a reference.

When done “correctly,” Setters are hand stripped for a very natural look. However, in pet grooming circles, it is common to see the pattern clipper-cut or styled using a combination of clipping and stripping to save time. Regardless of the method you chose, the anatomy reference points – or landmarks – will remain the same.

Setting the Throat: Feel for the muscles at the sides of the neck to set the throat pattern line. A visual clue to this area is at the “frill” or cowlick line running down the sides of the neck. The throat area is directly below the jaw, inside the muscles running down the outside of the neck. The shape is generally a soft “U” shape. The lowest part of the “U” stops a few fingers above the prosternum bone.

Body: The jacket coat on the bulk of the body is shorter and lays flat on dog. Follow the natural lay of the coat when working this area.

Shoulder: Use the turn of the muscle at the shoulder to set the jacket pattern on the body.

Elbow: The turn of the shoulder will also tell you the location of the elbow. This is the general location of where to start the pattern on the body, sweeping back and upwards towards the flank of the dog.

Spring of Rib: The turn of the ribs will help set the pattern line separating the dog’s body jacket which consists of much shorter coat, blending invisibly into the longer feathering found on the lower portion of the dog’s body.

Undercarriage: The undercarriage line creates a focal point for balance of the overall dog. The highest point of the graceful sweep will be directly under the last few ribs.

Flank: Moving into the flank area, the thigh muscle should be exposed to help accentuate a physically fit and muscular dog.

Tail: For balance, the tail should reach to the hock and be a triangular flag. There is a slight gap of fur on the underside of the tail at the base. This slight space separates the longer rear furnishings with the feathering on the tail.

Topline: The top line maybe level or slightly sloping from the withers to the tail.

Neck: The long graceful neck is well muscled and slightly arched.

Head: The lines of the skull are parallel with a well definite stop.

Ears: Set well back and low, even with or below the level of the eye.

All these areas are natural landmarks used as reference points on any breed. When you combine anatomy with the official breed standard for any purebred dog, you have knowledge. You can use this understanding to accentuate the proper structure of the English Setter.

Always remember, all transition lines should be invisible. Ideally, the English Setter should look totally natural when finished – as if the coat simply grew that way.

Combining the use of these anatomical landmarks and skillful technical skills, a talented pet stylist can easily create a symmetrical, stylish, and well-balanced trim on any dog – purebred or mixed breed.

Happy trimming!

~Melissa

MVpaw_no_Inner_whiteP.S. Has this helped? Let us know if there are other topics you’d like us to explore.  Jump on the Learn2GroomDogs.com Facebook page and tell us what would help you.


Building Teamwork Within Your Salon

Creating teamwork within a grooming department is a challenge. Getting ANY group of people to work in harmony with one another is no easy task.

Teamwork requires four things:

  1. Communication (sharing information)
  2. Leadership (direction and guidance)
  3. Accountability (rules and boundaries)
  4. Clarity (understanding the cause and purpose for every task)

Teamwork helps achieve goals. It also creates an enjoyable, rewarding place to work.

Over the years, I have had varied levels of success with fostering teamwork. I’ve had times when the entire organization was working together as a single unit. We were energized and excited. We met objectives. We knocked goals out of the park. Life was good.

I have also had times when there was very little teamwork. Frustration and negativity took over. Meeting objectives was almost impossible. Goals went out the window. More than once I questioned if the company would survive or if it was worth the effort to keep it going.

Here’s what I’ve discovered.

  1. You can’t succeed without strong and effective leadership.
  2. Individuals/organizations need to understand WHY they do what they do.
  3. Systems are crucial to duplicate desirable performance.

2017-02-15_1533Building teamwork requires strong leadership that explains WHY the work is being done. Every activity is begun knowing exactly what the end will be. Systems must be made that ensure the activity is done the same way, every time.

For a business to thrive, everybody needs to work together. Whether your team is made up of just two or fifty people, everybody needs to be accountable for results. Those results are tied to the goals and objectives of the business. Everybody needs to understand what role(s) they play in the success of the company.

Years ago, I learned about a formula in Keeping Employees Accountable for Results by Brian Cole Miller. It’s called the SIMPLE approach to accountability.

S = Set expectations

I = Invite commitment

M = Measure progress

P = Provide feedback

L = Link to consequences

E = Evaluate effectiveness


S = Set Expectations

  • Success = how well a staff focuses and works toward a common theme/goal.
  • Employees need to know what is expected of them.
  • The clearer the expectations are, the easier it will be to uphold those expectations down the road.

I = Invite Commitment

  • Team members are more likely to cooperate when they understand three things: what the goals are, what’s in it for them, and how the goals will help move the business forward.
  • Once they understand these three things, they are more likely to commit to the goals and being held accountable for the results.

M = Measure Progress

  • Once they’re committed to the goals, you need to track their progress.
  • Goals must be measurable. If you can’t clearly see where you are, you can’t see how far you need to go.
  • Track progress daily, weekly, monthly, quarterly, and annually. Keep it simple and consistent.

2017-02-15_1319P = Provide Feedback

  • Team members need feedback to know how well they are doing and where they can improve.
  • Feedback opens the door for problem-solving discussions and follow-up actions.
  • Understanding expectations, followed by honest feedback, is the backbone of accountability.
  • When providing feedback, focus on the behavior, not the person. Be specific. Do not mention characteristics like attitudes or intentions.

L = Link to Consequences

  • Teams need to understand the consequences of actions toward a goal. Ideally, these consequences are built into the discussion of goals and objectives so that expectations are clear from the start.
  • Consequences are not rewards or punishments. They are simply the natural result of behavior tied to the goals and objectives of the business.

E = Evaluate Effectiveness

  • Create a system for regular and timely performance reviews.
  • Review how the process has been handled. Praise positive performance. Fine-tune lackluster performance. Redirect underperformance. Explain how their performance affects progress toward the goals and objectives of the company.
  • Be consistent, honest, and fair to the entire team.

For goals to be meaningful and useful, they must be tied to larger organizational ambitions. In other words, you need to identify the “big picture” and work backward to set smaller milestones that will lead you there.

Staff members need to understand the roles they play in business. If they don’t, they are likely to feel disenchanted, lost, or hopeless. Team members at every level should be able to communicate exactly how their efforts feed into the larger business objectives – WHY the business exists, at all.

Teamwork is not just about how effective and efficient a group is, it’s also about the relationships in that group. Always remember, it takes work to create and maintain a positive relationship. Building a healthy marriage, raising a family, training a dog, winning at soccer, and growing a business all require time and effort.

Remember, anytime you’re dealing with more than one person, teamwork is needed. Successful teamwork requires clear communication, leadership, and accountability. Always begin with the end in mind. Once you know why you do what you do – everything else falls into place much easier.

~Happy trimming,

Melissa


The Importance of Downtime

HAMMOCKIn many of my business lectures, I ask my audience how many of them take regular vacations. I’m always shocked when I see how many pet professionals don’t schedule vacations or downtime for themselves.

Did you know roughly half of all Americans don’t take annual vacations? And if they do take vacations, it’s common that they stay connected to work or even bring work along with them! Are you guilty of either of these situations? I have always scheduled downtime for myself. However, I admit I am guilty of being connected to work wherever I am – even when on vacation.

Scheduling time off for yourself is important to your overall physical and mental health. There are many positive effects to your well-being.

Here’s a short list of positive attributes to scheduling down time for yourself.

  • increased productivity
  • open to new ideas and viewpoints
  • increased creativity
  • lower stress levels
  • higher energy
  • improved moods
  • positive relationships with family and friends

2017-02-08_1539I learned early in my career the importance of scheduling time off for myself. I have always been an over-achiever, taxing my system both mentally and physically on a regular basis. Yet, I always maintain an intense pace. Why? I know the importance of unplugging.

The key is getting it SCHEDULED.  What gets scheduled – gets done. That’s true for everything, including down time!

Schedule time to disconnect. Schedule time to unplug. Schedule time to breathe. Schedule time to just enjoy life.

Here is a collection of ways to unplug. Use it to get your ideas flowing on how YOU can find time to decompress from an abundant (and sometimes insanely busy) life.

  • Daily Down Time – Do something every day you enjoy. Maybe it’s spending quality time with your family or friends. Cooking. Exercise. Sports. Reading. Doing something creative. Just take the time to enjoy the simple things life offers.
  • ab3ca0e2f7a04a4ad659c82ea2485e0eFull Days – Book a day just to do something fun and special. You might opt to include only yourself. Or plan an activity with friends. Or with family. Many times, special days don’t require money but they do require time and planning.
  • Weekend Jaunts – When is the last time you booked a weekend excursion? Everyone has different tastes. Some enjoy the solitude of the woods, water, or slopes. Others get a charge out of dog show weekends. Others gravitate to the city. There are literally thousands of things you could do on a weekend, creating special memories for a lifetime.
  • Staycations or Holistay – If your life is supercharged or you don’t have the financial resources for a full-fledged vacation, staying home could be the best answer. What is a staycation or a holistay? It’s when you stay home and participate in leisure activities within driving distance. You sleep in their own bed at night. You might make day trips to local tourist sites, swimming locations, or participate in fun activities such as horseback riding, kayaking, wine tasting, hiking, or visiting museums. Most of the time it involves dining out more frequently than usual or participating in carefree dinner menus.
  • Vacations – Think big. Have fun. Head to the islands. The slopes. Experience a cruise. Explore areas you have never been. Participate in activities that are new to you. Every city, state, and country has a wide range of activities. The only thing holding you back is your imagination and possibly your pocketbook.

A word of caution. When planning any type of downtime – is make sure it stays downtime. Don’t over schedule too many activities. If you do, you will just jump from one frenzied lifestyle into another. You won’t relax and rejuvenate.

Vacations and down time reduce stress and improve health. Time away makes you an effective, productive, and happier worker. You’ll be refreshed and ready to tackle whatever life tosses your way. Take the time to get down time into your calendar.  You deserve it!

~Happy trimming,

Melissa

MVpaw_no_Inner_whiteP.S. How do you unplug?  If you don’t – or can’t – tell us why.  Jump on the Learn2GroomDogs.com Facebook page and tell us about it.


clinicSpend the day with Melissa

Melissa Verplank will be in Lutz, Florida on Sunday, March 19, 2017 for an all day seminar.  Melissa will present four of her most popular lectures that are sure to help you and your business!


8 Ways to Turn Setbacks into Success

I love setting goals. For me, goal setting leads to exciting challenges, personal development, and rewarding achievements. That is the fun part. Unfortunately, there is another side of the goal setting coin:

Setbacks.

What is a setback?

A setback is typically an event that hinders your forward progress. Maybe you had a staff member quit without notice. You lost a large account. A pet was injured in your care. Some type of government regulation has forced you to proceed differently. I have personally experienced every one of these setbacks – and then some!

Everyone responds to setbacks differently. If you are the leader, it’s easy to lead a team of people when everything is going well. A true test of leadership will be challenged when things are not going as well. Of course, setbacks pop up at the least opportune times. It’s the nature of the beast. If you are a business owner, this will happen on a regular basis to you and your team.

Over the years I have had my fair share of setbacks and adversity. Sometimes they were small. Sometimes they were massive. Sometimes even I did not believe we could overcome them.

As I work through each setback, I go through a series of emotions. It always starts out with disbelief. Anger. Despair. As I come to terms with the setback, the next stage of emotional triggers take place. Acceptance. Hope. Planning. And finally, a new positive path to follow.

I will not lie to you – it is not easy to deal with setbacks. They are emotionally draining, frustrating, and taxing. It is not uncommon to feel fear, experience doubt, or to feel hopeless. Here’s the good news: there are specific skills, mindsets, and actions that can help you turn a setback into success.

Facing setbacks can be a leadership building experience. Each time we have to deal with difficulties, we gain new knowledge and new skills to deal with a situation on a personal and professional level. Being tested in this manner is how inexperienced leaders become great leaders. It’s always an opportunity to realize leadership potential in yourself or your team.

Here are the steps that I follow whenever I am faced with a setback. I wish I could say I have only had to use these 8 tactics a few times. However, as a longtime business owner, I have gotten pretty experienced in using these skills to get through many challenging situations.

As business owners or team leaders, we have special responsibilities especially during difficult times. People will look to us to see how they should react to the situation. To find out what they should do. They’ll expect us to have some ideas and guide them through what might be a very frightening period.

If you have the ability to approach setbacks as opportunities for growth, you can stabilize your organization as well as moving forward. Even if you make mistakes, the experience can lead to a greater understanding of your situation and your work. It can advance your team or business to a new level. Remember, setbacks are a fabulous learning tool when handled effectively. It is important as you work through the solutions to always keep the big picture in mind and never give up.

Setbacks are generally a one-time occurrence. They may be serious, but they are not ongoing. When dealing with setbacks, keep an open mind. Know what your options are and act swiftly. If you stay focused, stay calm, and deliver your message with clarity, you can turn almost any setback – no matter how difficult – into a success.

We know setbacks happen to everyone. Jump over to the Learn2GroomDogs Facebook page and tell us what happened and how you conquered YOUR setback!

MVpaw_no_Inner_white    Happy Trimming!

~ Melissa


The 2017 Westminster Kennel Club Dog Show is Almost Here!

Westminster2017-1This time of year I always get excited. The 141st Annual Westminster Kennel Club Dog Show is just around the corner! For almost as long as I can remember, I have firmly planted myself in front of the TV for two nights. I would watch the show in its entirety. Why?

Because, the Westminster Kennel Club Dog Show is the “Superbowl” of the dog world. It is the best way to stay up to date with the latest trends and styles. I would throw a Westminster party. I loved inviting my entire grooming team over to be glued to the TV for two nights as the show aired. For days after the show, we would talk about the newest breeds that had been accepted by the AKC. The unique haircuts we saw. The latest style trends on established breeds.

The show was important for me. I was actively competing in the pet grooming contest arena. In the old days, we would record the show on VCR tapes. I can’t tell you how many times I would review those tapes before I stepped into the contest arena. Today, you can stream videos to any device or save it on DVR systems. By watching some the most spectacular dogs in the country compete at this level, I was able to get a clear image etched in my mind before I stepped into the ring at a grooming competition. Visualization is a key to success.

Secondly, I used the Westminster Dog Show as a way to help keep my grooming staff up-to-date with the latest styling trends.  Once I opened The Paragon School of Pet Grooming, we continued to use the show as a key learning tool for students. The annual dog show was instrumental for students learning breed identification and trim styles.

Tune in this year and enjoy the 2017 show. The Westminster Dog Show airs Monday, February 13 LIVE ON Nat Geo WILD from 8-11 p.m. and Tuesday, February 14 is LIVE ON Nat Geo WILD from 8-11 p.m. For streaming videos of each individual breed class, click here.

Happy Trimming!

~Melissa

MVpaw_no_Inner_white

P.S.  Do you watch? Jump on the Learn2GroomDogs.com Facebook page and tell me your thoughts about how to use this show or other resources to inspire yourself and your team.


error: Content is protected !!