Log InCartCall Now: (616) 667-7297

3 Options for Clients with Matted Dogs

How many times a week do you deal with a matted dog? If you are like many of us, it’s more than once. For some, it might even be a daily occurrence.

There are immediate questions that needs answers:

  • How do you talk with the pet parent?
  • How do you tell them they are not taking care of their pet properly?
  • What are the consequences of their neglect?
  • What can you do for them today?
  • What can you do for them in the future?

As a professional pet groomer, we always need to remember – humanity before vanity.

Can you demat a badly tangled coat?

Probably.

Should  you?

Not necessarily.

Once in a great while, a client will have a legitimate reason why their dog is in poor condition. Occasionally, I will demat a dog if I sense it’s a one-time occurrence. I know the tricks to get a dog detangled relatively quickly. I have the skill, products, and tools to do it safely and humanely. However, there are two main reasons why I won’t always do it.

  1. The dog has a low pain tolerance.
  2. The client will not appreciate the work.

Here’s a perfect example. Years ago, I had a Bichon owner who always brought her dog in matted. This Bichon had a dense, curly coat. She was a regular six-week client. The owner was always immaculately presented when she dropped her dog off – the clothing, the hair, the makeup, the shoes, the jewelry, and nails. You get the idea. Oh, and she drove a Cadillac.

This was a woman who was used to getting her way. Her dog was always on the edge of whether we could brush it out or not. She never brushed the dog at home between groomings. The dog was a great advanced student dog. He was quite tolerant of the brushing process making him a super lesson dog.

One week she missed her six-week scheduled appointment. When she showed up two weeks later, the dog was trashed – matted all the way to the skin.

Crest. Head. Legs.

We told her we were going to have to start over. We would need to shave her Bichon down to the skin. He would be naked. It was the only humane option.

She was horrified. She couldn’t be seen with a naked dog! There must be some way to save the coat.

There was. She could get the dog combed out HERSELF and bring it back. But we were going to have to be able to sink the comb in all the way to the skin and pull it easily through the coat.

We gave her a thorough lesson. We even sent her home with the proper tools. We told her to come back when she felt her Bichon was totally combed out. Then, and only then, would we would give him his longer, fuller Bichon haircut.

She went home determined that she would be able to get him detangled. A few days later she returned. When we did the comb test, do you think he passed?

Not a chance. She watched the comb clearly get hung up in the coat on the first pass.

We told her to take the dog home and continue working on him.

Long story short, she returned six more times before she finally gave up. We shaved the dog with a #7F blade. We were able to leave a little tiny bit of extra coat on his head and a tiny bit of fluff on his tail. Everything else was naked.

When her sweet Bichon finally grew out about 12 weeks later, we set her up on a two-week maintenance schedule. She never missed another appointment. She learned her lesson.

Here are the three options for clients who bring you a matted dog.

  1. The pet parent needs to learn how to brush.
  2. The pet parent needs to learn to like it short.
  3. The pet parent needs to book more frequent appointments.

When faced with a matted dog, how do you have a conversation with the owner?

The conversation needs to be sincere. It needs to focus on what is in the best interest for the pet. You need to be sympathetic to the reasons why the dog got in this condition.

(Stop rolling your eyes… I can see you.)

When you speak with an owner, they need to understand there’s only so much we as groomers can do. The last thing we want to do is hurt, injure, or bring discomfort to their pet.

b5205d66495a007babfa874878a04a88--haircuts-for-boys-layered-haircutsDogs have the mentality of a two-year-old child. If their two-year-old child, grandchild, niece, or nephew came to them with their hair matted all over their head, would they ask the child to tolerate having it combed out? If the tangles were tight and right next to the scalp, making every stroke of a comb or brush painful, they would most likely trim the matted hair out. Have you ever tried to remove gum or candy stuck in a child’s hair? Imagine the same impossible tangle right next to the scalp, covering the entire head. Trimming off that hair would be the most humane thing to do, even if the end result is not the haircut you would typically prefer.

It’s similar with a dog, only with the dog, the hair isn’t just on their head. It’s all over their entire body. You might be able to salvage a very small section but it’s not fair to ask the dog to submit to a lengthy dematting process. Most dogs do not have the pain tolerance or patience to sit through it. It could take hours to thoroughly brush and comb a dog out. Plus, there is a high risk of injury to their skin. And to top it off, asking a dog to sit through an extensive dematting process could be traumatic. It could scar them for the rest of their grooming life.

Even if a dog does have the tolerance for it, the cost will be extensive. Tell them what your hourly rate is. Estimate how long the dematting process would be. On a small dog, it might be about two to three hours (and yes, I would estimate on the high side), plus the regular grooming time.

If my hourly rate was $60 an hour, the customer would be looking at an extra $90-$120 for the dematting, alone. Money talks, so most of the time you can stop there.

If you sense the client is willing to pay your dematting rates, move into your next talking point: what’s in the best interest of the pet.

While it’s good to know they would be willing to spend the extra money to have the dog combed out, it’s also important to see if the dog will even tolerate it. At this point put the dog on the counter or grooming table. Grab your combination comb, sink the wide toothed end down to the skin – and give a firm tug. Gauge the reaction of the dog. Most of the time they will flip around with extreme displeasure. It’s visually clear to the pet parent their fur baby is being hurt. That’s exactly the reaction you want.

Most pet parents cannot stand seeing their dog in pain. If they understand this condition is painful to the dog they can often be trained not to allow their pet to become matted again.

matted dog 2

The reaction of the pet, how deep the pet parent’s pockets are, and whether you feel the owner can be rehabilitated into a well-trained client will determine where your conversation will go next.

Most of the time, you’ll want to go with the humane route – and that means a full shave off. I might – or might not – try to salvage a small amount of coat on the head and tail, if possible. Mentally prepare the owner for what the dog will look like after the grooming process. Remember to emphasize that this is the only option for their pet.

Once you settle on what you are going to do that day, talk about future haircuts and how to maintain the dog so it never gets in this condition again.

Remind them of their three options.

  1. Learn to brush
  2. Learn to like it short
  3. Book more frequent visits

Talk to them about their lifestyle and how their pet plays a role.

Ask if they are willing to find the time to properly brush and comb their dog between professional groomings. If they are, give them a thorough demonstration on proper brushing and combing techniques for their pet’s coat type. We always keep the necessary tools on hand in our retail area. Make sure your clients leave with the proper equipment to maintain their pets at home. Having a handout outlining proper line brushing techniques is also extremely helpful.

If they don’t have the time or the desire to brush their pet at home between groomings, talk about booking more frequent appointments and setting them up on an economical maintenance schedule. The maintenance schedule could be weekly or biweekly.

If the dog is just too far gone, if the client is a repeat offender, or you just don’t have time to deal with a matted dog – skip to the chase. I would simply tell them, no – I will not comb their dog out. There are no other options other than to shave the coat off.

Talk to them about rebooking their next appointment in 6-8 weeks. By about 12-14 weeks they should be grown in enough to be able to get the trim of their choice if they want to maintain a fuller look. They might also opt for a simpler trim style that is short – one length all over. Their choice will be based on how they want to care for their fur baby.

Regardless of whether you are doing a brush out on a matted dog or simply shaving the matted coat off, I encourage having owner sign a matted pet release form. This form opens the door to talk about the dangers involved with matted coats. It’s a simple fact: if the dog is extremely matted, there is going to be a higher risk of injury to the pet. If you talk about it prior to the grooming and the dog does get injured in any way, most of the responsibility has been lifted from your shoulders. However, that doesn’t give you the excuse to be careless. The last thing any of us want to do is injure a pet. However, when they are severely matted, the risk of them being hurt is always present.

Remember these key points:

  • It is always important to do what is in the best interest of the dog.
  • There is a limit to what you can do.
  • There’s a limit to what the dog can tolerate.
  • You are a professional pet groomer – not a magician.

There are limits on what you can – and should – do for the animal. Be honest. Be sincere. Keeping the pet foremost in your mind when coming up with a solution will always play in your favor. Even if the client is upset, stick to your guns. It’s the client’s fault the dog is matted, not yours.

Mentally prepare your client the worst-case scenario: a totally naked dog. Over-estimate the amount of time it’s going to take. Over-estimate the amount of money it’s going to cost. Over-estimate the risks involved with dealing with a severely matted pet. If you do that, anything beyond naked or less expensive or even a mild nick is going to be seen in a positive light by the client.

Happy trimming!

Melissa

MVpaw_no_Inner_white How do you deal with this issue? Jump on the Learn2GroomDogs.com Facebook page and tell us what works for you.



7 Speedy Grooming Tips for a Happier Pet

header
Speedy pet grooming is one of many ways we show compassion for the animals in our care. Grooming efficiently doesn’t mean you care less about their needs. You can groom a pet quickly while still being gentle, respectful, and without sacrificing quality and thoroughness.

I understand this not only as a groomer, but from personal experience with my own fur family. I have Maremma Sheepdogs, two of which are over 10 years old. They are heavy, double-coated, large dogs. At one time, they had the physical strength to endure longer grooming sessions. However, as they’ve aged, grooming has become more uncomfortable to tolerate.
Read the rest of this entry »


Shredding Shedding Problems

????????This is the time of year the big shedding breeds come in. They’re often the ones that haven’t been groomed in FOREVER. You know the ones – Goldens…arctic-type breeds…Saint Bernards. They have that coat that totally trashes your salon – and maybe even you. There are tricks to getting this type of job done without too much agony.  For anyone who’s missed this blog in the past – it’s a perfect time to revisit my blog on salvage work.

As many of you know, I’m a big dog person.  Working on these large furry dogs is one of my favorite things to do in a grooming salon.  Call me crazy – but I just love the transformation in this type of job.  Over the years, the process rarely makes me cringe, no matter the size or condition of the dog – I see it as a fun challenge!

Read the rest of this entry »


How Do You Remove Track Lines from a Coat?

I still remember how frustrated I got when I first started grooming.

eraserI was the assistant, doing mostly bathing and drying for the groomer. One day, she was overbooked and was falling deeply behind schedule. She had a basic “all trim” on a larger dog that she hadn’t even started yet. Out of desperation she asked if I would remove some of the coat before the bath.

I thought to myself, “Sure, why not? How hard could it really be?” I picked up the A2 clipper as the groomer handed me the appropriate head. I twisted it on and set to work.

What a mess. The dog wasn’t hurt but my work was awful. The dog was full of uneven coat and lots of tracking.

The groomer had always made it look so easy. Coat seemed to melt off like a hot knife through butter. Her clipper work was always smooth and even. No track marks. No sticky-outies.

This was not nearly as easy as I thought!

However, I stuck with it.

Quote In A CircleThe groomer coached me as I struggled with the second side. It turned out somewhat better but was far from perfect. Today, I would not consider my work that day as acceptable – not even as pre-work before the bath. It was that bad! Luckily, I didn’t have to worry about all the tracking. It was just the rough cut before the bath. Once the dog was clean and blown dry, the groomer finished it in no time.

Fast forward 10 years. I had mastered the clippers and figured out how to eliminate tracking in the coat. On rare occasions, I still had problems. By that time, I was in my own mobile grooming van and running my own business. One of my clients was a buff American Cocker whose owners wanted clipper cut.

Most of you who have been groomers for any amount of time know some buff-colored Cockers track terribly when clipper cutting. This dog was no exception.

It didn’t matter what blade I chose.

Tracks.

It didn’t matter how powerful the clipper was.

Tracks.

It didn’t matter what time of year it was.

TRACKS.

The. Coat. ALWAYS. Tracked.

On one appointment, I basically threw my hands up. I could not get the tracking out of the coat. I had used all the tricks I knew to no avail. As I sat there contemplating how to remove the lines, I had an idea. What would happen if I reversed a blade over this coat? Hmmm. At that point, I figured I didn’t have much to lose.

I tried out the technique on an obscure spot on the dog’s body. I reversed a #7F blade then stepped back to check my work. I realized it was going to be way too short. I bumped up to a longer #4F blade. When I tried again – it was perfect. It was the length of a #7 blade. And even better, it was baby butt smooth. Eureka!

Over the years, I’d figured out how to get all coat types super smooth, but this Cocker type coat had always given me trouble. Once I mastered that coat type, coat tracking was a thing of the past for me.

So how do you get coat super smooth without any tracks?

There is not one simple answer but there are lots of techniques and trouble-shooting options. Here are a few tricks that I discovered with years of practice.

Page 479 Ways to Eliminate Track Marks

  • You need super sharp blades. The sharper the blade, the faster and smoother the cut.
  • Get a powerful set of clippers. They don’t necessarily have to be large and clunky. They do need to have enough power, speed, and torque to glide effortlessly through a thick coat.
  • Use consistent speed when clipping through the coat. As you guide the clippers through the coat, you need to run the clipper consistently over the pet’s body.
  • Card thick and dense coats before AND after. Dead undercoat clogs clipper blades. Removing as much dead undercoat prior to clipping and then again after the clipping will greatly reduce lines.
  • Always follow the lay of the coat either clipping with the grain or against the coat growth. Cross coat cutting typically creates track lines. Focus on working with the natural lay of the coat.
  • Reverse blade clipping. When the coat growth pattern is distinctive, reverse clipping can be beneficial to remove or eliminate clipper tracks. Instead of working with the coat growth, work directly against it. Reverse clipping cuts the coat closer than working with the grain. Always bump the blade up two lengths longer – a #4F cuts the length of a #7F with the grain.
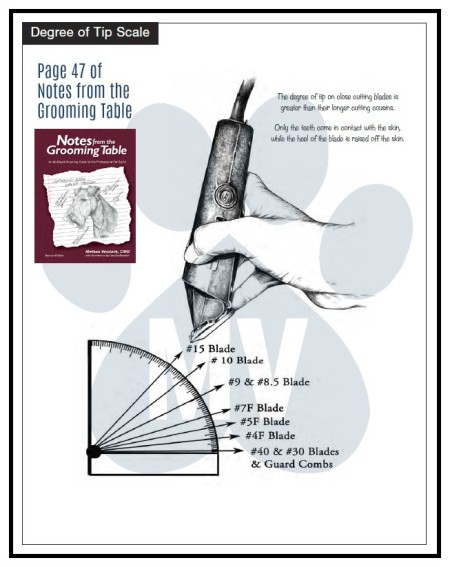
  • Maintain a consistent degree of tip on the blade as you clip. Every clipper blade works most efficiently when the heel of the blade is tipped up slightly. The shorter the clipping action, the higher the degree of tip.
  • Keep consistent pressure against the skin as you clip. Typically, the weight of the clipper is the correct pressure to apply. Keep a supple wrist as you guide the clipper over the pet’s body.
  • Fine detailed thinners work as erasers on stubborn lines. When all else fails, you can buffer clipper lines with thinning shears, knocking off just the high points of the tracks.

Every coat type is a little bit different. Some coats barely track at all. Others are almost impossible to get smooth. Learning how to minimize tracking takes time and practice. Mastering a smooth clipper cut in the least amount of time takes focus and attention to details.

There are a lot of moving parts when it comes to mastering clean perfect clipper work. Groomers who have mastered a track free simple “All Trim,” on a regular small to medium-sized can groom a pet in one hour or less.

If you struggle with this problem, my book, Notes from the Grooming Table, has a very detailed section about clipper work in the front of the book. My Learn2GroomDogs.com streaming video platform also has some great videos about efficient clipper work in the Core Video Category. Make sure to check out those two educational resources. If you work with a team of stylists, someone within your group might be able to coach and mentor you. You can also look for local clinics or workshops where you can work with a seasoned professional.

Happy trimming!

Melissa

 MVpaw_no_Inner_whiteWhat are the tricks you’ve used to eliminate tracking? Jump on the Learn2GroomDogs.com Facebook page and tell us about it.


How to Handle Tardy and No-Show Clients

Unfortunately, there isn’t an easy rule for solving the problems of tardy or no-show clients. The good news is that you have lots of options to help deal with it. Depending on how busy you are, cancellations can either be a blessing or a curse. In either case, if you have a client who is chronically dismissive or disrespectful of your time, you need to be proactive and correct the problem.

Our kennel, Whiskers Resort and Pet Spa, experienced 68 reservation cancellations over the 4th of July holiday. During the summer months, Whiskers runs at over 100% occupancy rate with its 180 rooms. During peak holidays such as Thanksgiving, Christmas, New Year’s, and Spring Break, Whiskers charges a $50 deposit for all reservations. This deposit is nonrefundable if the cancellation takes place two weeks prior to their check-in date. In the past, the deposit has not been charged for Memorial Day, the Fourth of July, or Labor Day. That will be changing.

For years we’ve tracked grooming appointment cancellations at The Paragon School of Pet Grooming.  Despite our continual efforts to knock the rate down, its remains a persistent 10%.

late

In the pet grooming industry, time is money. Clients who are chronically tardy or don’t show up for their appointments create havoc for both your schedule and your pocketbook.

It’s frustrating.

It’s disrespectful.

It’s rude.

(However, if you are overbooked, it can also be a blessing.)

There is no perfect solution for this problem. Everyone has a slightly different take on this situation. Some salons run on a very tight schedule while others are more relaxed. And let’s face it, there are times when the client has a legitimate excuse. So, what do you do?

8 Ways to deal with Tardy and No-show Clients.

  1. Call or text to confirm the day ahead. Sometimes clients just need is a gentle reminder to avoid a scheduling conflict.
  2. Breathe. For some pet stylists, having a cancellation is not a big deal. It doesn’t happen that often. The clients are well-trained and respectful of their appointments and time. In some cases, it might even be a relief.
  3. Overbook. Service businesses do this all the time to ensure they are full. The key here is to have a variety of pets on the books. If there are a few easy jobs sprinkled between the more difficult ones, you will get through your day, even if your cancellation rate is below the 10% mark.
  4. If they are 10 or 15 minutes late – call them. If they can make it into the salon within a few minutes, keep the appointment. It’s easier than trying to refill it – unless you don’t want to! If you opt not to honor their appointment, rebook them for another time. Don’t wait 30 or more minutes and then explode when they walk in the door expecting to keep their appointment. It’s better to make the call right away and know what your next step should be. This method offers you more control over the situation. With some clients, you need to personally point out why it’s important for you and/or your team to have set appointment times. This can be done in a friendly – yet firm – professional manner. This tactic also works well with non-chronic cancellations.
  5. Have a 3 Strike Rule. Some people are just forgetful. Others are just plain disrespectful. Others are downright rude. If the client will not respect your time, you don’t have to continue to put up with it. Occasionally, there are solid reasons why someone misses an appointment. Life happens. The 3 Strike Rule covers clients who are chronically late or don’t show up for their appointments. If you’re going to set up a 3 Strike Rule, what are the consequences? Do you refuse to groom the dog in the future? Charge a cancellation fee? Do you have a client prepay a nonrefundable amount for the scheduled next appointment? If you make a rule, there must be consequences. Make a policy, then consistently stick with it.
  6. If the client cancels, fails to show up, or is tardy beyond being able to groom them at their appointed time, reschedule them. Don’t do them a favor by squeezing them in the next day or two. Push them out at least two weeks. I’ve known many stylists that are so busy they have NO flexibility left in their schedules. If a client misses today’s appointment they can’t get another one until their next pre-scheduled appointment. This works exceptionally well for stylists that are booked out weeks, months, or even a year in advance. It can be a hard lesson for the client but it is generally very effective. Rarely do they miss another appointment.
  7. For clients who are chronically tardy or don’t show up, charge a late or no-show fee. You won’t always get it, but if they book another appointment, you can tack it on to their next grooming fee. You could also consider raising their base price to include an inconvenience fee.
  8. If you have a client who simply cannot adhere to a schedule or does not respect your time, have them prepay prior to their grooming appointment. This should be a nonrefundable amount. After all, your time is valuable and it’s worth money. If they cancel, you can’t get your time back nor the money you would have earned if they had kept their appointment.

late-payment-excusesAre there exceptions to your rules? Absolutely.

If you don’t already track how many cancellations you have each day and each week – start tracking it. Find out what your cancellation average is per day. Once you know the number, you can be proactive in correcting the problem.

Another way to look at it is from a dollar standpoint. At Paragon, our average cancellation rate is 10%. If you apply the 10% rate to your situation and you do 20 dogs a day at $50, that starts to add up! That translates into losing two dogs or $100 every day! Times that by five days a week and you’re at $500 of lost revenue. To me, it’s worth taking the time to simply call and remind people of their upcoming appointment the day before!

We are in the business of building positive relationships with our customers, both the two-legged and four-legged variety. Your personality and the type of relationship with your clients dictates how firmly you adhere to the demands on your time. Remember, these customers not only affect you and your time, they ultimately affect your schedule and your other clients. You need to be warm, caring, and maintain your professionalism.

Just because you are warm and caring does not mean you can’t set rules and boundaries. Remember, you can still provide great customer service and have a mutually respectful relationship that benefits both you and your client.

Happy trimming!

Melissa

MVpaw_no_Inner_white How do you deal with this issue? Jump on the Learn2GroomDogs.com Facebook page and tell us what works for you.


When Should You Just Say No?

Agressive dogrrPet groomers and stylists are in the service industry. Our role is to help people and their pets. When we do it well, we make people happy.

What if you can’t make them happy because you can’t groom the dog safely due to its aggression or health? Should you still groom the pet?

If you have been in business for any amount of time, I’m sure you’ve run into this scenario. Even seasoned professionals struggle with this dilemma at times. Should you groom the pet or turn the client away?

The easy answer is to refuse to groom the pet. However, there are many variables. If you feel the situation presents a high risk for the pet or you – simply say no. That’s your right as a business person or a conscientious employee.

You must put the safety of the pet and yourself first.

Once you have that clearly established in your mind you can start analyze the situation.

  • What is raising the red flags in your mind?
  • What are your qualifications when it comes to handling a difficult grooming situation?
  • Is this a new or a long-standing client?
  • Can the pet be groomed safely with the help of an assistant?
  • Will the pet cooperate if the owner stays or assists in the grooming process?

When I think about these questions, I always mentally play out the worst case scenario. The last thing that I ever want is to have to tell an owner that their pet was injured while in my care. Or that we had to take him to the vet for treatment. Worse yet – that their dog died during the grooming process.

Let’s face it, there are a host of things that could go wrong in any grooming salon even under the best of circumstances.

The list of dangers working in every grooming salon is massive. We are working with:

  • live animals
  • sharp instruments
  • tall tables
  • bathtubs
  • dryers
  • abrasive brushes
  • stacked kennels
  • slippery floors.

On most days, an experienced bather, groomer, or pet stylist takes all these dangers in stride. We know how to avoid accidental injuries to our four-footed clients.

So what do you do when that internal gut instinct kicks in?

You are standing there, looking at a dog (or cat) and listening to a client talk about their precious fur child. Deep down – some type of internal fear grips you. You just have a bad feeling about this particular groom. You know the old saying, “trust your gut instinct?” Well folks, that natural instinct is working in full force. Listen to it.

It’s okay to say “no” to a grooming client. It’s never worth grooming a dog you honestly feel is beyond your level of experience. If it’s more than you can handle, you have a potentially dangerous situation. The pet and you are the ones at risk – not the owner. I don’t know a single pet care specialist that ever wants to intentionally harm a pet.

Yet, if something goes wrong with the groom on that day, whose fault will it be? Yours.

Weigh out the risks. Whenever you need to decline service to a client, it’s an uncomfortable situation. But the alternative is much, much worse. Telling an owner their pet has been seriously hurt or died in your salon it the most difficult task you will have to address. You want to avoid that at all costs – even if it makes the client angry or upset.

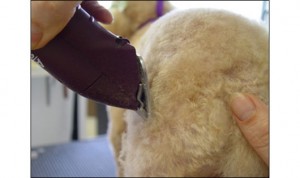
If it’s a new client, it’s much easier. There isn’t that emotional tie that comes with repeat or long-time clients. It’s much easier to refuse to groom a dog that is too big or too aggressive for you to handle.

It’s the long-time clients that are tough. The longer they have been a regular client, the harder it is. If a pet has physical ailments, it’s tougher. This is when you need to weigh out the risks and look for alternatives to your standard grooming practices. The health and wellness of the pet has to be a top priority.

Here are the questions you need to ask.

  • Could the pet be done safely with an assistant?
  • Would the dog benefit from the owner staying with the dog during the grooming process?
  • Would a different time of day work better for the pet? Maybe a time when you can focus solely on the pet without distraction?
  • If your salon is busy, would a solo stylist or mobile stylist be a better option?
  • Would it be in the best interest of the dog to get the grooming done without stopping? Maybe it’s best to break the grooming into sections, letting the dog rest between sessions? That might be over the course of the day or even over several days.
  • Would it be in the best interest of the dog to be groomed at a vet clinic where medical attention could be rapidly administered, if needed?

Years of experience have taught me there is not an easy answer. Whenever you need to decline services to a client, it’s an uncomfortable situation.

However, if you decline services, do so out of care and compassion for the pet. Be prepared to offer alternatives to the client, even if that means you simply tell them “no,” you cannot groom their dog. Be ready to refer them to someone better suited to handle their pet. List all the reasons WHY you cannot and will not groom their pet. Do it with the confidence of a professional.

In the end, as difficult as it is to say “NO” to clients, you will sleep a lot better at night when you do. Trust me on this one.

Happy trimming!

Melissa

 MVpaw_no_Inner_whiteWhat did you think?  Jump on the Learn2GroomDogs.com Facebook page and tell us your story!


How to Get Your Clipper Work Smooth – Like a Summer Hay Field

blogrIt’s been over 35 years since that first time. I still remember standing in awe, watching a talented pet groomer give a dog a haircut. She handled her clippers with ease. The long fur fell away like a hot knife through butter. The end result was smooth and gorgeous. And she was fast – super fast. She made the whole process seems so simple.

The first time I tried, I quickly discovered it was not simple. Those initial attempts were pretty pathetic. Saying my first efforts were rough and choppy would be polite. There were long tufts hanging out everywhere. I was frustrated beyond belief.

I was determined to master the skill. After all, the groomer I had been watching proved it could be done. It was simple – I just had to focus and figure it out.

Fast forward a few years of practice and a couple hundred dogs later, and I could make any dog look amazing. When I did a simple haircut on a pet, the fur fell away like a hot knife through butter. The end result was smooth and appealing. I could finish dogs in no time. I’d gotten very efficient with my clippers.

It took years of hard work. There were years of standing on my feet until they throbbed, working until my hands and shoulders ached. However, my pain can be your gain. Here are a few tips to enhance your speed when it comes to simple, low maintenance haircuts:

  • Use the most powerful clipper you can afford and are comfortable holding. Duel speeds or variable speed clippers are great options.
  • Work with the natural lay of the coat. You can work with or against the grain. If you reverse clip, the end result will leave that fur approximately two blade lengths shorter than working with the natural lay of the coat.
  • For a large majority of low maintenance trims done with a #4F, #5F, or a #7F blade with the grain, you will go over the pet three times before it’s really smooth.
  1. The first time removes the bulk.
  2. The second time takes out the high spots.
  3. The third time erases what you missed.
  • The strokes are long and smooth. They overlap slightly. I often tell students to think about a hay field. The farmer wants to be as efficient as possible – but he doesn’t want to miss anything, either. Most farmers work in nice, neat rows as they cut hay, slightly overlapping each row to ensure they don’t miss any portion of the field. Think about the dog’s body in the same manner. It’s a hay field. Your clipper is the tractor. You want it done right… and you want to be done before the dinner bell rings.
  • When clipping the legs, remember the actual contact of the cutting blade is minimal due to the shape of the surface. It’s round – like a pencil. Only a few teeth will make contact with the surface as you run the clipper down the leg. Thus, on legs you need multiple passes to get the same effect as three passes on the larger flat surface of the body. You can clearly see this relationship by simply running a blade down your own finger and looking at the blade’s point of contact.
  • Back brush. Back brush. Back brush!

clippersYou’ll always get a smoother cut on a dog that is clean and the coat has been fluffed. Once you make the initial pass to remove the bulk of the long coat, it’s time to pick up the brush. Back brush the entire dog and go over it a second time. On the third pass, again gently back brush the entire area that needs final attention. Did you get that? Back brush!

When do you know you are done? You are done clipping when there is no more coat coming off the dog after it has been washed, dried, and effectively back brushed. Period.

Clipper work on a low maintenance haircut style can be extremely frustrating for new groomer. But once you master the clipper and understand how to work with the coat, it becomes second nature. It becomes simple. You become fast. And you will be able to perform the haircut safely with great precision.  You can do it. It just takes focus

Happy trimming!

Melissa

 MVpaw_no_Inner_whiteWhat did you think about these ideas? What do you do that works great for you? Jump on the Learn2GroomDogs.com Facebook page and tell us about it.


The Secret to Handling Challenging Dogs

Dollarphotoclub_57676672In my years of teaching new pet groomers, I’ve seen hundreds of dogs take advantage of a new students. Dogs pull, squirm, whine, snarl… and bite. I’ve seen many students frustrated to the point of tears.

Then a miracle happens.

An instructor will walk over to the pet and gently take over for the student. Suddenly, this challenging pet turns into a perfect angel. The students’ jaw drops. A moment in stunned silence passes before the student exclaims, “How did you do that?!” The answer is simple:

Energy.

Dogs have keen senses and an uncanny ability to pick up on our energy and our confidence. They read us clearly even when we don’t think we are connecting to them. In the example above, the dog picked up on the instructor’s energy without a word having to be said.

Dogs are primarily nonverbal communicators. They have a language of their own. They are very clear in the messages that they give us. It is up to us to be able to interpret that language.

The #1 rule when working with pets is to remember the three C’s. As a professional you must remain: Calm, Cool, and Collected in ALL circumstances. The second you step out of this energy mode, the dog pet will know it.

Dogs are hardwired to think like dogs. They need a pack leader. If you do not exude the three C’s, dog language translates that to “poor leader.” The pet will not follow you. It will not cooperate with you.

So how do you gain the upper edge in this situation? Believe it or not, it all starts with your BREATHING.

I know it sounds far-fetched. How could something we do without conscious thought help in this situation?

To create a calm, cool, and collected energy, you need to be cool, calm, and collected. Deep breathing allows you body to channel that calm and focus. To make it happen, your breaths need to be deep and saturating. Breathe in slowly and deeply through your nose. Draw in the air and feel it fill your lungs. Now exhale slowly through your mouth. The most important part of deep breathing is to regulate your breaths. Three to four seconds in. Three to four seconds out.

Try it. You will feel the oxygen saturating your body. Tension begins to leave your shoulders. You will start to feel more relaxed almost immediately.

Screen-Shot-2015-11-05-at-4.08.52-PMDeep breathing can release stress and provide other noticeable health benefits. You will likely feel calmer after performing deep breathing exercises, and may trade feelings of anger or fear for a focused, relaxed state of mind. Most dogs will totally gravitate to this energy in a very positive way.

I firmly believe that 98% of all dog bites are preventable by reading the animal correctly and taking the appropriate precautions to protect yourself while gaining humane control over the pet. Your hands are your livelihood. You must take utmost care not to let your hands become injured.

Every pet is an individual with different physical and emotional characteristics. Some dogs receive clear directions and boundaries at home, making them very easy to work on in a professional setting. Other pets will not have the skills necessary to be well-mannered candidates in a professional grooming setting.

The personality quirks that you’ll experience while working professionally with pets will range from dogs that are perfect angels, to dogs that are mildly annoying, to dogs that could be potentially dangerous to work on for both the handler and to the pet itself.

Whenever working with pets it is always critical to remember the 3 C’s. As a professional you must remain calm, cool, and collected in all circumstances. And don’t forget to BREATHE.

Whenever you have a dog on a table or in your grooming facility, you must use humane, respectful, and consistent training messages. The more you can learn about dog psychology and combine it with actual experience, winning the control and the respect over the dogs will become second nature.

Always remember that dogs are primarily silent communicators. Excessive talking or giving of commands is not necessary to effectively communicate with them. Much of your control can come from maintaining the Three C’s – Always remain Calm, Cool, and Collected while working with any animal.

Any time you feel you are losing control of the three C’s, it’s time to step away from the grooming table and take a break. Breathe. Only when you can totally regain your composure is it time to step back and begin your work again.

There are many videos on Pet Handling in the Learn2GroomDogs library. Also my blog on Rating Dog Personalities is very helpful when determining how to rate personality and behavior in dogs.

Happy trimming!

Melissa

 MVpaw_no_Inner_whiteWhat did you think about these ideas? What do you do that works great for you? Jump on the Learn2GroomDogs.com Facebook page and tell us about it.


How to Scissor a Leg in Under 2 Minutes

autopilot-buttonGrooming systems allow us to go on autopilot. When we’re on autopilot, we can focus on the thing that matters the most – pets!
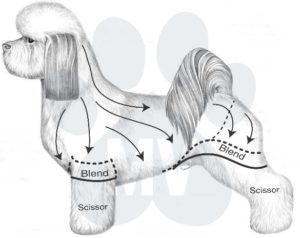
Think about the things you do every day. I’m sure you use systems all the time. I know I do.

I have a system for making coffee. I have a system for doing my makeup. I have a routine I follow when I exercise. I have a system when I get into the car to go somewhere. I have a routine I follow every night before I go to bed.

I bet you have a lot of routines, too.

When I follow my systems and routines, I don’t have the think about what I’m doing – I just do it. The beauty about routines is they become automated – and efficient.

How does it feel when you don’t follow your routine? What happens when you get interrupted? Do you lose your place? Do you have to stop and think about where you left off? Do you feel lost? What happens to your time?

I know when I’m interrupted, I lose my place. I get off track. I lose precious time. If it continues to happen, I get frustrated.

My guess is you’re just as busy as I am. We have places to go and things to do. Wasting time drives me nuts. How about you?

So, how do you apply this concept to dog grooming? Each phase of the grooming process can be broken down, systematically. For now, let’s talk about a routine for scissoring a leg in less than two minutes.

Now, I’m not talking about an 80-pound Doodle. I’m not talking about a dog you haven’t seen for months. I’m not talking about a dog that comes in matted to the hilt. I’m talking about average, everyday regular clients. Small and medium sized pets that have a bit of style to the haircut.

To become highly efficient with scissoring legs, there’s a secret.

It’s all in the set up BEFORE you pick up your shears.

Let’s break this down.

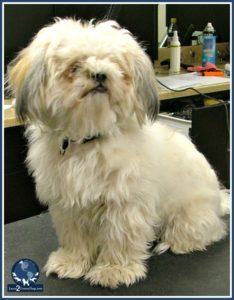
Let’s say you have a Shih Tzu that comes in every six weeks. It’s heavy coated and gets a medium guard comb on the body with fuller legs and a round head style. When it’s done, it’s so cute it looks like it should be a stuffed animal. The entire trim, prep, bath, fluff dry, and haircut should take 60 minutes or less.

First things first. The set up before you pick up your shears is critical. You’ll give yourself a huge head start if you do a few things beforehand.

All equipment needs to be sharp. Your blades need to be able to glide through the coat like a hot knife through butter. Your shears need to cut effortlessly with precision. Your thinners should run smoothly, without catching. Your Greyhound comb as well as your favorite slicker brush should be within easy reach.

Here’s my basic grooming routine on all my six-week or less clients who get a fuller styled leg trim.
  1. trim nails and clean ears
  2. bath
  3. towel dry
  4. hi-velocity fluff drying
  5. double-check coat for any mats or tangles prior to beginning the haircut
  6. trim the pads and round the feet at the same time with a #40 blade*
  7. Sani-work with a #10 (eyes, tummy, and under tail)
  8. guard comb work on the body*
  9. scissor the legs
  10. style the head
  11. style the ears
  12. style the tail
  13. apply bows and cologne based on client preference

I rarely break from this routine. This system allows me to go on to autopilot and focus on the pet and the quality of my work.

Notice the two stars in that list of 13 steps (6 and 8). Those are key areas when setting in the haircut to get legs done in less than two minutes. Those are your “cheat” areas.

What do I mean by “cheat”? Use your clippers. The clipper will remove the bulk of the hair. Any time you can remove excess coat with a clipper, you’re ahead of the game. It minimizes how much you must think about what you are doing while reducing the risk to the dog. #10’s, #40’s or guard combs rarely nick the body of the dog. Scissors? That’s another story. If you’re working with a quality pair of shears, they’re razor-sharp. It only takes one miscalculated move – one tug from the dog – and you have a potential injury that might require stitches. That’s not something any of us want.

Here is my step-by-step guide for this style of haircut focusing on the steps.

(Note: I always work around the dog in the circle.)

 Body:

  1. I brush downward over the leg and the foot with a slicker brush. With my less dominant hand, I slide my hand down the leg, with my finger and thumb closest to the table. When I get close to the foot, I gently ask the dog to lift its foot. I lightly clip the pads with a #40 blade (a #30 blade will work, too).
  2. Once the pads are clipped, I let my hand slide over the foot with my fingers wrapping around the edge of the dog’s foot. Any coat hanging over the edge of the foot, I quickly remove with my #40 blade. I repeat this process on all four feet.
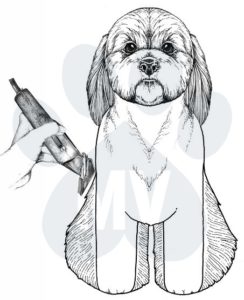
  3. Once the pads and feet are trimmed, I turn my attention to the guard comb work on the body. In the pattern transition areas, I let my guard comb skim off the longer hair on the thighs, rump, and the shoulders. I’m thinking about parallel lines.
  4. When I stand back and look, I want the lines to drop from the widest points on the shoulders and hips to the table. Since the feet have already been trimmed, once you blend the coat at the transition areas, there’s very little left to hand scissor. Normally it’s just an area between 2-3 inches wide.
  5. Once my clipper work is done on the body and I have smoothly transitioned the short coat into the longer fur on the legs – I’m ready to pick up my shears.

Legs:

(In this scenario, I’m starting with the front leg and moving to a rear leg but you can use whatever order works best for you – or the dog. As I work around the dog, I complete each leg before moving to the next one.)

  1. I start with the front legs. I fluff the coat up, gently holding the dog’s foot in my fingers then give the leg a little bit of a shake. The leg is positioned as close to the table top as I can while still elevating it slightly. With straight shears, I box the outside and inside leg lines. (Creating a box is much easier than trying to create a cylinder when setting in the lines.)
  2. Next, I let the dog stand naturally in a square position. I trim a straight line from the elbow to the table with the dog standing squarely. While the dog is standing, I eyeball the front of the front leg making a mental note how much coat needs to come off to create a straight line.
  3. I recomb the entire leg, give it a little shake, and begin my final scissoring. With the dog standing, remove the corners and any longer hair falling over the boxed-in area, creating a nice straight cylinder. I then pick up the foot and detail the cylinder shape.
  4. I quickly give the leg another comb-up and do the final detailing with my thinning shears. I remove any of the high spots or rough patches.
  5. As I get close to finishing shaping the leg, I slide my fingers in around the top of the elbow, and give a gentle squeeze. This hold stabilizes the dog and naturally makes them point their toes so I can focus on the foot. I give the foot a quick fluff with my comb. Picking up my thinners, I remove any rough edges falling outside of the nice rounded foot blending into the sidelines on the leg. I never cut on the underside of the foot from this position.
  6. I put the foot down and let the dog stand naturally. I double-check my work between the large pad of the foot and the stopper pad. I re-trim that area if it needs it.
  7. To double-check the pad area, I brush the coat down and trim any stray hairs with small detail shears – always working around the outside area of the foot pad.
  8. I double-check all my work before I move on to the rear leg.

The rear leg will be the same (with a few variances) to help establish the angles of the rear assembly. When doing the guard comb work, I sweep the clipper over the hip and rump area and feather off towards the stifle. This helps establish the angulation on the rear leg.
  1. On the rear legs, I fluff the coat up. Gently holding the dog’s foot in my fingers, I give the leg a little bit of a shake. With the dog standing squarely, I scissor the outside of the leg in a straight, parallel line to the table.
  2. Next, while standing directly behind the dog, I scissor a straight parallel line on the inside of the leg.
  3. I re-fluff the leg and let the dog stand naturally. I scissor in the front of the rear leg, accentuating the curved angle from the stifle to the hock and then straight down to the rounded foot. I will often switch to curved shears for this section.
  4. Finally, I fluff the rear portion of the leg. Using curved shears, I scissor in the angles over the rump and down the rear section of the back leg, accentuating the angulation.
  5. I quickly give the leg another comb-up and remove any of the high spots or rough patches with thinners.
  6. I slide my hand around the thigh, lifting the foot slightly off the table, focusing now on the foot. I give it a quick fluff with my comb and pick up my thinners to remove any rough edges falling outside the lines of the nice rounded foot. I blend the foot into the sidelines on the leg. I set the leg down and double-check the hock.
  7. I fluff the leg one more time and do one of two things:
    1. Lift the dog so it is standing on its hind legs. With the dog lifted in this manner, I get a clear view of the inside of the rear legs. I look for rough spots needing to be smoothed out – or –
    2. Gently pick up the one of the rear legs. Lift it only as high as the dog is comfortable (most of the time allowing the dog to bring its leg into its body a bit). I double-check the inside of the rear leg and smooth out any rough spots with thinners.
  8. To double-check the pad area, I brush the coat down and trim any stray hairs with small detail shears, always working around the outside area of the foot pad.
  9. I double-check all my work before I move on to the next leg.

Have you ever timed yourself? If you haven’t, I encourage you to do so. You can’t improve what you don’t track. It’s important to know how long each step of the grooming process takes you. If you are not being able to get legs scissored on a relatively simple trim quickly, I encourage you to grab a timer or watch the clock. Play the time game with yourself. It’s fun. If you work on the system, you will be able to complete a leg in under two minutes.

When grooming pets, I love to automate what I do. It allows me to give the client a consistent haircut every time. It allows me to be efficient. It allows me to minimize the amount of time I spend on each task. I love how having systems in place allows me the freedom to focus on what is important – the pet.

Being efficient allows you to do more pets per day while enjoying your job. It doesn’t mean that you’re working harder, it just means you’re being productive. Think about all the things you do where you have a system or a routine in place. Thorough systems and routines allow you to get through the process effortlessly. And who doesn’t like that?

Creating routines and systems will also increase your revenue generation. I have yet to find anybody who does not appreciate being able to earn more money without having to work harder for it.

 MVpaw_no_Inner_whiteJump on the Learn2GroomDogs.com Facebook page and tell us your tricks and tips for scissoring legs and saving time.


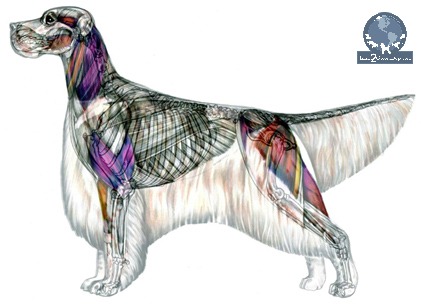
How to Use Anatomy to Groom the English Setter

Anatomy is the Foundation of All Grooming 

You’ve heard me say this before:

All dogs – whether a Yorkshire Terrier, a Great Dane, a Bulldog, or a Dachshund – possess identical bone and muscle structure. Fundamentally, they all are the same.

Excellent grooming starts always starts with a firm understating of canine anatomy. It is the FOUNDATION of all grooming.
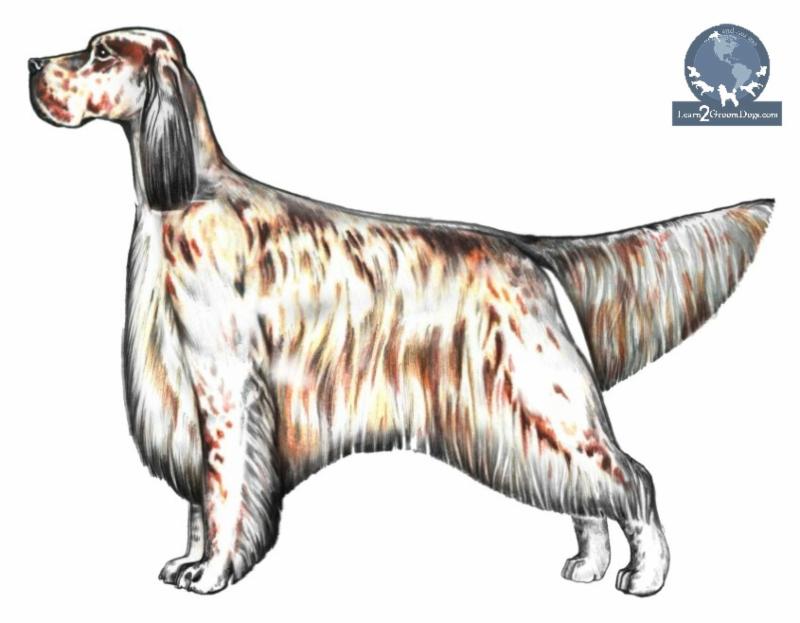
Basic pattern lines are set based on the muscle and bone structure.

Depending on how physically active a dog is, the muscle structure may be very prominent. It could be lurking under a layer of fat. It may also be poorly developed due to age or lack of physical activity.

Nonetheless, those muscles are there. They will help you set symmetrical and correct pattern lines.

The bones are there, too. Whether the dog is anatomically correct when compared to the breed standard is something else altogether when we are dealing with pet dogs. Understanding what a physically sound dog is will help you immensely. When you know the difference between good and bad structure, you’ll be able to hide many faults.

When we combine all the layers of the dog – the bones, muscles, the skin and the fur – we will be able to mold and shape the coat to highlight the dog’s best features and downplay the others. If the bone structure is a little less than perfect, you can use the hair to camouflage those defects.

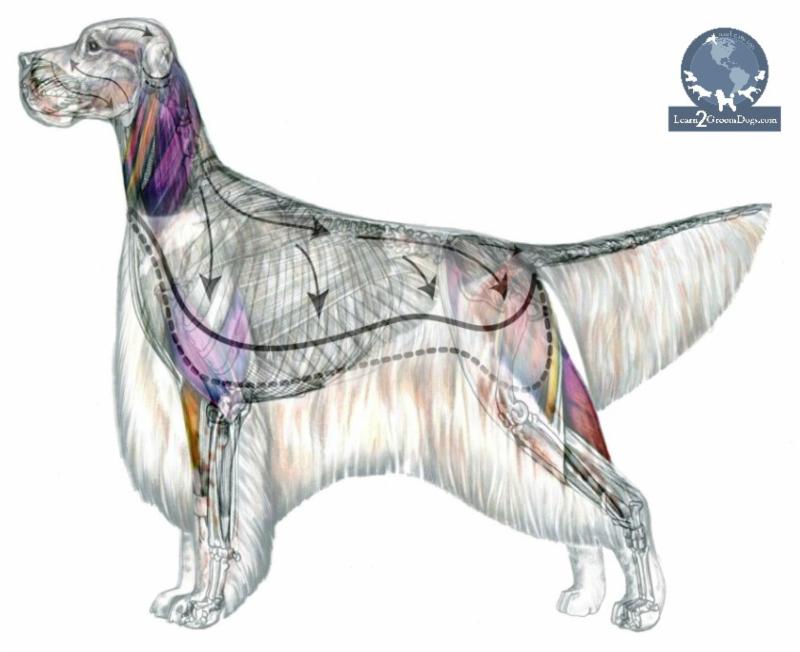
Before you begin grooming any dog, get your hands on them! Close your eyes. Feel the structure under the coat. Sink your fingers deep in the fur. Pay close attention to the muscle groups highlighted in color in these diagrams.

The Essence of the Breed

Before you start grooming any dog, you need to familiarize yourself with the breed and understand its essence.

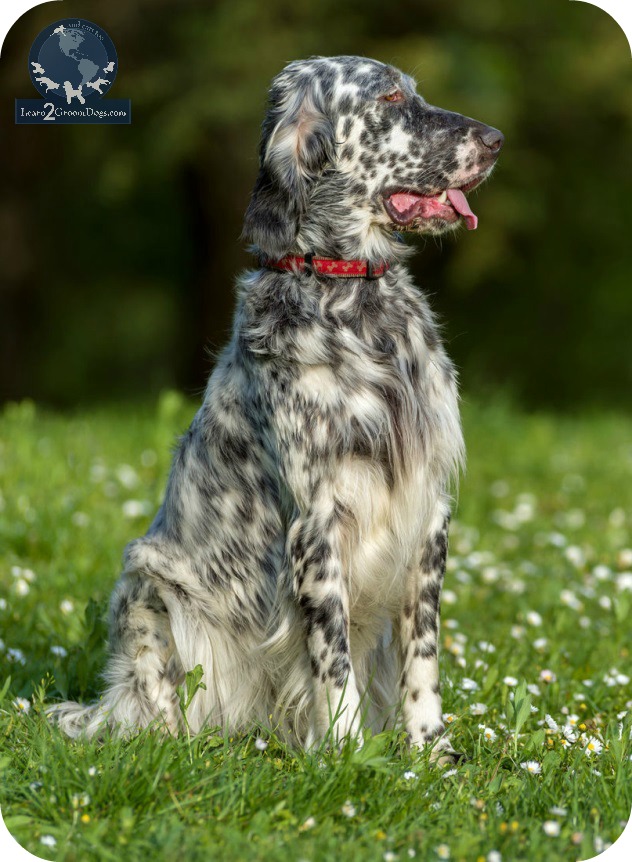
The English Setter is a Sporting dog of great style. It should be physically fit and structurally sound to work long hours in the field flushing game. The general outline of the English Setter will be rectangular. The shoulder lay back and the angles of both the front and rear assemblies should allow for adequate reach and drive.

The coat is silky, flat, and should lay close to the body. English Setters have longer feathering on the ears, chest, abdomen, underside of thighs, back of all legs, and on the tail. The longer coat should not be so long as to hide the true lines of the dogs, movement, or the function of field hunting.

Landmarks for Grooming & Styling

When it comes to grooming, let’s work around the dog using its anatomy as a reference.

When done “correctly,” Setters are hand stripped for a very natural look. However, in pet grooming circles, it is common to see the pattern clipper-cut or styled using a combination of clipping and stripping to save time. Regardless of the method you chose, the anatomy reference points – or landmarks – will remain the same.

Setting the Throat: Feel for the muscles at the sides of the neck to set the throat pattern line. A visual clue to this area is at the “frill” or cowlick line running down the sides of the neck. The throat area is directly below the jaw, inside the muscles running down the outside of the neck. The shape is generally a soft “U” shape. The lowest part of the “U” stops a few fingers above the prosternum bone.

Body: The jacket coat on the bulk of the body is shorter and lays flat on dog. Follow the natural lay of the coat when working this area.

Shoulder: Use the turn of the muscle at the shoulder to set the jacket pattern on the body.

Elbow: The turn of the shoulder will also tell you the location of the elbow. This is the general location of where to start the pattern on the body, sweeping back and upwards towards the flank of the dog.

Spring of Rib: The turn of the ribs will help set the pattern line separating the dog’s body jacket which consists of much shorter coat, blending invisibly into the longer feathering found on the lower portion of the dog’s body.

Undercarriage: The undercarriage line creates a focal point for balance of the overall dog. The highest point of the graceful sweep will be directly under the last few ribs.

Flank: Moving into the flank area, the thigh muscle should be exposed to help accentuate a physically fit and muscular dog.

Tail: For balance, the tail should reach to the hock and be a triangular flag. There is a slight gap of fur on the underside of the tail at the base. This slight space separates the longer rear furnishings with the feathering on the tail.

Topline: The top line maybe level or slightly sloping from the withers to the tail.

Neck: The long graceful neck is well muscled and slightly arched.

Head: The lines of the skull are parallel with a well definite stop.

Ears: Set well back and low, even with or below the level of the eye.

All these areas are natural landmarks used as reference points on any breed. When you combine anatomy with the official breed standard for any purebred dog, you have knowledge. You can use this understanding to accentuate the proper structure of the English Setter.

Always remember, all transition lines should be invisible. Ideally, the English Setter should look totally natural when finished – as if the coat simply grew that way.

Combining the use of these anatomical landmarks and skillful technical skills, a talented pet stylist can easily create a symmetrical, stylish, and well-balanced trim on any dog – purebred or mixed breed.

Happy trimming!

~Melissa

MVpaw_no_Inner_whiteP.S. Has this helped? Let us know if there are other topics you’d like us to explore.  Jump on the Learn2GroomDogs.com Facebook page and tell us what would help you.


error: Content is protected !!