 By Melissa Verplank, CMG & Paragon Founder
It’s shedding season in the northern hemisphere. All those heavy coated bath and brush dogs have begun the seasonal shedding process. It’s my favorite time of year!
Is it messy? Absolutely. Can it be a lot of work? You bet. But if you’re prepared, have the right tools, and know the tricks, it doesn’t take that long. And it’s not that hard. I don’t know about you, but for me, this is the most gratifying grooming work. There is nothing more rewarding. I love the feel. I love the smell. I love to watch the dogs move as their coat floats and glistens in the sun.
I love big furry dogs. My husband and I live with three Maremma Sheepdogs. We live on a farm in Michigan and experience all four seasons. Seasonal shedding is something we battle every year. As owners of a grooming school, we are fortunate to have our dogs groomed on a regular basis.
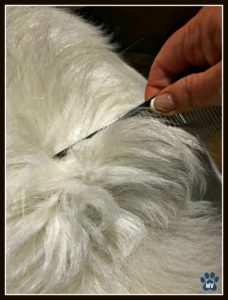 After a recent grooming session, our Maremmas came home looking and feeling great. However, although one looked amazing, a closer inspection told a different story. Her loose and shedding coat was still stuck next to her skin. In another week, we were going to have a mess. She was going to start leaving tufts of white fur everywhere. When done well, all the packed coat is removed and a comb will glide through the coat from the skin out. Each hair shaft stands independently. This wasn’t the case with this grooming.
As professional pet groomers, we are problem solvers. People bring us dirty dogs. Shedding dogs. Stinky dogs. Overgrown dogs. Matted dogs. Our job is to clean them up while treating them with respect and compassion. The faster and safer we can get though a big job, the better is it for all involved – people and pets. But we want to be thorough at the same time. If a grooming job is not going to hold up or it’s not thoroughly done, the client isn’t going to come back and/or become a repeat customer.
What are the tricks to get these heavily coated, shedding dogs done in the least amount of time?
Here’s what I think about every single time I groom a heavy coated dog:
The bigger and messier it is, the more impressive and rewarding the outcome will be.
- A clean coat is going to facilitate speed in the grooming process. Let’s face it, it’s much more enjoyable to work on a clean coat versus a dirty coat! Let the shampoo do a lot of the work for you. If you remove the dirt prior to doing a lot of brushing, your products and your tools can do most of the work for you to remove matted and shedding coat. My rule of thumb is if the water can penetrate to the skin, get the dog directly to the tub. If there are sections that are so dense that water can’t penetrate, cut those areas into sections so that it can. Do at least two lathers with a shampoo. The first one can be quick and the second lather much more thorough. Occasionally, you might need a third lather in certain spots to get it clean. Using a great conditioning treatment after the bathing process can also be very beneficial.
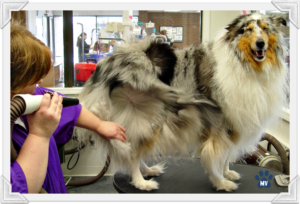
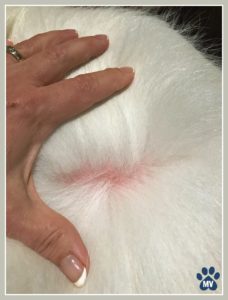 A powerful high velocity dryer or “blaster” is the key to getting through this type of grooming job. A powerful stream of air from the high velocity dryer will do the bulk of the work for you when it comes to removing mats, tangles, and shedding coat. Ideally, you will want to have a condenser cone on the nozzle of the dryer when you first start the drying process. On well-behaved dogs who enjoy the high velocity dryer, two or even three high velocity dryers can be used to speed up the entire process. On pets that have a lot of mats, tangles, and densely packed coat, using a high velocity dryer with a condensing nozzle to blow the shampoo out of the coat on the second lather in the tub is a great trick. What do you do when you have a ring on your finger that you can’t get off? Apply soap, right? The same principle applies. The shampoo provides the lubrication and air pushes the hair apart. Easy on the dog – and easy on you.
- Being efficient and effective starts with focus. Your eyes should always be looking directly where the air is striking. Hold the dryer nozzle as close to the skin as possible without curling the hair onto itself, which can cause whip knots. (These whipped knots are almost impossible to remove.) As you’re moving the nozzle around the dog, watch for problem areas with the skin and coat. As the air strikes an area, the coat spiders out. The spidering area is loose coat, mats, and tangles as it’s pushed out and away from the skin.
- Elbow grease is a must. Once all the problem areas have been loosened and pushed out as much as possible, it’s time to remove the condenser cone and pick up the brush. You will brush using a pat-and-pull method just where the air is striking. It’s a very soft and methodical brushing technique. Done correctly, it’s highly effective while also being gentle on the dog. Brush only where the air is concentrated. This allows you brush to work through the rest of the problem area while the air blows excessive fur out of the way and off the dog.
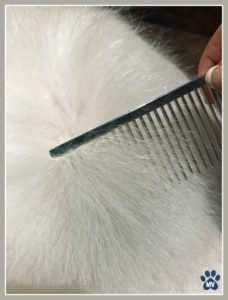 Be methodical. Be kind. Be considerate to the needs of the pet. Sometimes, on these heavily coated dogs, slowing it down will actually speed you up. Be thorough. The dog is not done until a wide toothed comb can be sunk down to the skin and pulled smoothly through the coat. Feel for dampness. Feel for inconsistency in coat density. Let your fingers sink to the skin. Let your hands be your guide. If anything triggers a quality control check, don’t ignore it. Go back and redo that area.
This type of work is a challenge. Not everybody can do it well. But those who do enjoy working on the large and the furry know what I’m talking about. We love it. I get so much gratification seeing piles of loose coat on the floor. I love those days when we have to empty out our shop vac multiple times because of so much shedding coat floating around the salon! At the end of those days, I know I’ve earned my money (and a glass of vino!)
If you’d like to learn the details of dealing with a heavy coated dog, here are some resources:
Notes From the Grooming Table
Bathing, Drying, Brushing, and Structure of a Mat sections
Notes From the Grooming Table – DIGITAL EXPERIENCE
Use the search tool to quickly find: Bathing, Drying, Brushing, and Structure of a Mat sections
 Theory of 5:
Bath and Brush section
 Learn2GroomDogs.com
streaming video lessons:
- Bathing & Drying Combination Coat
- Bathing & Drying Heavy Coated
- Brushing Skills
- Finishing the Bath & Brush Style Pet
- Salvage Work on a Heavy Coated Dog
- Structure of a Mat
- The Magic of Forced Air Drying
- Speed & Efficiency – How to Groom a Monster Sized Dog in 76 Minutes
I love seeing a coat that glimmers in the sun. That moves with the dog as it moves. When you sink your hands into it, it feels soft and silky. Not only does the dog look good – they smell good too! The dog knows it. They have an air of distinction – they are proud and it shows. This type of work, done well, makes me proud to be a professional pet groomer.
~Happy trimming,
Melissa
P.S. Did I miss any tricks? Tell me what works for you. Jump on the Learn2GroomDogs.com Facebook page and tell us about it.

