I still remember how frustrated I got when I first started grooming.
 I was the assistant, doing mostly bathing and drying for the groomer. One day, she was overbooked and was falling deeply behind schedule. She had a basic “all trim” on a larger dog that she hadn’t even started yet. Out of desperation she asked if I would remove some of the coat before the bath.
I thought to myself, “Sure, why not? How hard could it really be?” I picked up the A2 clipper as the groomer handed me the appropriate head. I twisted it on and set to work.
What a mess. The dog wasn’t hurt but my work was awful. The dog was full of uneven coat and lots of tracking.
The groomer had always made it look so easy. Coat seemed to melt off like a hot knife through butter. Her clipper work was always smooth and even. No track marks. No sticky-outies.
This was not nearly as easy as I thought!
However, I stuck with it.
 The groomer coached me as I struggled with the second side. It turned out somewhat better but was far from perfect. Today, I would not consider my work that day as acceptable – not even as pre-work before the bath. It was that bad! Luckily, I didn’t have to worry about all the tracking. It was just the rough cut before the bath. Once the dog was clean and blown dry, the groomer finished it in no time.
Fast forward 10 years. I had mastered the clippers and figured out how to eliminate tracking in the coat. On rare occasions, I still had problems. By that time, I was in my own mobile grooming van and running my own business. One of my clients was a buff American Cocker whose owners wanted clipper cut.
Most of you who have been groomers for any amount of time know some buff-colored Cockers track terribly when clipper cutting. This dog was no exception.
It didn’t matter what blade I chose.
Tracks.
It didn’t matter how powerful the clipper was.
Tracks.
It didn’t matter what time of year it was.
TRACKS.
The. Coat. ALWAYS. Tracked.
On one appointment, I basically threw my hands up. I could not get the tracking out of the coat. I had used all the tricks I knew to no avail. As I sat there contemplating how to remove the lines, I had an idea. What would happen if I reversed a blade over this coat? Hmmm. At that point, I figured I didn’t have much to lose.
I tried out the technique on an obscure spot on the dog’s body. I reversed a #7F blade then stepped back to check my work. I realized it was going to be way too short. I bumped up to a longer #4F blade. When I tried again – it was perfect. It was the length of a #7 blade. And even better, it was baby butt smooth. Eureka!
Over the years, I’d figured out how to get all coat types super smooth, but this Cocker type coat had always given me trouble. Once I mastered that coat type, coat tracking was a thing of the past for me.
So how do you get coat super smooth without any tracks?
There is not one simple answer but there are lots of techniques and trouble-shooting options. Here are a few tricks that I discovered with years of practice.
 9 Ways to Eliminate Track Marks
- You need super sharp blades. The sharper the blade, the faster and smoother the cut.
- Get a powerful set of clippers. They don’t necessarily have to be large and clunky. They do need to have enough power, speed, and torque to glide effortlessly through a thick coat.
- Use consistent speed when clipping through the coat. As you guide the clippers through the coat, you need to run the clipper consistently over the pet’s body.
- Card thick and dense coats before AND after. Dead undercoat clogs clipper blades. Removing as much dead undercoat prior to clipping and then again after the clipping will greatly reduce lines.
- Always follow the lay of the coat either clipping with the grain or against the coat growth. Cross coat cutting typically creates track lines. Focus on working with the natural lay of the coat.
- Reverse blade clipping. When the coat growth pattern is distinctive, reverse clipping can be beneficial to remove or eliminate clipper tracks. Instead of working with the coat growth, work directly against it. Reverse clipping cuts the coat closer than working with the grain. Always bump the blade up two lengths longer – a #4F cuts the length of a #7F with the grain.
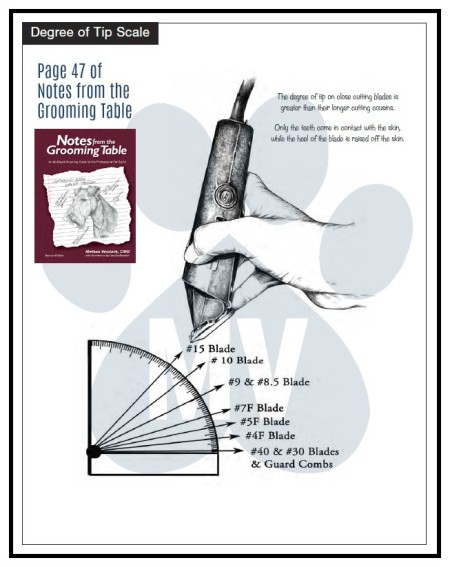
- Maintain a consistent degree of tip on the blade as you clip. Every clipper blade works most efficiently when the heel of the blade is tipped up slightly. The shorter the clipping action, the higher the degree of tip.
- Keep consistent pressure against the skin as you clip. Typically, the weight of the clipper is the correct pressure to apply. Keep a supple wrist as you guide the clipper over the pet’s body.
- Fine detailed thinners work as erasers on stubborn lines. When all else fails, you can buffer clipper lines with thinning shears, knocking off just the high points of the tracks.
Every coat type is a little bit different. Some coats barely track at all. Others are almost impossible to get smooth. Learning how to minimize tracking takes time and practice. Mastering a smooth clipper cut in the least amount of time takes focus and attention to details.
There are a lot of moving parts when it comes to mastering clean perfect clipper work. Groomers who have mastered a track free simple “All Trim,” on a regular small to medium-sized can groom a pet in one hour or less.
If you struggle with this problem, my book, Notes from the Grooming Table, has a very detailed section about clipper work in the front of the book. My Learn2GroomDogs.com streaming video platform also has some great videos about efficient clipper work in the Core Video Category. Make sure to check out those two educational resources. If you work with a team of stylists, someone within your group might be able to coach and mentor you. You can also look for local clinics or workshops where you can work with a seasoned professional.
Happy trimming!
Melissa
 What are the tricks you’ve used to eliminate tracking? Jump on the Learn2GroomDogs.com Facebook page and tell us about it.


