Log InCartCall Now: (616) 667-7297

Salvage Work

Many of us are seeing a lot of pets that are ready for a great makeover.  With that in mind, I thought it was the perfect time to revisit my blog on salvage work.

As many of you know, I’m a big dog person.  Working on these large furry dogs that have a huge shedding problem is one of my favorite things to do in a grooming salon.  I know, I know, call me crazy – but I just love seeing the transformation in this type of job.  Over the years I’ve gotten really quick with the process and rarely cringe, no matter what the size of the dog, nor the condition – I see it as a fun challenge!

My #1 rule is: Never work on a dirty dog. If water can penetrate the coat, let your products do the job.

Working on a dirty dog is not only unpleasant, but it also takes longer to do.  Plus, there will be a lot of coat damage and breakage.  A dirty coat is dry and brittle. The dirt and dander trapped within the fur makes it more difficult to brush out. Working on a clean coat will be easier for both you and the pet – and much more pleasant.

If there are large chunks that water cannot penetrate, go ahead and break up the tangle using the tool that is safe for the pet.  Don’t worry about removing it completely, just break it apart so the water and shampoo can do its job.

Prepare your bathing area.  If the dog is exceptionally dirty, use a shampoo especially designed for dirty dogs.  Using a follow-up treatment of a skin and coat conditioner after bathing twice (or maybe three times in some areas) will assist with the brush out and dead coat removal during the drying process.  Make sure you have all the tools you’ll need to aid in getting the dog clean like rubber curries or scrub brushes.  And make sure you have plenty of towels handy.  To see my video lesson on salvage work at Learn2GroomDogs.com, click here.

K9IIIVS-LGMy favorite trick when working with this type of job is to bring my high velocity dryer right into the bathing area (bring your eye and ear protection, too!).  With the dog fully lathered, blow the shampoo right off the pets while they are tethered in the tub.  The slippery soap will allow the dirt, loose coat, and tangles slide out, being trapped in the shampoo and sticking to the back wall of the tub, minimizing the mess.  Not all the shedding coat or mats will be removed but a lot will, making your job easier once you transfer to the drying table.  Once you have blown out the pet,follow up with the rinsing process.  Repeat this process as many times as necessary to get the dog “squeaky clean.”Once the pet is clean and thoroughly rinsed, apply a skin and coat conditioning treatment before heading to the drying table.  Read your directions: some conditioning treatments need to be rinsed out while others do not.  Your high velocity dryer and a heavy slicker brush will be your best friends during the drying process.

Rule # 2: Be Methodical and Thorough

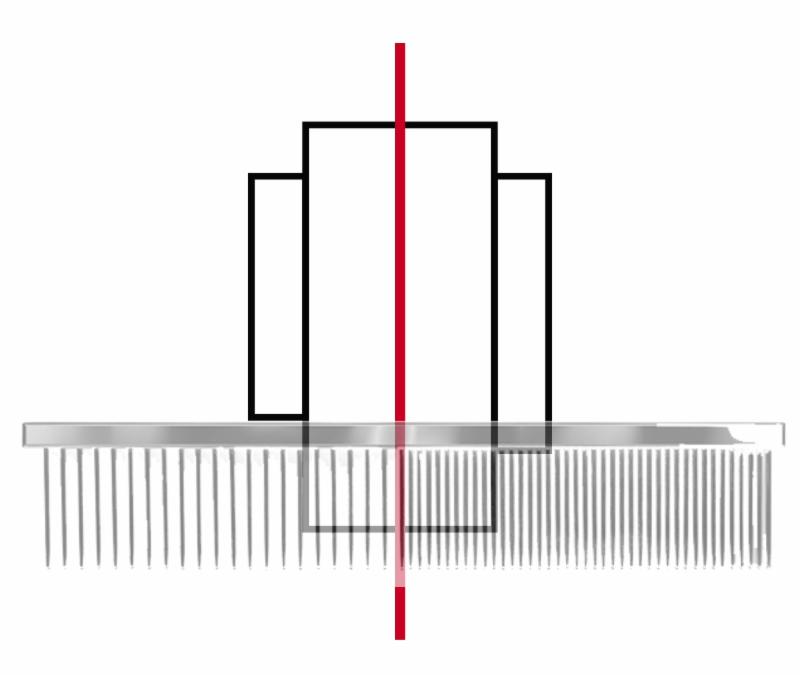
First, blow out as much moisture and loose coat at possible with the air flow.  Use the highest power setting the pet is comfortable with, and a condenser cone.  Once you have pushed as much water and loose fur from the pet, remove the condenser cone, and bring the air flow close to the pet’s skin.  “Boost” any loose coat out of the dog by lightly patting the area where the air is striking the skin with a slicker brush.

Continue to work over the dog in a methodical manner until your brush glides through the coat easily and no more loose coat is trapped in the brush.

Rule #3 – ENJOY!

When the dog is complete, it should smell clean and fresh.  The coat should be glossy and float freely as the dog moves.  There should be an irresistible desire to reach down and bury your hands in a freshly groomed pet.

What are your best methods? Jump over to the Learn2GroomDogs Facebook page and tell us about it!

Happy Trimming!

~ Melissa


Production Bathing & Drying

production-blogPet bathing and drying seems to be a huge time challenge for many professionals. Many of you are all overflowing with pets to bathe during the summer season. I thought this would be a great time to review my time-tested “game.” I loved to play this game whether it was with 8 or 80 dogs a day! I’ve done it both ways and every number in-between over the years.

If you are one of those high volume shops doing 40 – 70 or more pets per day…  that’s a lot of toenail trimming no matter how you look at it!! How can you get more done in less time while not letting the quality of the work suffer? Here’s my method –  it’s a fast paced game with lots of variables to mix it up every day. After all, whoever thought pet grooming was going to be a boring job?

It’s not a mystery but it is like cooking a meal. The larger and more extravagant the meal (with multiple dishes being served), the more complicated the timing and the choices get to be. With a few dogs, it’s pretty simple – the choices are limited. Add more dogs and the variables increase.  Move to a full-blown shop pushing through 50+ dogs and you have something like a full force, successful restaurant that is managed by an experienced head chef.  OK, so how do you manage your bathing and drying roster so all the pets are done to the highest degree of quality and proficiency, just like getting multiple dishes to the table all done to perfection and hot?

The Three Basic Rules & Guidelines to Follow

1Review all the dogs on your roster for that day or session. This game works best when you have multiple pets arriving at one time so you can stagger them according to coat type, size, and degree of difficulty.

2Do your largest and furriest dog first. Something that can be bathed and then lightly high velocity dried to lift and separate the fur. By spending a few minutes with the high velocity dryer on each pet, it allows a clear view of any special needs of that animal while enhancing airflow to the coat once it is placed in an inactive drying situation. Bathe and set up the coat on all the bath and brush pets first, starting with the largest and most time-consuming dogs, working down the line of difficulty to the least difficult of the bath and brush pets. Once all the bath and brush pets are bathed, then proceed with dogs that need active drying to yield the best results

3Your goal on all trim dogs is not only to get the pet clean, but the coat needs to be tangle free and as straight as possible for the finished trim. After all the B&B pets are bathed, start washing your trim dogs. Start with the pet that has the heaviest and straightest coat – something that can sit for a few minutes while you bathe your other haircut pets without risking the coat drying before you get to an active drying method. Let the pet sit in a warm place wrapped in a towel. Proceed washing the next pet based on size, coat density and curl factor – less curl hits the tub before a curly coat – curly coats such as Bichons or Poodles go to the tub last. Once all the trim pets are bathed, start drying. The first pet up on the drying table should be the one that has the curliest, but lightest coat since that coat type will dry the quickest. If the coat dries before an active form of drying can take place while the coat is still damp, it will be impossible to remove the curl unless you re-wet the pet. Once the curliest coats have been fluffed dried so they are absolutely straight, move to the next kinkiest or wavy coat type – also weigh in the coat density factor. A lighter or shorter coat will need to go before a heavier or longer coats. A typical example would be that you have two dogs of equal size and similar haircuts like a 1 guard on the body and a fuller leg style. One dog is a Lhasa and the other is a Maltese/Shih Tzu mix. Normally the Maltese cross would have a lighter density of coat than the Lhasa, thus the Maltese mix gets dried before the Lhasa. Continue this process moving from the curliest coats down the line. The key is to get to a coat before it is dry so the heat of the dryer can straighten the fur out. Remember, the goal is always to have a straight, fluffy, mat free coat to finish. Curls and kinks in the fur make it impossible to execute a trim that is smooth and sleek. If a coat gets too dry, it must be re-wetted and the drying process started over.

????????There are many variations to how this game gets played out to be effective. It is what makes a day interesting to a professional pet stylist. The better you get at this game, the faster you will be able to get through multiple pets without sacrificing quality. Think about what we do in the terms of food. An average home cook should be able to get 2-3 dishes on the table at the same time. A first-class home cook should be able to handle a meal with 4-5 dishes and at least 6 people. Seasoned home entertainers can handle an elaborate holiday meal for 20 with ease. A professional chef will master an entire shift serving over a 100 meals and all their side dishes with it all arriving to the table hot and beautifully prepared.

How far can you push yourself – before you get lost in the order of bathing pets? Test yourself and see how you do. It’s a fun game that can be challenging yet really invigorating. The more dogs, the more fun, and reward when it goes smoothly!

What are your best methods? Jump over to the Learn2GroomDogs Facebook page and tell us about it!

Happy Trimming!

~ Melissa


Who Should You Hire?

Recently, I’ve been hearing a lot of questions when it comes to hiring groomers and stylists. Questions like, “How should I grow my business? Which is better – independent contractors or employees?”

Early in my career I faced the same question. I went the same route as many of you. I was phenomenally successful with my first mobile grooming van in the early 80s. I needed to bring someone on to help handle my client load.

1rrAt the time, it was just me. I wore all the hats. My focus was strictly on grooming and growing my business. I didn’t have time to deal with payroll, taxes, and Workman’s Comp. The easiest way for me to handle the situation was to bring on an independent contractor to run a second van. Within a very short time I needed to bring on another van with another independent contractor.

As I was growing the business, my father (who is also a successful businessman) was watching over my shoulder. He heavily questioned my thought process about using independent contractors instead of employees. Just like many of you, I had every excuse in the book as to why independents contractors were better for my business.

  • “I can’t afford employees.”
  • “I don’t have time to figure out all the taxes.”
  • “They supply all their own hand tools.”
  • “They work without supervision in the vans.”
  • “Everybody else pays their groomers as independent contractors.”

I was confident I was doing the right thing.

Was I?

I ran like this for a number of years. My business was growing and so was my team. Then I learned about one of my idols who was a very knowledgeable and talented pet stylist who bought an existing and thriving salon.

The IRS had come in for a standard audit of his business. Guess what? They determined all of his independent contractors were actually employees. They went after him for all of the back taxes for the entire team. Years of back taxes. And to make matters even worse – they went after him for all of the back taxes due from the previous owner, as well.

My idol was destroyed – not just financially.

He lost his business.

He lost his house.

He lost his marriage.

He lost everything. He virtually became homeless.

2rrThe IRS is not somebody you want to mess with. They can destroy you.

Once I learned of this story, I went back and really looked at how I was running my business.

  • The company dispatcher booked our contracted stylist’s appointments.
  • The company dictated what their route needed to be and what time they needed to arrive to the client’s home.
  • The contracted employees were required to create daily written records of the services provided along with the charges with each appointment. With existing clients, stylists were expected to follow the directions in the trim histories, plus they were required to abide by the established pricing structure.
  • Checks were made out to my company.
  • The company set the pricing structure charged for the work done by each stylist.
  • The contracted employees worked full-time for my company.
  • The contracted employees were paid weekly commissions based off of their previous week’s sales.
  • I supplied the van, the tables, dryers, shampoos, vacuums, maintenance on the vans, fuel, and auto insurance on the mobile units.
  • All vans were stored and dispatched out of my property.
  • I had the ability to fire them.

Sure, there are a few gray areas. When I reviewed the list of 20 questions the IRS (see the image below) uses to determine whether a team member should be receiving a 1099 or a W-2, I had that deep gut sense I had been working with misclassified workers. I was terrified.

I flipped my team of independent contractors to employees almost instantly and never looked back. My father was immensely relieved with my change of heart – and rightly so.

3rrYes, having employees was more costly to my business. I made the necessary adjustments. I raised our grooming prices. I hired an office assistant to deal with the weekly payroll. I boosted the level of responsibility of my accountant to deal with taxes on a quarterly basis. We made it work and we continued to thrive.

If you are in the United States, take a look at the questions below. You can click on and print the image to review it more carefully. Answer them honestly. What is your gut telling you?

This is not an area where you can afford to be wrong. Choosing the wrong classification could cost you weeks – if not months – of grief. Maybe you’ll get away with a slap on the wrist. Maybe you’ll have to make up all those back taxes and pay them to the IRS. Or maybe they will come down so strongly you could lose your business. Your home. And even your life as you know it.

Are you willing to take the risk?

Are you in this situation? Jump over to the Learn2GroomDogs Facebook page and tell us about it!

Happy Trimming!

~ Melissa

IRS-20


Help! I Have Too Many Clients!

Did you know about half of all small businesses fail within the first four years? It’s a scary statistic, but fortunately, you’re not one of the fallen. Your books are full. You’re grooming steadily all day long. The phones are ringing off the hook – it’s a dream come true, right?

There can sometimes be a dark side to all of this success. Do you feel like no matter how hard you work, how efficiently you groom, you just can’t get ahead? Is your first available appointment still three weeks out – or more? Is your cancellation list getting longer and longer?

I’ll bet you’re tired.   

Stressed.

Frustrated.

Wondering why you ever opened your own business.

After all, wasn’t it supposed to be fun and satisfying to finally be your own boss? Yet somehow, grooming all those cute little fluffy puppies has lost its appeal.

Sound familiar? I’ve been there more times than I care to admit!

What are you going to do?

The easy solution would be to hire another groomer. Unfortunately, finding someone talented, reliable, and a good fit for your team can be quite challenging. Most grooming schools have far more job requests than their graduates could fill. Placing an ad in any type of help wanted advertising outlet yields only crickets when it comes to finding anybody even remotely qualified to groom dogs and cats.

This is an age-old problem. I don’t know of a single successful grooming business that has not faced this dilemma at some point.

Don’t fret. You have options. Some are more long-term solutions. Others can be implemented instantly for immediate relief.

  1. Train your own groomers and stylists from scratch.
  2. Delegate basic tasks.
  3. Hire an assistant.
  4. Become exclusive by raising your prices, which will instantly lighten your client load.

Training your own groomers and stylists from the ground up is a great long-term solution – and sometimes the only option. It’s not a quick fix, but it is something you will want to keep in the back of your mind for the future. If you opt to go this route, keep in mind it will typically take six months to a year to train to someone who can independently groom dogs.

If you are a salon owner, my guess is you wear many hats when it comes to running your business. What if you could have someone else do some of the NON-grooming related tasks? Hire someone full or part-time to do the tasks you really don’t need to be doing. Things like:

  • cleaning
  • laundry services
  • running errands
  • bookkeeping
  • payroll
  • data entry

Delegate anything you can to assist with the smooth running of your business – or your home – which is not directly related to grooming.

Training a grooming assistant is a great option. Having someone to help with the more elementary tasks of grooming pets isn’t as time-consuming or difficult as training a full-fledged groomer. Yet, a well-trained assistant can almost double your productivity. A large bulk of the time grooming dogs is eaten up in the wet room.

Yes, training an assistant takes time but you will make that time up quickly! It will go even faster if you utilize the Core Skills videos in the Learn2GroomDogs.com online library. Combine that with select sections from the first 80 pages of Notes From the Grooming Table – Second Edition, and you have a winning recipe for success. Let’s face it, half of the time spent grooming dogs is spent in the bathing, drying, and fluffing areas.

There are other benefits to having an assistant work with you. They can jump in to help with other simple tasks when you really need another set of hands. Wouldn’t it be great to have someone who could:

  • help handle a challenging pet
  • answer the phone
  • run dogs and do potty breaks
  • help with customers
  • clean and sanitize
  • do laundry

…the list could go on and on.

Many successful stylists just don’t want to deal with a staff. They want to keep it simple. Uncomplicated. Stress-free. Yet if you have way too many clients, the demands on your time and your sanity will be quickly tested.

If the other three options are not good fits for you, maybe raising your prices and becoming exclusive is the best option. If you stop and do the math, it can be pretty enlightening. Raising your prices by $5 to $10 per dog will weed out your client load almost instantly, freeing up your time – and giving you time to breathe.

When you feel you could work twenty-four hours per day, seven days a week, and still not have sufficient time to get everything done – it’s time for a change. Situations like this are what contribute to safety issues, affect your personal life – maybe even your health.

Success is a great thing as long as you manage the growing pains of your business. If you don’t, the business is going to be running you instead of you running your company.

If you are one of the success stories with an abundance of pooches (or felines) coming through your doors, congratulations! Remember – managing growth is just as important as creating an amazing service for your customers. If you are feeling frustrated and stressed out, make the change you feel best fits your situation. Get off that work overload treadmill. Once you do, you might even enjoy your business again!

Has this ever happened to you? What did you do? Jump over to the Learn2GroomDogs Facebook page and tell us about it!

Happy Trimming!

~ Melissa


3 Things You Need to Know to Groom Any Breed (What You Need to Do If a New Breed of Dog Lands on Your Grooming Table)

It’s a day like any other when you get a phone call from a client:

“I have a (insert breed here). Do you know how to groom them correctly?”

Um…

You’ve never groomed this breed before. In fact, the closest you’ve come to one is seeing it at a dog show. Maybe you’ve never even heard or seen the breed before.

“Why yes, Mrs. Jones, we certainly can make your Bedlington look like a Bedlington!” you say confidently as you book the appointment for the following day.

You hang up the phone and reality sets in. You’ve never seen this type of dog cross your grooming table. You don’t have a clue how to actually groom it correctly. What do you do?

The first thing I would tell you is – don’t panic!

Here are three core strategies you need to groom any breed of dog.
 

  1. Have strong technical skills. If your clipping, guard comb work, scissoring, blending, and basic hand stripping skills are good, you should be able handle this without much of a problem.
  2. Have a solid understanding of canine anatomy. If you understand how bones and muscles create a sound dog, it becomes even easier.
  3. Know how to translate a breed standard. If you can interpret the written breed standard into a visual, you’re golden.


So what is your next step? How are you going to be confident when that client walks in the door tomorrow?

Your next step is to look up the breed in reference books. If you have an American Kennel Club (AKC) Complete Dog Book (or a similar book from your country), start there. This will give you the official breed standard. Review the breed profile. Read about the history of the dog to gather clues about the dog. After a quick scan, you I have a good idea of the size, temperament, and structure of this new dog. Most books will also have photos that accompany each breed. If you don’t have an official breed standard book handy, you can always look it up online.

Once you have become familiar with the breed itself, take a look at your grooming books. Review the instructions. Compare the instructions to what you have read and saw in the breed standard.

The Internet is an invaluable research tool. Use it wisely. Most breeds will have a parent club that hosts an official site for the breed. Spend a few minutes reviewing images of top winning dogs in their galleries. With a little luck, you may even find grooming directions or links to grooming directions from dedicated breeders.

As groomers and stylists, we are a visual bunch. “A picture is worth a thousand words.” This is so true for us. I love to do Google image searches of breeds I’m not familiar with. Here’s a tip to finding good images. When you enter terms in the search bar, add keywords like: AKC Champion Bedlington Terrier or UKC Champion Fresian Water Dog. There is a big difference if you type into your search engine, “images of Miniature Schnauzers” verses “images of AKC Champion Miniature Schnauzers.” You will pull up a WIDE assortment of images. Some will be great. Others not so great. Some will be worthless. And others will be totally off the mark. You need to have enough knowledge to filter through the images, finding the best images to suit your needs.

Use a little caution when looking up information online. Always remember – not everything posted on the internet is correct or presents the best image of a breed. Make sure you use all your resources to gather the most accurate information possible.

3672638_lWatching videos on the breed in question is also a great option. Again, a word of caution – not every “how to video” on the internet will be beneficial. Today, anyone can post a video online. Unfortunately, there is a lot of poor quality grooming being featured – especially if it is free. Go to trusted sources like Learn2GroomDogs.com that are truly qualified to demonstrate how to groom a particular breed.

Yes, you need to do a little research. Will it require a little effort? Yep.

However, if you have those three nuggets of knowledge, you will have the foundation skills to groom any breed.

  1. strong technical skills
  2. solid comprehension of canine anatomy
  3. ability to interpret the breed standard

With those 3 skills, you can groom any breed of dog that comes your way.

If you are a newer stylist or just don’t have the time to do all the research, there is a shortcut. Notes From the Grooming Table will allow you to fast track your knowledge. Simply grab the book and turn to the breed you have a question about. We are just about to release the fully updated Second Edition of Notes From the Grooming Table. Keep your eyes open for how to get this revised edition – announcements on how to get yours will be available soon.

As pet groomers and stylists, we get to see plenty of dogs. It’s rare and exciting to get a breed you are not familiar with. Most of us pros enjoy the challenge of learning about a new breed. Figuring out what we will need to do to make the dog look like it should – or could – look like if the owners allow you to groom it correctly.

I know, I know… many owners just want the hair shaved off once they walk through your door. Or the dog is in such poor condition, the only humane option is to shave the coat off and start over. That’s always a disappointment once you’ve put in effort to educate yourself. Hopefully, the new client motivated you to learn few new things you can add to your knowledge toolbox even if you didn’t get to execute the trim!

Happy Trimming!

~ Melissa

P.S.

Did these tricks help? Go online and tell us what you think on the Learn2GroomDogs Facebook page.


How to Brighten a Dogs Coat Using a Staple Pantry Item

Today, we have a wide assortment of products to make our grooming jobs easier. They give us better results and may even help us do the job faster. It could be anything from a shampoo, to a coat conditioner. It might be a magical spray or powder you apply to the coat. Take a look at any grooming catalog and you’ll find a vast array of items from a variety of manufacturers that can take care of just about anything you could need.

But how do you know exactly what to reach for when a unique situation presents itself? Sometimes you don’t always know what you need. Or maybe what you need is a specialty item and you don’t have it at your fingertips. What do you do then?

Smart groomers and stylists often turn to home remedies. Years before we had the variety of products we do today, most clever groomers turned to their own cabinets for solutions. They used their ingenuity and developed home remedies to solve their grooming dilemmas.

Recently on the Learn2GroomDogs.com set, we had an unusual situation. Luckily, we had the masters of home remedies in for a filming weekend, Lisa Leady and Suesan Watson. (If you haven’t caught their L2GD lesson on home remedies – click here! Not only is it educational, the sister duo missed their true calling as a comedy routine!)

All of the dogs for that filming weekend were dogs that were supplied to us, sight unseen. We’d simply made the request for eight dogs.

The criteria was:

  1. They needed enough fur so that Lisa and Sue could actually groom them.
  2. The dogs needed reasonably nice temperaments.

That’s it.

While we were at lunch, the dogs were checked in. Our team had placed them in a holding area to await their afternoon film session. When we returned, we were excited to see what was we had to film. I knew all our afternoon dogs were mixed breeds that had come from a large 300+ dog puppy mill rescue that took place a few years ago. Luckily, all of the dogs found 
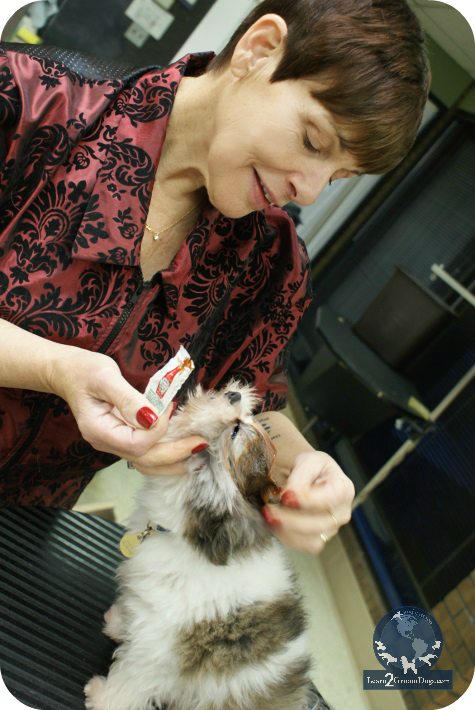
loving homes. The family supplying the dogs for the Learn2Groom film shoot had adopted three of the puppies. Many of the rescued pets were Shih Tzus, Pomeranians, Malteses, or mixes of the three breeds.

When we walked into the kennel room at the Paragon School of Pet Grooming, we were so excited. Every dog was adorable! But one really stood out – a Pomeranian/Shih Tzu mix. It had plenty of coat that brought out a few key features, making him even more appealing. But it did have a problem – and it was smack dab on the top of his head: a huge, rusty-colored lick stain.

If you’ve been in this profession for any amount of time, you know exactly what we were looking at. Apparently, one of his four-legged siblings had taken to cleaning the top of his head on a frequent basis. The constant licking had turned the white fur a rusty red color. He also had a fair amount of rust staining near his eyes and around his mouth.

Sue immediately reached for this little cutie. As she was snuggling with him she looked me right in the eyes and said, “Do you have any ketchup?”

What?

Why did Sue want ketchup?? Even though I hadn’t said a word, my expression must have asked the question.

Sue quickly went on to explain that ketchup would lighten the stain on the top of the dog’s head. “Really?” I exclaimed. I didn’t bother to question her – I knew she had something good up her sleeve. Sue said it didn’t matter what brand of ketchup we chose – any ketchup would work. I quickly went and found a couple packets of ketchup in the kitchen and handed them to her.

We took the dog out onto the practical skills floor and set him on a grooming table. Sue simply opened a package of ketchup and started to apply it to the dry coat. She generously worked it into the top of his head, under his eyes, and on his muzzle area. Once the ketchup had thoroughly saturated the hair, we set this little guy aside to sit for about 30 minutes before bathing him.

I was amazed after Sue bathed and dried this little dog. The rust-colored staining was significantly lighter! Was it gone altogether? No. But it was considerably lighter on the top of his head. Around his eyes and on his muzzle area it was almost totally removed.

I was astounded.

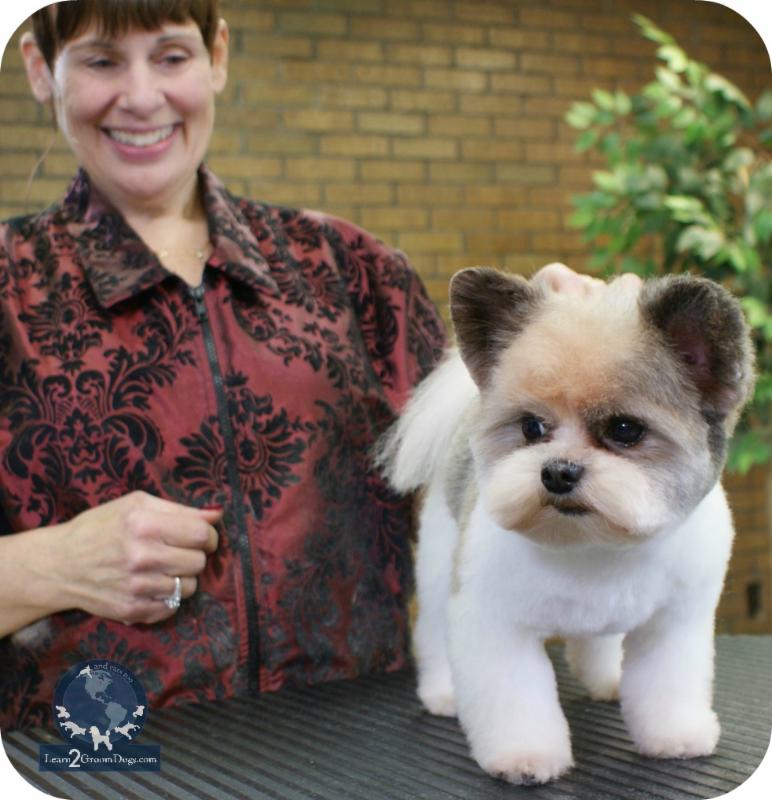
Sue suggested that we do a couple more applications in the future to really lighten the top of his head.

After seeing what a single application of ketchup (yes ketchup!) had done to brighten this dog’s coat, there was no doubt in my mind that a few more applications would lighten the stain even further.

I love home remedies when it comes to grooming. These problem-solvers are made from items that you just naturally have on hand. Many times they are common pantry items that all of us have hidden away in drawers or cupboards.

Who knew you could use ketchup to lighten and brighten the coat? It was a new one for me.

Watch for Suesan Watson in an upcoming Learn2GroomDogs.com video lesson featuring this adorable little Pomeranian/Shih Tzu mix.  Join today!

Happy Trimming!

~ Melissa

P.S.

Do you have any tricks like this one? Tell us about them on the Learn2GroomDogs Facebook page.


Learning to See Like an Artist

Welcome to my blog!  For the next few weeks, my marketing expert, Joelle Asmondy, will be filling in for me while I work on a large project.  Joelle is a whiz with marketing.  I can’t wait to see which helpful tidbits she shares with you!  Enjoy!

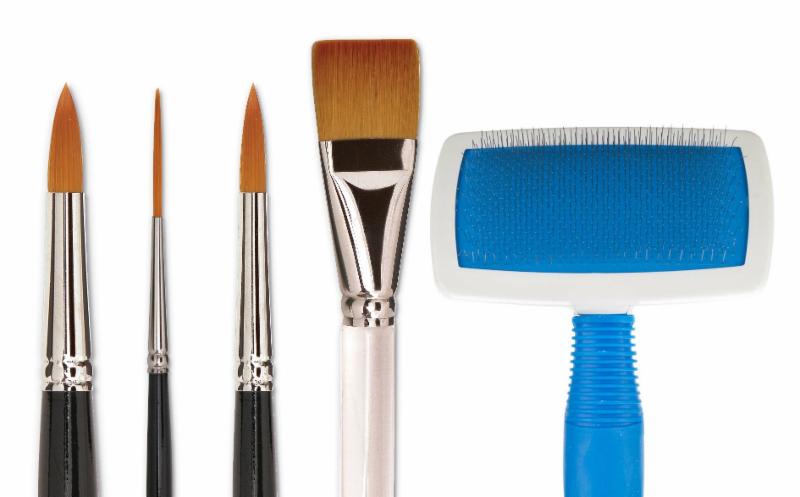
If you ask people in our industry if they think grooming and styling pets is an art form or a skilled trade, most would say that it’s a little of both. I agree. When you watch members of GroomTeam USA at work, their efforts are definitely works of art. Skills like theirs take years to develop. Today, I want to talk about one aspect of that development: learning to see like an artist.

I’ve had the benefit of seeing hundreds of people learn to become pet groomers during my years at The Paragon School of Pet Grooming. I also have a Bachelor’s Degree in Art, which means I’ve taken a lot of classes to develop a range of skills that are similar to what we teach our students. Just like being a good groomer means more than loving to work with pets, learning to become an artist takes more than loving to paint or draw. It requires control and the ability to see things that others do not.

“Seeing” like an artist, or “developing your eye,” takes time and patience. Essentially what you are doing is training yourself to see:

  • what is there
  • what isn’t there
  • what things look like now
  • what the finished product should look like
  • spatial alignment
  • balance
  • proportion
  • perspective

Learning how to see these things takes practice. Here are a few tips to help get you there.

Have a Plan

Melissa Verplank has mentioned this concept when she says that you should “begin with the end in mind.” It involves imagination on your part and the ability to see into the future – in this case, a beautifully groomed pet.

When I’m about to start a drawing or painting, it begins with a blank canvas or sheet of paper. With a sculpture, it begins with a lump of clay or stone. Before I even get started, I’ve already spent time thinking about what I want to do. In my head, I’ve already figured out what I want the finished product to look like. I know what tools or colors I will use, and what it will look like each step of the way. I know the process I will follow and how involved it will be. I might have a series of detailed sketches to help keep me on course. Above all, I spend time before I ever touch pencil to paper just looking at the blank page and seeing what I will create on it. The pet is your canvas. Before picking up your clippers, take a minute to really look at what you’re working with so you know where you’re going.

LOOK – See the Shapes in the Clouds

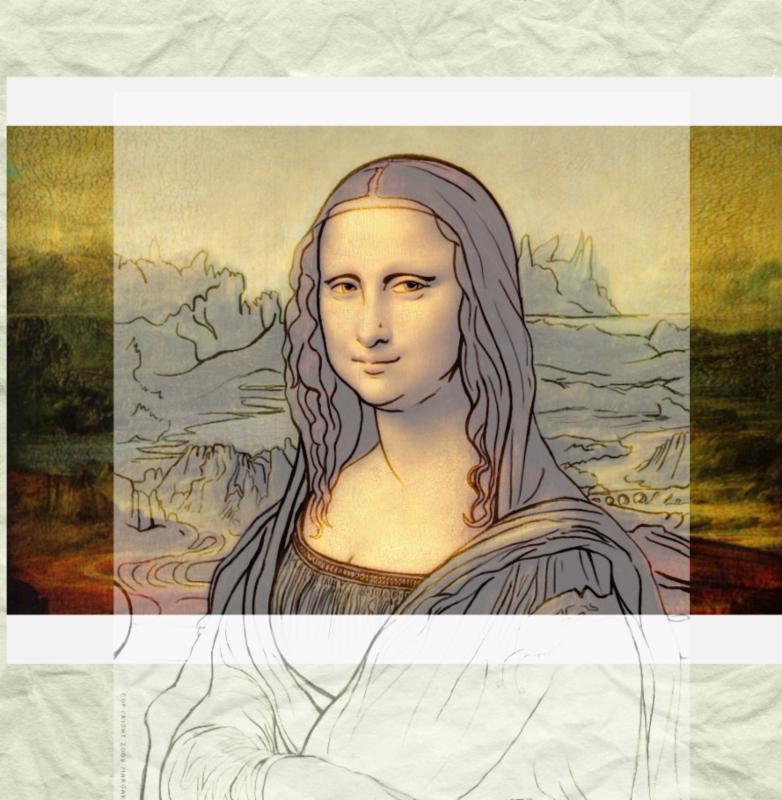
So I’m staring at the page… what am I looking at? What am I looking for? When I’m staring at that blank sheet of paper, I’m seeing what I will put there. As I stare into that whiteness, I’m watching the colors and lines take shape in my mind and align themselves on the page. It’s like my mind has produced a transparency of the finished product and has mentally created an overlay onto the page. All I have to do is put the marks on the paper. If I’m sculpting, I’m staring at the lump of rock and seeing the shape of what I want to create in the stone. All I have to do is remove all the stuff around it and let it out.

When grooming, first look at the pet before you. From your training, attending conformational dog shows, your AKC Complete Dog Book, and maybe your copy of Notes From the Grooming Table, you know what the dog should look like when it’s done. Learn to see the shape of the perfectly groomed pet through the overgrown coat, like transparent layers stacked one on top of the other. When you can see that perfectly groomed “after” image clearly in your mind, you can begin the process of “erasing” anything extra that blocks that view.

Be able to picture your finished product – after all, if you don’t know where the finish line is, how will you know you’ve completed the race?

Know Your Landmarks and Learn the Art of Navigation

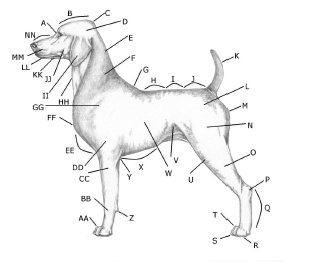
Trim styles are all about anatomy. Groomers need to know their breed standards and to know them they need to understand anatomy. If you’re a visual learner, get out your reference material and study the images until you can see them on any dog that walks into your salon. If you’re a tactile student and learn by doing, get those books out and learn to find reference points on dogs through your sense of touch. Feel where the point of rump is, the point of shoulder, and the barrel of the chest. If you can’t see them, learn your anatomy reference points by touch. Then learn to do both. Developing your knowledge base creates reliable instincts and reflexes.

Learn how to Measure Balance and Proportions Visually

Have you even been on a diet? Have you ever measured out quantities of food? Were you surprised by how much or how little a cup of anything was? With practice, you could eyeball a quarter cup of yogurt or 4 ounces of chicken pretty accurately, right? Didn’t it speed up the process?

The same thing is true when it comes to visual measurements. With practice, you get better and more efficient. I learned it in art school by using a pencil or my thumb, but groomers can use a trusty comb to do this trick.

The Eye Exam

Imagine yourself grooming a dog. You know that the right side has to match the left. Standing directly in front of the dog, imagine a straight line dividing the pet in half. Compare each side to the other, using specific points of reference as a guide. Look for landmarks on the pet’s head, body, and legs that require symmetry. Stepping back and looking from side to side will help. If you know things are off, but can’t figure out why, hold up your comb and cover up one side, then the other. It’s kind of like an eye exam where you read the chart first with your right eye, then your left. Think of it like a game of, “Spot the Differences.” Make it fun so it becomes less frustrating.

Thumbs Up

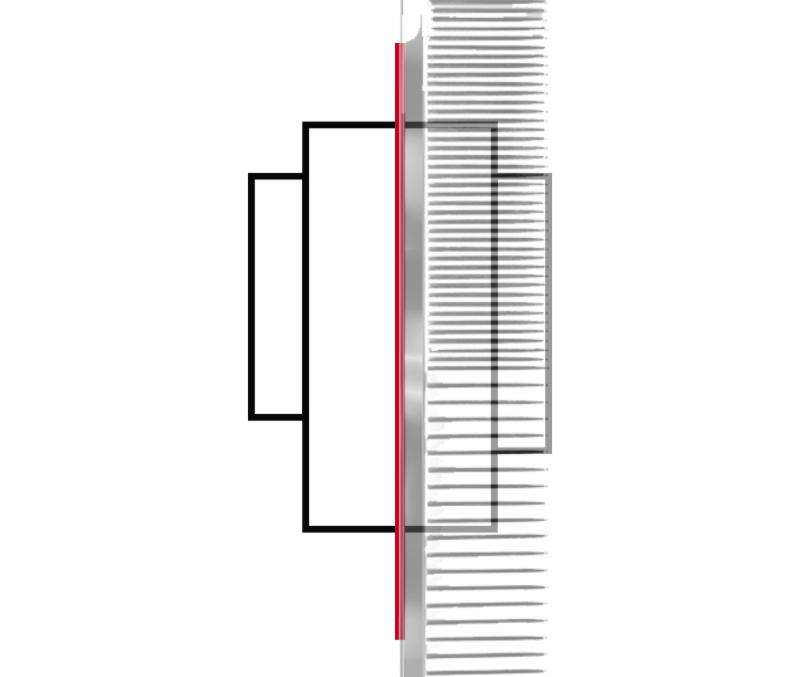
Have you ever wondered why artists extend their thumbs, or hold up a pencil or brush and stare at it at arm’s length? What they’re doing is making visual measurements and that thumb or brush is the ruler.

For this one, you’re still standing back and facing the pet head-on and imagining that line dividing the pet in equal halves. Are your ears the same length? Hold your comb even with the bottoms of the ears and perpendicular to the floor. You’ll be able to see which one is longer and be able to even them out.

Take a Step Back

Step back from the dog so you can see the entire animal. As artists, one of the worst habits we fall into is spending too much time working in one specific area. We have good reasons for it – we want it to be perfect. The problem is that while you’ve been tinkering away and nitpicking at that one foot, you’ve lost all sense of perspective and balance with the rest of the body. Now, you’ve got one foot smaller than the rest, so you have to tighten up the other three. You do that, then realize that the legs are now off, so you tighten them up, too. Suddenly, you see that by shortening the legs, the body is out of whack, and you’ve lost control. Losing control = losing time. By zooming in, you’ve created more work for yourself and lost time. That’s not a winning combination.

So what happened? Well, you basically made a rookie carpenter’s mistake. When you shorten up one table leg without doing proper measurements, the table wobbles. Standing too close or failing to look at the whole dog regularly results in perspective-based mistakes. Standing back allows you to see things more clearly.

Developing your artistic eye is not only helpful – it’s practical. By training your eyes to see what you need them to see, you’ll save time, become more efficient, and achieve a more balanced trim. You’ll gain confidence in your abilities and your customers will see the difference. Understanding these visual measurement tricks and putting them into practice is one small step toward becoming the groomer you know you can be. It’s worth the time to learn to see like an artist and unleash your own potential.

Did this help?  Tell us how you unleash YOUR inner artist on the Learn2GroomDogs Facebook page.

Click here for a complete video list to make searching Learn2GroomDogs.com even easier! 

Make it a great day!

~Joelle Asmondy


Grooming Efficiently vs Grooming Fast – What’s the Difference?

We all have different reasons why we love our careers. For most of us, our careers started because we were obsessed with dogs and cats. What a fabulous way to make money – doing something you enjoy. My guess is that many of you not only love animals, they’re also a hobby and a huge part of your lives. I know very few career opportunities that allow pet lovers to work in a field that they truly adore.

I love dealing with people who are passionate about their career choices. I always encourage people to seek out personal growth. To look at ways to do things better, more efficiently, and with greater focus. Raise the bar. Set personal goals. Set limits. Develop strategies. Ultimately, the pet, the individual, and the business wins.

If you are a solo stylist, you get to make up your own rules. Work at your own pace. There is very little pressure to move beyond your comfort zone.

However, if you work with a team, you will usually have quotas to meet and rules that you need to follow. The business sets up these boundaries in the best interest of the client, staff, and the long-term health of the company. If someone does not meet quotas, it creates a frustrating situation for the rest of the team in terms of time, quality, and financial stability.

Years ago when I ran a mobile operation, our minimum quota of grooms per day was six – or the equivalent of six. Thus, two slots were given for larger jobs such as Standard Poodles and heavy-coated Cockers. If someone had something very small on their roster, they were always given an option to groom another small dog. As long as the vans were routed well, this quota worked out well across the board for years.

There was one exception: Sue (not her real name).

Whenever I hired a new mobile stylist, I always started them with just four dogs and combined that with a very wide arrival schedule. All of our stylists knew this right from the get-go. The quota they needed to meet was six grooms per day. The funny thing about Sue was that she didn’t care about the number of pets she groomed or the amount of money she made. Although she was passionate about animals and people, she did not groom because she needed the cash.

For a long time I was extremely frustrated with Sue’s performance. She would arrive at base at eight o’clock in the morning to pick up her van. Many times she did not come back to base until well after eight o’clock at night. The most dogs I could ever get her to do was five.

It took me a while to realize the frustration was all mine. As a business owner, it’s critical that I pay attention to the financial numbers – but there’s a bigger picture: customer service.

When I looked at Sue’s scheduled re-bookings, she could rarely take on a new client. Her clients absolutely loved her. She wasn’t the fastest groomer. She wasn’t a competition level stylist – never would be. Her grooms were basic, neat, and thorough. However, she was the most compassionate person I have ever hired. Not only did she enjoy the pets, she was passionate about her clients.

To Sue, her career was more than a means to a financial end, it was her social and entertainment outlet. I swear she had breakfast, lunch, and dinner with her clients. She ran errands for them. She shoveled their walks. She loved the senior citizens and the geriatric pets. She would talk with them for hours!

Hmmm. These were the clients my highly efficient stylists wanted to avoid like the plague. Once I came to terms with this concept, I ended up making it work in our favor.

I let Sue slide on the quota. She was dealing with all those clients the rest of my team would rather not do. By letting Sue focus on our more time-consuming clients (and enjoying it!), it allowed the rest of my team to focus on making quotas and/or exceeding them. It worked.

So even though I let Sue slide – only doing five grooms a day when the actual quota with six – it allowed the rest of my team to focus on grooming more pets. Not necessarily faster – just more efficiently.

There’s a big difference between grooming efficiently and grooming fast. Grooming efficiently involves doing a good job. Grooming too fast, in my eyes, translates to sloppy work. When I look at developing a grooming team or training new staff members, I always look for people who have the ability to focus and work efficiently.

To me, being efficient means doing a great job in the least amount of time.

I recently heard one of our industry leaders say, “I don’t know many wealthy groomers.” I don’t, either. I do know a lot of groomers and stylists that make a comfortable living and love their careers. Being able to work efficiently translates into creating larger client lists, larger paychecks, and the ability to breathe easily at the end of the day.

Unlike Sue, the majority of us have other responsibilities, outside interests, families to care for, and households to run. We may even have businesses to manage. Not to mention maintaining the health and well-being of both ourselves and the four-legged clients on the table. As much as we love our jobs, we can’t afford to be tethered to a grooming table any longer than necessary.

Being efficient as you groom is not about being fast or sloppy. It’s about being the best that you can be. It’s about creating systems throughout the entire grooming process so we do not miss any steps. As those systems are developed, they become automatic. Once they become part of a routine, you can focus on other areas that bring value to the pets we groom, the clients, and to our own lives.

Think about how you can create systems – or routines – at every step of the grooming process (see the graphic below). Break it into bite-sized chunks.

Time everything. Knowing how long each step takes is the starting point of creating any routine. Each step could be broken down further into smaller nuggets, too. Once you start tracking, you can start improving your routine without sacrificing quality.

I love this quote. I try to live my life by it – in all areas. I hope you do too.

The only person you should try to be better than is the person you were yesterday.
~Anonymous

There are plenty of groomers and stylists who are highly efficient. They can do a small, simple trim in under an hour – and knock it out of the park in terms of quality and customer service. Others struggle to complete the same trim in two hours. Others choose to do that simple trim at their own pace. As long as the work is top quality, the pets are treated with care and compassion, and the environment is safe for everyone – it’s OK.

We all have different reasons why we groom. For some, it’s more than just a job – it’s a lifestyle. Remember, there is a big difference between being an efficient bather, groomer, or stylist and being a fast one. Never stop learning. How you apply new knowledge is totally up to you.

What are your time-saving tricks? Jump over to the Learn2GroomDogs Facebook page and tell us.  You can even click here for a quick lesson in how to use the site.

Make the most of your time every day.  Click here to download our FREE handout to help you structure your day.  You can even watch Melissa’s video to see how it’s done, here.


Click here for a complete video list to make searching Learn2GroomDogs.com even easier!
 

Happy trimming,

~Melissa


How to Read Classic Dog Body Language – Appropriate Composure for the Pet Professional

We work with pets because we are passionate about them. It’s simple: we love what we do. Yet it’s important to remember that every dog is an individual. Not only do they look different, they all have different physical and emotional characteristics. Different personalities.

Some dogs receive clear directions from their owners. They have rules and boundaries at home. This makes them very easy to work with in a professional setting. Other pets will not be well-mannered in a professional setting. The personality quirks we all experience working with pets will vary from dog to dog.

  • Many will be perfect angels
  • Others will be mildly annoying
  • Some will be potentially dangerous to work with for both the handler and the pet

Based on your level of pet interaction experience, you should be able to work through many of these personality quirks. Your commands to the pet need to be clear, concise, and consistent.

Dogs are primarily non-verbal communicators. However, they do have a very clear language of their own. It is up to us to interpret that language. The good news? Dogs are very clear in the messages that they give us.

I firmly believe that 98% of all dog bites are preventable. If you have read the pet correctly, getting bitten is highly avoidable. At times, you will need to take appropriate precautions to protect yourself. You need to gain control of the situation in a manner that is safe and respectful of the pet. It’s important to your career not to become injured. Remember, your hands are your livelihood.

Whenever working with pets, it is always critical to remember the 3 C’s. As a professional you must remain:

  1. calm
  2. cool
  3. collected

…at all times – in all circumstances.

There are many different types of dogs. Many will require special handling techniques. Plenty of groomers or stylists are good with all personalities. Others have honed their skills. They specialize in working with dogs with special needs such as puppies, geriatric dogs, or aggressive dogs.

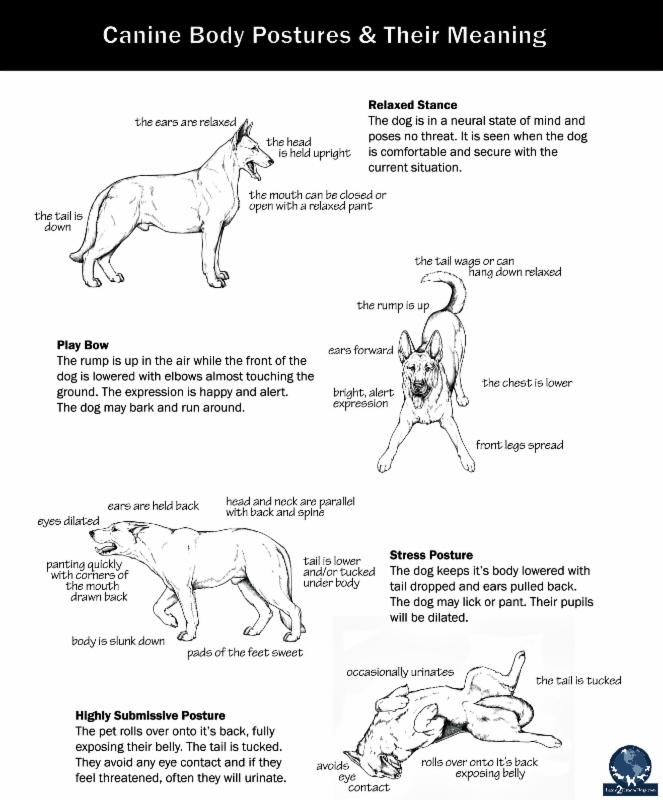
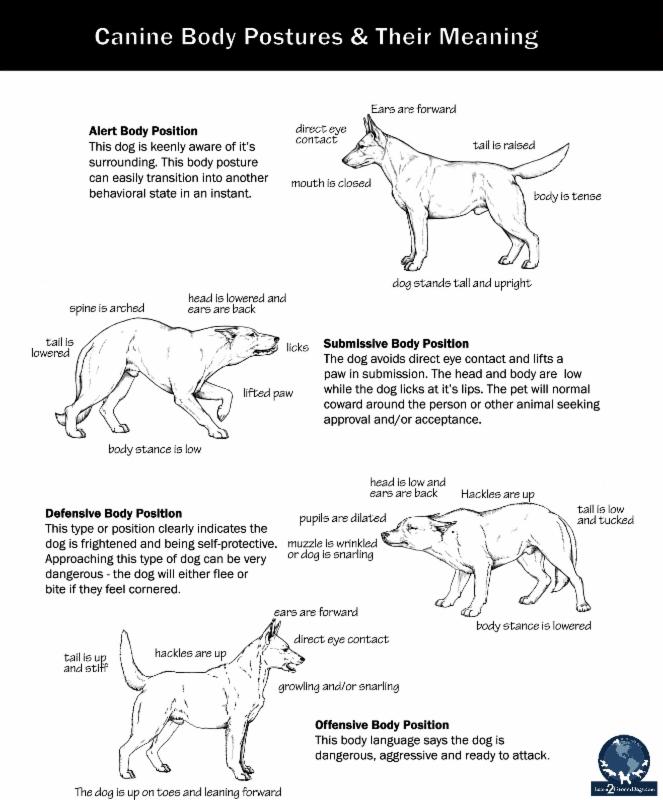
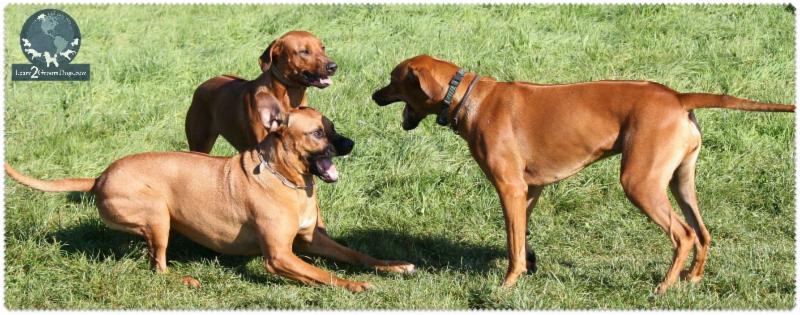
Here is a collection of basic dog postures we see every day. Every position indicates a different attitude. This is by no means everything you will need to know about “reading” dogs. If you are working professionally with them, this is just the tip of the iceberg.

You will need to gather loads of information about canine communication. By doing this, you’ll learn to work in harmony with dogs. When that happens, you’ll instantly feel the rewards. You’ll quickly learn how to respond to them in a non-verbal way.

By being knowledgeable in canine body language, you’ll keep both you and the pet safe at all times. The more time you spend studying dogs and working firsthand with them, the more proficient your skills will become.

Our number one responsibility to the pet and its owner is to always treat the pet with the utmost respect using humane handling practices.

Basic Body Language of the Pet

There are basic body positions that you need to recognize immediately when observing a pet. The eight basic positions have been illustrated for you below. Spend some time observing dogs so that you can instantly recognize these eight positions.

Non-Threatening Body Language:

  1. The Relaxed Stance
  2. Play Bow
  3. Submissive Body Position

These 3 indicate dogs that are safe to approach in a calm, gentle manner. These dogs are generally easy to work with and respond well to basic commands. Normally, an enthusiastic dog will need a little firmer command while a submissive dog will respond better to gentler techniques.

Use Caution When Approaching Body Language:

  1. Highly Submissive Postures
  2. Stressed Posture
  3. Alert Body Posture
  4. Defensive Body Position
  5. Offensive Body Position


These positions indicate you need to approach with caution. Based on how you interact with them, they may feel comfortable and slip into a nonthreatening language. If they do that, it indicates they are safe to approach.

If they feel threatened in any way, they can easily slip into the flight or fight mode. This is their natural defense. If you have them tethered with a lead and not under control, this flip of personality could easily manifest into a very difficult situation. This is a pet that could attack, bite, urinate, defecate, or release its anal glands.

Working with pets is a highly rewarding career option. However, if you don’t truly understand canine body language, passion can quickly turn into frustration. Use your passion early in your career to learn everything you can about their body language. It’s an invaluable skill to have.

Did we miss anything? Jump over to the Learn2GroomDogs Facebook page and tell us. To read more on what can happen if you don’t pay attention to canine dog language, click here. You can even see a video on Learn2GroomDogs.com on this topic!

Happy trimming,

~Melissa


How to Get Legs Smooth on a Close Haircut – Tricks to Eliminate “Stickie-outies” on Legs

Do you struggle to get the spindly legs smooth of that clipped #5 all trim? You get the body OK – that comes out nice and smooth. But the legs. Argh. That’s another story altogether!

Legs are always a pesky problem for groomers who are just starting out. Maybe you’ve been grooming for a while, but still struggle with this area. You’re not alone. Legs should only take you a few minutes to get smooth. If you’re missing the mark, here’s some help.

This is my long standing golden rule for all clipper work: “3 passes and you’re done.” Period. Your end result should be super smooth. No rough spots. No sticky-outies. Fast. Clean. Simple.

bladerrLegs have their own set of challenges. One of the largest issues is simply the shape. When you set a clipper blade on one of those spindly legs, the point of contact is minimal. Look at it on your own finger, simulating a leg. You’re only making contact with one or two teeth. You’re going to have to rapidly go over those legs several times if you have any hope of getting them smooth.

I have some ideas for how to get a nice finish on those legs in no time. It’s easy when you understand the principles and the foundation skills of all good clipper work.

1. Don’t skimp on the prep.
An excellent bath and a quick hi velocity blow dry can make a world of difference in your finish – even on #10 or #7 all over trim. If they have six weeks or less of coat, get them into the tub right away. It won’t take you any more time to bathe and blow them dry and you will get a superior finish.

If the dog has more than six weeks growth, quickly knock off the bulk of the coat. Don’t worry about getting it smooth or neat at this point. Just remove the bulk of the coat as fast as you can. You don’t need to be bathing and drying all of that extra hair. Once the bulk of the fur is removed, head to the bathtub. Follow up with a quick high velocity dry to get the coat to stand up and away from the dog’s body.

If the dog will not tolerate a high velocity dryer, don’t worry. Just make sure they are thoroughly towel-dried. Give the pooch a light mist with a coat amplifying product or hairspray. Use a soft slicker brush to back brush and work the product into the coat while it is still damp. Let them air dry in a comfortable environment until they are dry and ready for finish trimming. Keep in mind this is a very short haircut and fluff drying is not really necessary.

2. Know your holds.
There is an order that you need to work over the legs to be efficient. Start from the top and work down to the toes.
PicMonkey Collage
Whenever you are working on legs, always keep them as low to the table as possible. The higher you lift the leg, the more uncomfortable the pet is going to become. As they become uncomfortable – they struggle. They nip. They whine. They squeal.

You need to be absolutely clear on whether you’re honestly hurting the pet or if they’re just being difficult. If you do not lift the leg more than an inch or two off the table, more than likely, they are just being difficult. Proceed in a calm, cool, and collected manner.

To get the top of the legs, hold onto the toes. I place my finger into the crevices of the foot pad. Then I press down between the digits so only skin is trapped between my fingers. Then I have a good hold so that I can maneuver the leg low to the table but I can get clearance all the way around.

If you’re holding them correctly, and they still struggle, simply maintain your hold. Anchor the heel of your hand on the table while you’re still holding onto the toes. Let the pet struggle lightly against your hold. After a few tries, and you don’t let go, most dogs stop pulling. You have gently and quietly taught them to hold still for the clipping procedure. Yeah! Minor victory for you! Be sure to give them praise when they do well and begin to respond positively.

For the toes, it’s a little trickier. For the front legs you want to grasp the top of the leg above the elbow joint. Then gently squeeze with your thumb and first finger. This hold will also offer stability as your hands rest in the armpit area.   As you squeeze you will notice the dog will literally point it’s paw. That will give you enough rigidity in the pastern joint to run the clipper smoothly over the foot area, getting a smooth cut.

On the back legs, you’re going to slide your hand underneath the dog’s thigh. Stretch your fingers so that they can sit just above the ischium joint (point of buttocks) and the stifle joint. Now with the leg slightly off the table top squeeze gently. Just like on the front, joint will become stiff and the dog will point it’s toe. This will give you the firmness you need to work the clipper over the foot area.

3. Tip of the clipper.
No matter what blade you use, it is important to maintain a consistent degree of tip to the clipper blade. This is also known as “keeping the blade up on it’s cutting edge.” Imagine a pencil being held right under the blade as you guide it down the leg. The closer the pencil is to the teeth, the higher the tip angle. The further back you keep the imaginary pencil, lesser of the degree of tip. Generally speaking, the closer the blade cuts, the higher you need to tip the blade for it to be effective.

clipperrrEqually important is the amount of pressure placed on the blade. The perfect pressure is the weight of the clipper. Let gravity do the work. When you get in those awkward positions that all dog groomers get into, you will need to simulate the same amount of pressure as your work on the sides and under the dog. Use your own arm to teach you how to gauge the pressure while maintaining consistent pressure as you would maneuver around the dog.

4. Don’t forget to brush.
It’s important to back brush. On the shorter trims, a softer brush is generally your best choice. Back brushing is done with the slicker brush while brushing the coat against the grain. The pressure on the brush should be very light. Use the entire pad of the brush, making gentle contact with the skin and coat. Keep the pressure soft on the brush so the skin is not scraped, causing a potential “brush burn.” Back brush the entire leg once. Then make multiple clipper passes using effective techniques. Once the bulk of the coat is gone, repeat the process a second time to get a smoother finish. On the third back brush pass, there should only be high spots or uneven areas left to get with the clippers.

5. The final detail finish.
Once you have back brushed and clipped the legs three times there should be very little coat left, but there are always a few pesky strays that pop out.

Now it’s time to pull out a nice pair a blending shears. For this type of detail work, I prefer a finer toothed blender or thinning shear. I always opt for blenders over normal shears for safety reasons. I rarely opt to use a smooth bladed shear. The risk of injury is just too great. A blending or a thinning shear is a much safer option to get those final stray hairs you just couldn’t pick up with the clipper.

As a professional pet groomer or stylist, you always want the dog to look its best. Uneven haircuts do not reflect positively on a professional salon. You must be able to do a significantly better job than the dog’s owner could do themselves.

Dealing with all four legs on small- to medium-sized pets should not take more than 1 to 3 minutes per leg to complete the bulk of the clipper work. Never forget, as much as we love our jobs, time is money. You want to become as efficient as possible.

quotePay attention to the details. There’s a difference between a good #7 All and a bad #7 All. If you want your clients to return – you need to be paying attention to the details. These low maintenance style trims are the bread-and-butter of many professional grooming salons. Getting those low maintenance haircuts super-smooth in the least amount of time possible is the key to a successful salon

Do you struggle with this area? How have you managed to conquer this issue? Jump over to the Learn2GroomDogs Facebook page and tell us about it.

Happy trimming,

~Melissa


error: Content is protected !!