Log InCartCall Now: (616) 667-7297

Blog » Pet Grooming -Productivity

Grooming Efficiently vs Grooming Fast – What’s the Difference?

We all have different reasons why we love our careers. For most of us, our careers started because we were obsessed with dogs and cats. What a fabulous way to make money – doing something you enjoy. My guess is that many of you not only love animals, they’re also a hobby and a huge part of your lives. I know very few career opportunities that allow pet lovers to work in a field they truly adore.

I love helping people who are passionate about their career choices. I always encourage people to seek out personal growth. To look at ways to do things better, more efficiently, and with greater focus. Raise the bar. Set personal goals. Set limits. Develop strategies. Ultimately, the pet, the individual, and the business wins.

If you are a solo stylist, you get to make up your own rules. Work at your own pace. There is very little pressure to move beyond your comfort zone.

However, if you work with a team, you will usually have quotas to meet and rules that you need to follow. The business sets up these boundaries in the best interest of the client, staff, and the long-term health of the company. If someone does not meet quotas, it creates a frustrating situation for the rest of the team in terms of time, quality, and financial stability.

Years ago when I ran a mobile operation, our minimum quota of grooms per day was six – or the equivalent of six. Thus, two slots were given for larger jobs such as Standard Poodles and heavy-coated Cockers. If someone had something very small on their roster, they were always given an option to groom another small dog. As long as the vans were routed well, this quota worked out well across the board for years.

There was one exception: Sue (not her real name).

Whenever I hired a new mobile stylist, I always started them with just four dogs and combined that with a very wide arrival schedule. All of our stylists knew this right from the get-go. The quota they needed to meet was six grooms per day. The funny thing about Sue was that she didn’t care about the number of pets she groomed or the amount of money she made. Although she was passionate about animals and people, she did not groom because she needed the cash.

For a long time I was extremely frustrated with Sue’s performance. She would arrive at base at eight o’clock in the morning to pick up her van. Many times she did not come back to base until well after eight o’clock at night. The most dogs I could ever get her to do was five.

It took me a while to realize the frustration was all mine. As a business owner, it’s critical that I pay attention to the financial numbers – but there’s a bigger picture: customer service.

When I looked at Sue’s scheduled re-bookings, she could rarely take on a new client. Her clients absolutely loved her. She wasn’t the fastest groomer. She wasn’t a competition level stylist – never would be. Her grooms were basic, neat, and thorough. However, she was the most compassionate person I have ever hired. Not only did she enjoy the pets, she was passionate about her clients.

To Sue, her career was more than a means to a financial end, it was her social and entertainment outlet. I swear she had breakfast, lunch, and dinner with her clients. She ran errands for them. She shoveled their walks. She loved the senior citizens and the geriatric pets. She would talk with them for hours!

Hmmm. These were the clients my highly efficient stylists wanted to avoid like the plague. Once I came to terms with this concept, I ended up making it work in our favor.

I let Sue slide on the quota. She was dealing with all those clients the rest of my team would rather not do. By letting Sue focus on our more time-consuming clients (and enjoying it!), it allowed the rest of my team to focus on making quotas and/or exceeding them. It worked.

So even though I let Sue slide – only doing five grooms a day when the actual quota with six – it allowed the rest of my team to focus on grooming more pets. Not necessarily faster – just more efficiently.

Untitled Infographic(1)rrThere’s a big difference between grooming efficiently and grooming fast. Grooming efficiently involves doing a good job. Grooming too fast, in my eyes, translates to sloppy work. When I look at developing a grooming team or training new staff members, I always look for people who have the ability to focus and work efficiently.

To me, being efficient means doing a great job in the least amount of time.

I recently heard one of our industry leaders say, “I don’t know many wealthy groomers.” I don’t, either. I do know a lot of groomers and stylists that make a comfortable living and love their careers. Being able to work efficiently translates into creating larger client lists, larger paychecks, and the ability to breathe easily at the end of the day.

Unlike Sue, the majority of us have other responsibilities, outside interests, families to care for, and households to run. We may even have businesses to manage. Not to mention maintaining the health and well-being of both ourselves and the four-legged clients on the table. As much as we love our jobs, we can’t afford to be tethered to a grooming table any longer than necessary.

Being efficient as you groom is not about being fast or sloppy. It’s about being the best that you can be. It’s about creating systems throughout the entire grooming process so we do not miss any steps. As those systems are developed, they become automatic. Once they become part of a routine, you can focus on other areas that bring value to the pets we groom, the clients, and to our own lives.

Think about how you can create systems – or routines – at every step of the grooming process. Break it into bite-sized chunks.

Time everything. Knowing how long each step takes is the starting point of creating any routine. Each step could be broken down further into smaller nuggets, too. Once you start tracking, you can start improving your routine without sacrificing quality.

I love this quote. I try to live my life by it – in all areas. I hope you do too.

The only person you should try to be better than is the person you were yesterday.
~Anonymous

There are plenty of groomers and stylists who are highly efficient. They can do a small, simple trim in under an hour – and knock it out of the park in terms of quality and customer service. Others struggle to complete the same trim in two hours. Others choose to do that simple trim at their own pace. As long as the work is top quality, the pets are treated with care and compassion, and the environment is safe for everyone – it’s OK.

We all have different reasons why we groom. For some, it’s more than just a job – it’s a lifestyle. Remember, there is a big difference between being an efficient bather, groomer, or stylist and being a fast one. Never stop learning. How you apply new knowledge is totally up to you.

Make the most of your time every day.  Click here to download our FREE handout to help you structure your day. 

Happy trimming!

Melissa

Do you agree with this post? Jump on the Learn2GroomDogs.com Facebook page and tell us why or why not.


How Many Pets a Day Should You Groom?

I often say there are shades of gray in pet grooming.

Marc and WestieHow many dogs a day you should groom is one of the BIG gray areas! The number will be different for everybody. Some people feel overwhelmed grooming even three dogs in a full day. Other people can do 16 while barely breaking a sweat.

Here are just a handful of the scenarios affecting the number of dogs that might be groomed in a day.

  • Level of grooming experience
  • Work space setup
  • Equipment
  • Salon location
  • Salon type
  • Size of salon/mobile setup
  • Working solo or with assistance
  • Pet size
  • Type of grooms – low maintenance, bath and brush, show trim styles
  • Personal motivation
  • Your personality
  • Financial need

I’m sure you could add a few more to this list!

Typically, when someone first graduates from grooming school or is new to the industry, productivity is not high on their skill list. Rather, their focus is on thoroughness, quality, and safety.

New groomers will improve their speed as they develop skills and confidence. They need experience. They need coaching. They need guidance to create an effective grooming system. The system allows thoroughness while enhancing the quality of their work and the pace in which they do it.

If you’re a seasoned pet stylist, you’ve learned many of the tricks that allow you to be efficient. You’ve learned how to quickly assess a pet and easily determine its grooming needs. You are thorough. You work safely. You have a strong base of repeat customers.

Over the years I’ve seen beginners struggle to get through three dogs. I’ve seen highly efficient, seasoned stylists get through 16 or more dogs in the single day and still have the time and energy to have a little “me time” that evening. Where do you fall on the scale? Where would you like to be?

Being able to work quickly and skillfully can also be impacted by the layout of your work space. Are you set up for maximum efficiency? A bad layout will add unnecessary footsteps to your day and waste your time and energy.

Quote In A CircleYour equipment, tools, and products will also help or hurt you. Many products will enhance your speed and the quality of your final product. Do you have access to high-quality, time-saving, products and tools? When used correctly, they are well worth the investment and can help you groom more pets efficiently.

If you are a solo stylist either in your own salon or mobile setting, 6 to 8 dogs will likely be your maximum. In addition to grooming pets, independent business owners have a wide range of duties and responsibilities. They are the receptionist, the bookkeeper, the marketer, the janitor, and the record keeper – along with every other task it takes to run a successful business. If you are a mobile stylist, you also have driving and van maintenance added to your list of responsibilities.

Efficiency comes into play when pet grooming establishments start building a team. You cannot build a successful business or team with inefficient team members. Inefficient teams will not be able to groom as many pets as their efficient counterparts.

Financial need affects dog numbers. To get a decent paycheck, everyone needs to pull their weight. If you are hired onto a team or work with an assistant, you will have quotas to meet. Some quotas are determined by dog numbers. Other businesses use financial sales volume. Both help determine how many dogs are groomed each day.

Typically, once you start working with others, dog volume increases. In most salons, a team of people working together will be expected to do a minimum of eight dogs a day or more. When you’re working within a team, everybody has a specialty. Each person can focus on what they do best, whether it’s customer service, bathing and drying, or pet trimming and styling. If you have an assistant doing the bathing and drying for you, the number of pets might jump from 6-8 to 12-14. Let’s face it – bathing and drying dogs takes time! If a shop has a good bather/prepper, you can easily groom more pets in a day.

The type of trim combined with the sizes of dogs being done will make a huge difference in how many pets can be done each day. A #7F All on a six-week regular Shih Tzu is much different from a longer guard comb trim with stylized scissored legs. What happens if you increase the size of the dog? Larger dogs simply take much more time. To me, a Doodle is the equivalent of two or three smaller dogs, depending on the type of haircut it is getting.

For many pet professionals, WHY you groom pets will also influence how many dogs you groom in a day. One of the amazing things about our industry is we all love dogs. There are those who really enjoy taking their time with the grooming process and will groom fewer pets. There are those who will try to help as many pets as they can in a single day. Others enjoy the creativity. Some enjoy the flexibility the career offers while others are motivated by the career opportunities. There are also groomers that simply enjoy earning a living by doing something they love.

How many dogs should you groom each day? There are lots of gray areas so there is no right answer. Whatever your motivation, no matter how many dogs you groom each day, the most important thing should always be the health and safety of the pets entrusted to you.

Happy trimming!

Melissa

MVpaw_no_Inner_whiteDo you agree with this post? Jump on the Learn2GroomDogs.com Facebook page and tell us why or why not.


An Easy Way to Create a Poodle Beveled Cuff

As with all grooming techniques, there are many ways to get the job done.

When I was a contest groomer, I always did my Poodle cuffs by hand. I would brush the coat down then give it a quick fluff with my comb. Once it was fluffed, I’d glide a long straight shear in and set the lower edge. Then I’d re-fluff and grab my long curved shears to round and bevel the edges. It was time-consuming.

Done well, the beveled cuffs came out gorgeous. Done poorly, they were a sloppy mess. I had four chances to be perfect with my cuffs – or four chances to really mess up.

For pet dogs, I quickly taught myself another method. It was quick. Fool-proof. And it worked well on most of my shorter stylized pet trims.

On most of my pet trims, I cheated off excess leg hair by skimming it with a guard comb. Not only was it fast – it helped me set the length, too. Once I had the legs roughed in, I would brush the leg coat over the clipped foot with a firm slicker brush. I would slide my hand down the leg with my thumb and first finger resting just below the clipper line on the Poodle foot. My fingers would be my guide as I slid in a small pair of detailing scissors (I choose small shears for the safety of my own fingers!). I would scissor all the way around the cuff line, removing the longer hair.

When I released the coat… voila! A perfect cuff for an active pet. I could adjust the fullness of the beveled cuff by adjusting my scissored line somewhere between the lines of the knuckles of the foot and just below the clipped line on the foot. The lower I was on the foot with my cuff line, the fuller the bevel.

Once my cuff was set, I would neaten and finish the entire leg with shears, smoothing out my guard comb work.

I used this method for years. I even started to incorporate it into my more polished work in the contest ring. It worked well there, too – especially if I used it as a double-check after I did my cuffs with longer shears.

In the past few years, I’ve seen extremely talented stylists start using another method to get perfect cuffs every time. They use a #30 or #40 blade on their clippers! Who knew?

So how do you do it?

It’s very similar to my old method, but instead of shears, pet stylists reach for their cordless 5 in 1 style clipper. They set the blade at the shorter levels, basically the length of a #30 or #40 blade.

Hold the foot off the table at a comfortable level for the pet. With a firm slicker brush, brush all the hair down around the foot. Once the coat is brushed into place, slide your hand down the pet’s leg, thumb and forefinger closest to the foot.

Stop and hold the foot with your fingers coming to rest right at the clipped cuff line. While maintaining your hold on the foot, gently trim at right angles around the cuff with the #30 or #40 blade. Simply touch the coat at the edge line you want to set.

The fullness of the leg coat will determine where you place the line. For fuller legs, use the top of the crease marks on the toes. If the leg coat is shorter, move the line closer to the clipped cuff line.

When you release the coat, the fur will be nicely beveled. The line should be crisp and free of all stray hairs. As with the hand-scissored cuff, check the work from all angles to make sure the cuffs are level from side to side and front to back. Don’t forget to look from table level when inspecting your cuffs for perfection.

It may take a few tries to perfect this technique, but once you do, creating flawless cuffs every time becomes simple. With a well-prepped dog, this technique is fun, fast, and super safe.

Happy trimming!

Melissa

MVpaw_no_Inner_white  Did you try it? How did it work for you? Jump on the Learn2GroomDogs.com Facebook page and tell us what works for you!


How to Handle Tardy and No-Show Clients

Unfortunately, there isn’t an easy rule for solving the problems of tardy or no-show clients. The good news is that you have lots of options to help deal with it. Depending on how busy you are, cancellations can either be a blessing or a curse. In either case, if you have a client who is chronically dismissive or disrespectful of your time, you need to be proactive and correct the problem.

Our kennel, Whiskers Resort and Pet Spa, experienced 68 reservation cancellations over the 4th of July holiday. During the summer months, Whiskers runs at over 100% occupancy rate with its 180 rooms. During peak holidays such as Thanksgiving, Christmas, New Year’s, and Spring Break, Whiskers charges a $50 deposit for all reservations. This deposit is nonrefundable if the cancellation takes place two weeks prior to their check-in date. In the past, the deposit has not been charged for Memorial Day, the Fourth of July, or Labor Day. That will be changing.

For years we’ve tracked grooming appointment cancellations at The Paragon School of Pet Grooming.  Despite our continual efforts to knock the rate down, its remains a persistent 10%.

late

In the pet grooming industry, time is money. Clients who are chronically tardy or don’t show up for their appointments create havoc for both your schedule and your pocketbook.

It’s frustrating.

It’s disrespectful.

It’s rude.

(However, if you are overbooked, it can also be a blessing.)

There is no perfect solution for this problem. Everyone has a slightly different take on this situation. Some salons run on a very tight schedule while others are more relaxed. And let’s face it, there are times when the client has a legitimate excuse. So, what do you do?

8 Ways to deal with Tardy and No-show Clients.

  1. Call or text to confirm the day ahead. Sometimes clients just need is a gentle reminder to avoid a scheduling conflict.
  2. Breathe. For some pet stylists, having a cancellation is not a big deal. It doesn’t happen that often. The clients are well-trained and respectful of their appointments and time. In some cases, it might even be a relief.
  3. Overbook. Service businesses do this all the time to ensure they are full. The key here is to have a variety of pets on the books. If there are a few easy jobs sprinkled between the more difficult ones, you will get through your day, even if your cancellation rate is below the 10% mark.
  4. If they are 10 or 15 minutes late – call them. If they can make it into the salon within a few minutes, keep the appointment. It’s easier than trying to refill it – unless you don’t want to! If you opt not to honor their appointment, rebook them for another time. Don’t wait 30 or more minutes and then explode when they walk in the door expecting to keep their appointment. It’s better to make the call right away and know what your next step should be. This method offers you more control over the situation. With some clients, you need to personally point out why it’s important for you and/or your team to have set appointment times. This can be done in a friendly – yet firm – professional manner. This tactic also works well with non-chronic cancellations.
  5. Have a 3 Strike Rule. Some people are just forgetful. Others are just plain disrespectful. Others are downright rude. If the client will not respect your time, you don’t have to continue to put up with it. Occasionally, there are solid reasons why someone misses an appointment. Life happens. The 3 Strike Rule covers clients who are chronically late or don’t show up for their appointments. If you’re going to set up a 3 Strike Rule, what are the consequences? Do you refuse to groom the dog in the future? Charge a cancellation fee? Do you have a client prepay a nonrefundable amount for the scheduled next appointment? If you make a rule, there must be consequences. Make a policy, then consistently stick with it.
  6. If the client cancels, fails to show up, or is tardy beyond being able to groom them at their appointed time, reschedule them. Don’t do them a favor by squeezing them in the next day or two. Push them out at least two weeks. I’ve known many stylists that are so busy they have NO flexibility left in their schedules. If a client misses today’s appointment they can’t get another one until their next pre-scheduled appointment. This works exceptionally well for stylists that are booked out weeks, months, or even a year in advance. It can be a hard lesson for the client but it is generally very effective. Rarely do they miss another appointment.
  7. For clients who are chronically tardy or don’t show up, charge a late or no-show fee. You won’t always get it, but if they book another appointment, you can tack it on to their next grooming fee. You could also consider raising their base price to include an inconvenience fee.
  8. If you have a client who simply cannot adhere to a schedule or does not respect your time, have them prepay prior to their grooming appointment. This should be a nonrefundable amount. After all, your time is valuable and it’s worth money. If they cancel, you can’t get your time back nor the money you would have earned if they had kept their appointment.

late-payment-excusesAre there exceptions to your rules? Absolutely.

If you don’t already track how many cancellations you have each day and each week – start tracking it. Find out what your cancellation average is per day. Once you know the number, you can be proactive in correcting the problem.

Another way to look at it is from a dollar standpoint. At Paragon, our average cancellation rate is 10%. If you apply the 10% rate to your situation and you do 20 dogs a day at $50, that starts to add up! That translates into losing two dogs or $100 every day! Times that by five days a week and you’re at $500 of lost revenue. To me, it’s worth taking the time to simply call and remind people of their upcoming appointment the day before!

We are in the business of building positive relationships with our customers, both the two-legged and four-legged variety. Your personality and the type of relationship with your clients dictates how firmly you adhere to the demands on your time. Remember, these customers not only affect you and your time, they ultimately affect your schedule and your other clients. You need to be warm, caring, and maintain your professionalism.

Just because you are warm and caring does not mean you can’t set rules and boundaries. Remember, you can still provide great customer service and have a mutually respectful relationship that benefits both you and your client.

Happy trimming!

Melissa

MVpaw_no_Inner_white How do you deal with this issue? Jump on the Learn2GroomDogs.com Facebook page and tell us what works for you.


What Is the Difference Between Rakes and Undercoat Rakes?

Illustration 1

Illustration 1

These tools can be confusing. When you read their descriptions in catalogs, they’re so similar…

They do the same thing, don’t they?

No, they don’t. Let me explain.

Both remove undercoat on thick coated dogs. It’s the METHOD of removal that varies. One pulls out dead and shedding coat without cutting the fur. The other has sharp, curved teeth which remove the undercoat but will also cut the coat. One is used primarily on dry coats, both before and after the bath. The other is effective prior to shampooing, during the bathing process, and after the dog is clean and dried.

Illustration 2

Illustration 2

The difference isn’t so much in the names. The names are interchanged all the time. To keep them straight in my own mind, I call them different things. It’s particularly beneficial when giving directions to others to utilize different names.

Rakes

Rakes are designed to pull out dead coat and shedding fur with ease. Typically they are a T-shape (see Illustration 1) with rounded pins on the head of the T. On some heads, the top bar is long, up to 6 inches across. On other designs, the head may be only a couple of inches wide. The length and shape of the teeth will vary, too. On some rakes (see Illustration 2), the teeth are short and shaped almost in a tiny cone-type fashion. With others, the teeth are long, sinking deeply into heavy, long coats. On almost all models, the handle comes directly out from the cross bar head with all the teeth.

This type of rake is designed to remove dead coat while not damaging the healthy coat. You work the tool in the natural direction of the coat growth. Care must be used not to sink the comb too far into a dense coat repeatedly with too much pressure. Tugging too firmly on a thick or tangled coat will be uncomfortable for the dog and difficult for the groomer. Repeatedly digging in too deeply could injure the skin, as well.

Illustration 3

Illustration 3

Used correctly, rakes can be highly efficient for removing dead coat or “lint” from rustic-coated breeds. They are used primarily on double-coated, heavy-coated, or rustic-coated dogs.

Undercoat Rakes

Undercoat rakes have many small, sharp, curved blades set close together that remove undercoat. They are available in a variety of tooth widths, making this tool suitable for a wide range of breeds. On shedding breeds, they can remove dead, fuzzy undercoat in minutes, yet leave the top coat shiny and healthy. On harsh-coated dogs, they mimic the hand-stripped look quickly and easily.

Undercoat rakes can be used on a wet or a dry coat. Pull the rake in the direction of the coat growth.Always start with a wider toothed rake to start (see Illustration 3). Work down to narrower teeth as the tool pulls through easily, removing less and less coat.

Undercoat rakes normally work better when used prior to bathing or in the tub on a wet coat.

Illustration 4

Illustration 4

Use caution when working with this tool. On some coat types, especially heavy-coated dogs, they will cut the top coat while removing the undercoat. While the blades are curved (see Illustration 4), you still need to be careful how much pressure you put on the tool as you drag it through the coat so you do not injure the skin. Use caution when working around areas where the skin is thin like in the hock area, ear junctions, flank, and armpits.

Undercoat rakes work well on many coat types including double coated breeds, heavy coats, and rustic coat types. The work exceptionally well on any breed that is hand-stripped like many of the Sporting or Terrier breeds. Just be sure to monitor your progress as you work this tool over the dog.

Here is a cool trick I have seen used with undercoat rakes. This trick minimizes cutting the coat while pulling out dead coat, particularly once the coat is clean and dry. Simply take a thick rubber band and wrap it around the hooks of the blade (see Illustration 5). The rubber protects the coat from excessive cutting while the rubber helps grip the dead coat, allowing to be pulled out almost effortlessly.

Illustration 5

Illustration 5

Happy trimming!

Melissa

 MVpaw_no_Inner_whiteWhich raking tools do you prefer? Why do you like some more than others? What would you recommend to a newer groomer?  Jump on the Learn2GroomDogs.com Facebook page and tell us!


When Should You Just Say No?

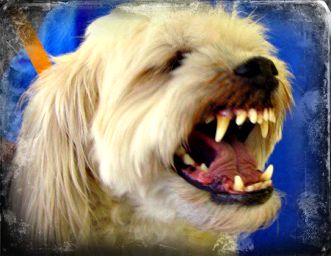
Agressive dogrrPet groomers and stylists are in the service industry. Our role is to help people and their pets. When we do it well, we make people happy.

What if you can’t make them happy because you can’t groom the dog safely due to its aggression or health? Should you still groom the pet?

If you have been in business for any amount of time, I’m sure you’ve run into this scenario. Even seasoned professionals struggle with this dilemma at times. Should you groom the pet or turn the client away?

The easy answer is to refuse to groom the pet. However, there are many variables. If you feel the situation presents a high risk for the pet or you – simply say no. That’s your right as a business person or a conscientious employee.

You must put the safety of the pet and yourself first.

Once you have that clearly established in your mind you can start analyze the situation.

  • What is raising the red flags in your mind?
  • What are your qualifications when it comes to handling a difficult grooming situation?
  • Is this a new or a long-standing client?
  • Can the pet be groomed safely with the help of an assistant?
  • Will the pet cooperate if the owner stays or assists in the grooming process?

When I think about these questions, I always mentally play out the worst case scenario. The last thing that I ever want is to have to tell an owner that their pet was injured while in my care. Or that we had to take him to the vet for treatment. Worse yet – that their dog died during the grooming process.

Let’s face it, there are a host of things that could go wrong in any grooming salon even under the best of circumstances.

The list of dangers working in every grooming salon is massive. We are working with:

  • live animals
  • sharp instruments
  • tall tables
  • bathtubs
  • dryers
  • abrasive brushes
  • stacked kennels
  • slippery floors.

On most days, an experienced bather, groomer, or pet stylist takes all these dangers in stride. We know how to avoid accidental injuries to our four-footed clients.

So what do you do when that internal gut instinct kicks in?

You are standing there, looking at a dog (or cat) and listening to a client talk about their precious fur child. Deep down – some type of internal fear grips you. You just have a bad feeling about this particular groom. You know the old saying, “trust your gut instinct?” Well folks, that natural instinct is working in full force. Listen to it.

It’s okay to say “no” to a grooming client. It’s never worth grooming a dog you honestly feel is beyond your level of experience. If it’s more than you can handle, you have a potentially dangerous situation. The pet and you are the ones at risk – not the owner. I don’t know a single pet care specialist that ever wants to intentionally harm a pet.

Yet, if something goes wrong with the groom on that day, whose fault will it be? Yours.

Weigh out the risks. Whenever you need to decline service to a client, it’s an uncomfortable situation. But the alternative is much, much worse. Telling an owner their pet has been seriously hurt or died in your salon it the most difficult task you will have to address. You want to avoid that at all costs – even if it makes the client angry or upset.

If it’s a new client, it’s much easier. There isn’t that emotional tie that comes with repeat or long-time clients. It’s much easier to refuse to groom a dog that is too big or too aggressive for you to handle.

It’s the long-time clients that are tough. The longer they have been a regular client, the harder it is. If a pet has physical ailments, it’s tougher. This is when you need to weigh out the risks and look for alternatives to your standard grooming practices. The health and wellness of the pet has to be a top priority.

Here are the questions you need to ask.

  • Could the pet be done safely with an assistant?
  • Would the dog benefit from the owner staying with the dog during the grooming process?
  • Would a different time of day work better for the pet? Maybe a time when you can focus solely on the pet without distraction?
  • If your salon is busy, would a solo stylist or mobile stylist be a better option?
  • Would it be in the best interest of the dog to get the grooming done without stopping? Maybe it’s best to break the grooming into sections, letting the dog rest between sessions? That might be over the course of the day or even over several days.
  • Would it be in the best interest of the dog to be groomed at a vet clinic where medical attention could be rapidly administered, if needed?

Years of experience have taught me there is not an easy answer. Whenever you need to decline services to a client, it’s an uncomfortable situation.

However, if you decline services, do so out of care and compassion for the pet. Be prepared to offer alternatives to the client, even if that means you simply tell them “no,” you cannot groom their dog. Be ready to refer them to someone better suited to handle their pet. List all the reasons WHY you cannot and will not groom their pet. Do it with the confidence of a professional.

In the end, as difficult as it is to say “NO” to clients, you will sleep a lot better at night when you do. Trust me on this one.

Happy trimming!

Melissa

 MVpaw_no_Inner_whiteWhat did you think?  Jump on the Learn2GroomDogs.com Facebook page and tell us your story!


How to Get Your Clipper Work Smooth – Like a Summer Hay Field

blogrIt’s been over 35 years since that first time. I still remember standing in awe, watching a talented pet groomer give a dog a haircut. She handled her clippers with ease. The long fur fell away like a hot knife through butter. The end result was smooth and gorgeous. And she was fast – super fast. She made the whole process seems so simple.

The first time I tried, I quickly discovered it was not simple. Those initial attempts were pretty pathetic. Saying my first efforts were rough and choppy would be polite. There were long tufts hanging out everywhere. I was frustrated beyond belief.

I was determined to master the skill. After all, the groomer I had been watching proved it could be done. It was simple – I just had to focus and figure it out.

Fast forward a few years of practice and a couple hundred dogs later, and I could make any dog look amazing. When I did a simple haircut on a pet, the fur fell away like a hot knife through butter. The end result was smooth and appealing. I could finish dogs in no time. I’d gotten very efficient with my clippers.

It took years of hard work. There were years of standing on my feet until they throbbed, working until my hands and shoulders ached. However, my pain can be your gain. Here are a few tips to enhance your speed when it comes to simple, low maintenance haircuts:

  • Use the most powerful clipper you can afford and are comfortable holding. Duel speeds or variable speed clippers are great options.
  • Work with the natural lay of the coat. You can work with or against the grain. If you reverse clip, the end result will leave that fur approximately two blade lengths shorter than working with the natural lay of the coat.
  • For a large majority of low maintenance trims done with a #4F, #5F, or a #7F blade with the grain, you will go over the pet three times before it’s really smooth.
  1. The first time removes the bulk.
  2. The second time takes out the high spots.
  3. The third time erases what you missed.
  • The strokes are long and smooth. They overlap slightly. I often tell students to think about a hay field. The farmer wants to be as efficient as possible – but he doesn’t want to miss anything, either. Most farmers work in nice, neat rows as they cut hay, slightly overlapping each row to ensure they don’t miss any portion of the field. Think about the dog’s body in the same manner. It’s a hay field. Your clipper is the tractor. You want it done right… and you want to be done before the dinner bell rings.
  • When clipping the legs, remember the actual contact of the cutting blade is minimal due to the shape of the surface. It’s round – like a pencil. Only a few teeth will make contact with the surface as you run the clipper down the leg. Thus, on legs you need multiple passes to get the same effect as three passes on the larger flat surface of the body. You can clearly see this relationship by simply running a blade down your own finger and looking at the blade’s point of contact.
  • Back brush. Back brush. Back brush!

clippersYou’ll always get a smoother cut on a dog that is clean and the coat has been fluffed. Once you make the initial pass to remove the bulk of the long coat, it’s time to pick up the brush. Back brush the entire dog and go over it a second time. On the third pass, again gently back brush the entire area that needs final attention. Did you get that? Back brush!

When do you know you are done? You are done clipping when there is no more coat coming off the dog after it has been washed, dried, and effectively back brushed. Period.

Clipper work on a low maintenance haircut style can be extremely frustrating for new groomer. But once you master the clipper and understand how to work with the coat, it becomes second nature. It becomes simple. You become fast. And you will be able to perform the haircut safely with great precision.  You can do it. It just takes focus

Happy trimming!

Melissa

 MVpaw_no_Inner_whiteWhat did you think about these ideas? What do you do that works great for you? Jump on the Learn2GroomDogs.com Facebook page and tell us about it.


The Secret to Handling Challenging Dogs

Dollarphotoclub_57676672In my years of teaching new pet groomers, I’ve seen hundreds of dogs take advantage of a new students. Dogs pull, squirm, whine, snarl… and bite. I’ve seen many students frustrated to the point of tears.

Then a miracle happens.

An instructor will walk over to the pet and gently take over for the student. Suddenly, this challenging pet turns into a perfect angel. The students’ jaw drops. A moment in stunned silence passes before the student exclaims, “How did you do that?!” The answer is simple:

Energy.

Dogs have keen senses and an uncanny ability to pick up on our energy and our confidence. They read us clearly even when we don’t think we are connecting to them. In the example above, the dog picked up on the instructor’s energy without a word having to be said.

Dogs are primarily nonverbal communicators. They have a language of their own. They are very clear in the messages that they give us. It is up to us to be able to interpret that language.

The #1 rule when working with pets is to remember the three C’s. As a professional you must remain: Calm, Cool, and Collected in ALL circumstances. The second you step out of this energy mode, the dog pet will know it.

Dogs are hardwired to think like dogs. They need a pack leader. If you do not exude the three C’s, dog language translates that to “poor leader.” The pet will not follow you. It will not cooperate with you.

So how do you gain the upper edge in this situation? Believe it or not, it all starts with your BREATHING.

I know it sounds far-fetched. How could something we do without conscious thought help in this situation?

To create a calm, cool, and collected energy, you need to be cool, calm, and collected. Deep breathing allows you body to channel that calm and focus. To make it happen, your breaths need to be deep and saturating. Breathe in slowly and deeply through your nose. Draw in the air and feel it fill your lungs. Now exhale slowly through your mouth. The most important part of deep breathing is to regulate your breaths. Three to four seconds in. Three to four seconds out.

Try it. You will feel the oxygen saturating your body. Tension begins to leave your shoulders. You will start to feel more relaxed almost immediately.

Screen-Shot-2015-11-05-at-4.08.52-PMDeep breathing can release stress and provide other noticeable health benefits. You will likely feel calmer after performing deep breathing exercises, and may trade feelings of anger or fear for a focused, relaxed state of mind. Most dogs will totally gravitate to this energy in a very positive way.

I firmly believe that 98% of all dog bites are preventable by reading the animal correctly and taking the appropriate precautions to protect yourself while gaining humane control over the pet. Your hands are your livelihood. You must take utmost care not to let your hands become injured.

Every pet is an individual with different physical and emotional characteristics. Some dogs receive clear directions and boundaries at home, making them very easy to work on in a professional setting. Other pets will not have the skills necessary to be well-mannered candidates in a professional grooming setting.

The personality quirks that you’ll experience while working professionally with pets will range from dogs that are perfect angels, to dogs that are mildly annoying, to dogs that could be potentially dangerous to work on for both the handler and to the pet itself.

Whenever working with pets it is always critical to remember the 3 C’s. As a professional you must remain calm, cool, and collected in all circumstances. And don’t forget to BREATHE.

Whenever you have a dog on a table or in your grooming facility, you must use humane, respectful, and consistent training messages. The more you can learn about dog psychology and combine it with actual experience, winning the control and the respect over the dogs will become second nature.

Always remember that dogs are primarily silent communicators. Excessive talking or giving of commands is not necessary to effectively communicate with them. Much of your control can come from maintaining the Three C’s – Always remain Calm, Cool, and Collected while working with any animal.

Any time you feel you are losing control of the three C’s, it’s time to step away from the grooming table and take a break. Breathe. Only when you can totally regain your composure is it time to step back and begin your work again.

There are many videos on Pet Handling in the Learn2GroomDogs library. Also my blog on Rating Dog Personalities is very helpful when determining how to rate personality and behavior in dogs.

Happy trimming!

Melissa

 MVpaw_no_Inner_whiteWhat did you think about these ideas? What do you do that works great for you? Jump on the Learn2GroomDogs.com Facebook page and tell us about it.


How to Scissor a Leg in Under 2 Minutes

autopilot-buttonGrooming systems allow us to go on autopilot. When we’re on autopilot, we can focus on the thing that matters the most – pets!

Think about the things you do every day. I’m sure you use systems all the time. I know I do.

I have a system for making coffee. I have a system for doing my makeup. I have a routine I follow when I exercise. I have a system when I get into the car to go somewhere. I have a routine I follow every night before I go to bed.

I bet you have a lot of routines, too.

When I follow my systems and routines, I don’t have the think about what I’m doing – I just do it. The beauty about routines is they become automated – and efficient.

How does it feel when you don’t follow your routine? What happens when you get interrupted? Do you lose your place? Do you have to stop and think about where you left off? Do you feel lost? What happens to your time?

I know when I’m interrupted, I lose my place. I get off track. I lose precious time. If it continues to happen, I get frustrated.

My guess is you’re just as busy as I am. We have places to go and things to do. Wasting time drives me nuts. How about you?

So, how do you apply this concept to dog grooming? Each phase of the grooming process can be broken down, systematically. For now, let’s talk about a routine for scissoring a leg in less than two minutes.

Now, I’m not talking about an 80-pound Doodle. I’m not talking about a dog you haven’t seen for months. I’m not talking about a dog that comes in matted to the hilt. I’m talking about average, everyday regular clients. Small and medium sized pets that have a bit of style to the haircut.

To become highly efficient with scissoring legs, there’s a secret.

It’s all in the set up BEFORE you pick up your shears.

Let’s break this down.

Let’s say you have a Shih Tzu that comes in every six weeks. It’s heavy coated and gets a medium guard comb on the body with fuller legs and a round head style. When it’s done, it’s so cute it looks like it should be a stuffed animal. The entire trim, prep, bath, fluff dry, and haircut should take 60 minutes or less.

First things first. The set up before you pick up your shears is critical. You’ll give yourself a huge head start if you do a few things beforehand.

All equipment needs to be sharp. Your blades need to be able to glide through the coat like a hot knife through butter. Your shears need to cut effortlessly with precision. Your thinners should run smoothly, without catching. Your Greyhound comb as well as your favorite slicker brush should be within easy reach.

Here’s my basic grooming routine on all my six-week or less clients who get a fuller styled leg trim.

  1. trim nails and clean ears
  2. bath
  3. towel dry
  4. hi-velocity fluff drying
  5. double-check coat for any mats or tangles prior to beginning the haircut
  6. trim the pads and round the feet at the same time with a #40 blade*
  7. Sani-work with a #10 (eyes, tummy, and under tail)
  8. guard comb work on the body*
  9. scissor the legs
  10. style the head
  11. style the ears
  12. style the tail
  13. apply bows and cologne based on client preference

I rarely break from this routine. This system allows me to go on to autopilot and focus on the pet and the quality of my work.

Notice the two stars in that list of 13 steps (6 and 8). Those are key areas when setting in the haircut to get legs done in less than two minutes. Those are your “cheat” areas.

What do I mean by “cheat”? Use your clippers. The clipper will remove the bulk of the hair. Any time you can remove excess coat with a clipper, you’re ahead of the game. It minimizes how much you must think about what you are doing while reducing the risk to the dog. #10’s, #40’s or guard combs rarely nick the body of the dog. Scissors? That’s another story. If you’re working with a quality pair of shears, they’re razor-sharp. It only takes one miscalculated move – one tug from the dog – and you have a potential injury that might require stitches. That’s not something any of us want.

Here is my step-by-step guide for this style of haircut focusing on the steps.

(Note: I always work around the dog in the circle.)

 Body:

  1. I brush downward over the leg and the foot with a slicker brush. With my less dominant hand, I slide my hand down the leg, with my finger and thumb closest to the table. When I get close to the foot, I gently ask the dog to lift its foot. I lightly clip the pads with a #40 blade (a #30 blade will work, too).
  2. Once the pads are clipped, I let my hand slide over the foot with my fingers wrapping around the edge of the dog’s foot. Any coat hanging over the edge of the foot, I quickly remove with my #40 blade. I repeat this process on all four feet.
  3. Once the pads and feet are trimmed, I turn my attention to the guard comb work on the body. In the pattern transition areas, I let my guard comb skim off the longer hair on the thighs, rump, and the shoulders. I’m thinking about parallel lines.
  4. When I stand back and look, I want the lines to drop from the widest points on the shoulders and hips to the table. Since the feet have already been trimmed, once you blend the coat at the transition areas, there’s very little left to hand scissor. Normally it’s just an area between 2-3 inches wide.
  5. Once my clipper work is done on the body and I have smoothly transitioned the short coat into the longer fur on the legs – I’m ready to pick up my shears.

Legs:

(In this scenario, I’m starting with the front leg and moving to a rear leg but you can use whatever order works best for you – or the dog. As I work around the dog, I complete each leg before moving to the next one.)

  1. I start with the front legs. I fluff the coat up, gently holding the dog’s foot in my fingers then give the leg a little bit of a shake. The leg is positioned as close to the table top as I can while still elevating it slightly. With straight shears, I box the outside and inside leg lines. (Creating a box is much easier than trying to create a cylinder when setting in the lines.)
  2. Next, I let the dog stand naturally in a square position. I trim a straight line from the elbow to the table with the dog standing squarely. While the dog is standing, I eyeball the front of the front leg making a mental note how much coat needs to come off to create a straight line.
  3. I recomb the entire leg, give it a little shake, and begin my final scissoring. With the dog standing, remove the corners and any longer hair falling over the boxed-in area, creating a nice straight cylinder. I then pick up the foot and detail the cylinder shape.
  4. I quickly give the leg another comb-up and do the final detailing with my thinning shears. I remove any of the high spots or rough patches.
  5. As I get close to finishing shaping the leg, I slide my fingers in around the top of the elbow, and give a gentle squeeze. This hold stabilizes the dog and naturally makes them point their toes so I can focus on the foot. I give the foot a quick fluff with my comb. Picking up my thinners, I remove any rough edges falling outside of the nice rounded foot blending into the sidelines on the leg. I never cut on the underside of the foot from this position.
  6. I put the foot down and let the dog stand naturally. I double-check my work between the large pad of the foot and the stopper pad. I re-trim that area if it needs it.
  7. To double-check the pad area, I brush the coat down and trim any stray hairs with small detail shears – always working around the outside area of the foot pad.
  8. I double-check all my work before I move on to the rear leg.

The rear leg will be the same (with a few variances) to help establish the angles of the rear assembly. When doing the guard comb work, I sweep the clipper over the hip and rump area and feather off towards the stifle. This helps establish the angulation on the rear leg.
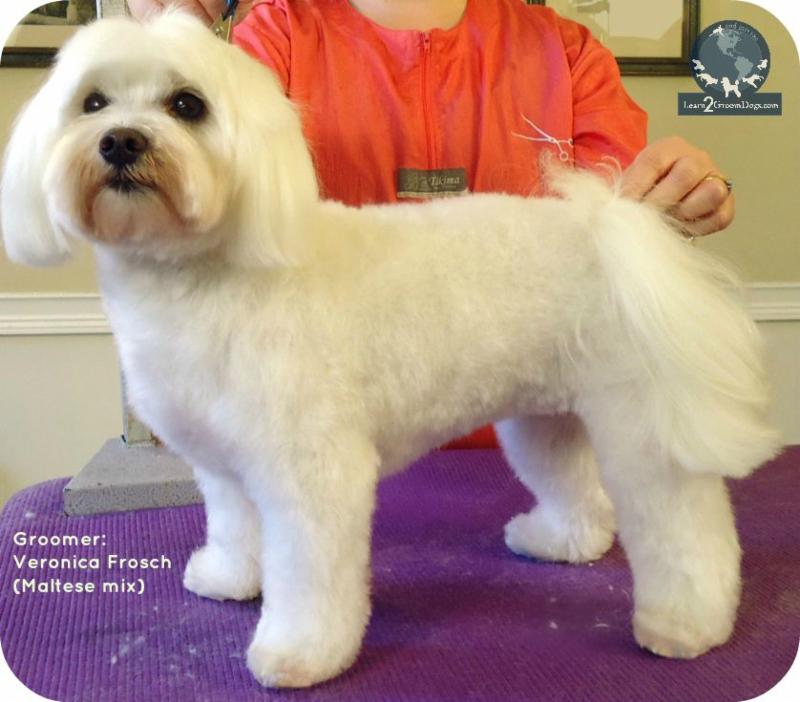
  1. On the rear legs, I fluff the coat up. Gently holding the dog’s foot in my fingers, I give the leg a little bit of a shake. With the dog standing squarely, I scissor the outside of the leg in a straight, parallel line to the table.
  2. Next, while standing directly behind the dog, I scissor a straight parallel line on the inside of the leg.
  3. I re-fluff the leg and let the dog stand naturally. I scissor in the front of the rear leg, accentuating the curved angle from the stifle to the hock and then straight down to the rounded foot. I will often switch to curved shears for this section.
  4. Finally, I fluff the rear portion of the leg. Using curved shears, I scissor in the angles over the rump and down the rear section of the back leg, accentuating the angulation.
  5. I quickly give the leg another comb-up and remove any of the high spots or rough patches with thinners.
  6. I slide my hand around the thigh, lifting the foot slightly off the table, focusing now on the foot. I give it a quick fluff with my comb and pick up my thinners to remove any rough edges falling outside the lines of the nice rounded foot. I blend the foot into the sidelines on the leg. I set the leg down and double-check the hock.
  7. I fluff the leg one more time and do one of two things:
    1. Lift the dog so it is standing on its hind legs. With the dog lifted in this manner, I get a clear view of the inside of the rear legs. I look for rough spots needing to be smoothed out – or –
    2. Gently pick up the one of the rear legs. Lift it only as high as the dog is comfortable (most of the time allowing the dog to bring its leg into its body a bit). I double-check the inside of the rear leg and smooth out any rough spots with thinners.
  8. To double-check the pad area, I brush the coat down and trim any stray hairs with small detail shears, always working around the outside area of the foot pad.
  9. I double-check all my work before I move on to the next leg.

Have you ever timed yourself? If you haven’t, I encourage you to do so. You can’t improve what you don’t track. It’s important to know how long each step of the grooming process takes you. If you are not being able to get legs scissored on a relatively simple trim quickly, I encourage you to grab a timer or watch the clock. Play the time game with yourself. It’s fun. If you work on the system, you will be able to complete a leg in under two minutes.

When grooming pets, I love to automate what I do. It allows me to give the client a consistent haircut every time. It allows me to be efficient. It allows me to minimize the amount of time I spend on each task. I love how having systems in place allows me the freedom to focus on what is important – the pet.

Being efficient allows you to do more pets per day while enjoying your job. It doesn’t mean that you’re working harder, it just means you’re being productive. Think about all the things you do where you have a system or a routine in place. Thorough systems and routines allow you to get through the process effortlessly. And who doesn’t like that?

Creating routines and systems will also increase your revenue generation. I have yet to find anybody who does not appreciate being able to earn more money without having to work harder for it.

 MVpaw_no_Inner_whiteJump on the Learn2GroomDogs.com Facebook page and tell us your tricks and tips for scissoring legs and saving time.


I Want a “Puppy Cut”

Don’t you love it when an owner walks into a salon and ask for this trim by name? They actually think this is a universal standard trim that all groomers and pet stylists should know how to do. When we start asking them questions, they get all huffy, thinking we don’t know how to do our jobs. Frustrating!! You and I know there isn’t a consistent right way to do a “puppy cut.” There are many – many variations!
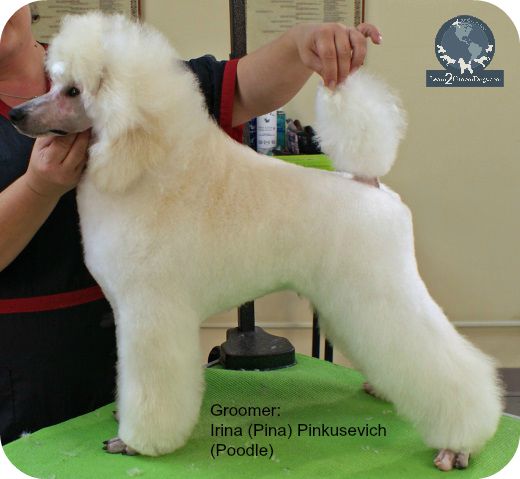
The puppy cut is one of the most popular haircuts. It works well on a wide variety of pets. From Shih Tzus to Doodles. From Pomeranians to Bichons. Almost any breed that grows longer coat can be done in this easy-to-care for style.

Yet, the puppy cut is also the most misunderstood haircut in grooming salons around the country. Why? There are no clear directions of what this trim actually is or how it should be done. It’s left up to individual personal interpretation by owners, groomers, or talented pet stylists.

The puppy cut started out as a trim style for Poodles. The puppy cut is a specific trim used on young Poodles in the dog show world. Once the puppy turns a year-old, they are put into the elaborate adult haircut for the conformation ring.

Today, the term “puppy cut” is used very loosely. It can apply to a wide variety of different breeds. It’s highly adaptable to any size of dog. Coats can be curly, wavy, or straight. Almost any purebred or mixed breed that grows hair looks appealing in a “puppy cut.”

quote 2 Many owners love this style of trim. It can be very cute. It’s easy to care for. It’s highly versatile. That’s a win-win-win for any busy family! The dog does not drag in dirt and debris from outdoors. Their ears do not drag in the food or water dish. The need for brushing between grooming appointments is minimized. And on smaller pets, bathing between grooming appointments is a breeze. When done well, it can be extremely attractive, to boot.

So what is it?

Essentially, the puppy cut is one length all over. The most common length is between 1-2 inches over the body, legs, tail, head, and ears. Typically, it’s done with a clipper fitted with a long guard comb over the blade. There should not be any clipper marks, uneven coat, or sharp edges left in the fur. Next to a powerful clipper, high quality blenders are your best friends when doing this trim. Everything is soft and plush, like a fluffy puppy.

The term “puppy cut” can be tricky. In some circles the puppy cut can also be known as the “teddy bear trim”, “summer cut”, or “kennel cut.” I’ve even seen some salons turn their version of the trim into their “signature haircut.” So the puppy cut becomes “The Posh Pet Special” (brilliant marketing by the way!) Generally, the only things that change between theses trims are the names and the length of coat.

It’s important to keep this in mind, too: one person’s interpretation of a puppy cut might be that of a smooth-coated puppy. Think Boxer, Pug, or Beagle. Another person’s interpretation would be that of a fluffier breed like a Shih Tzu, Bichon, or Poodle. There’s also a big difference between a four-week old puppy and a ten-week old puppy in terms of coat growth.
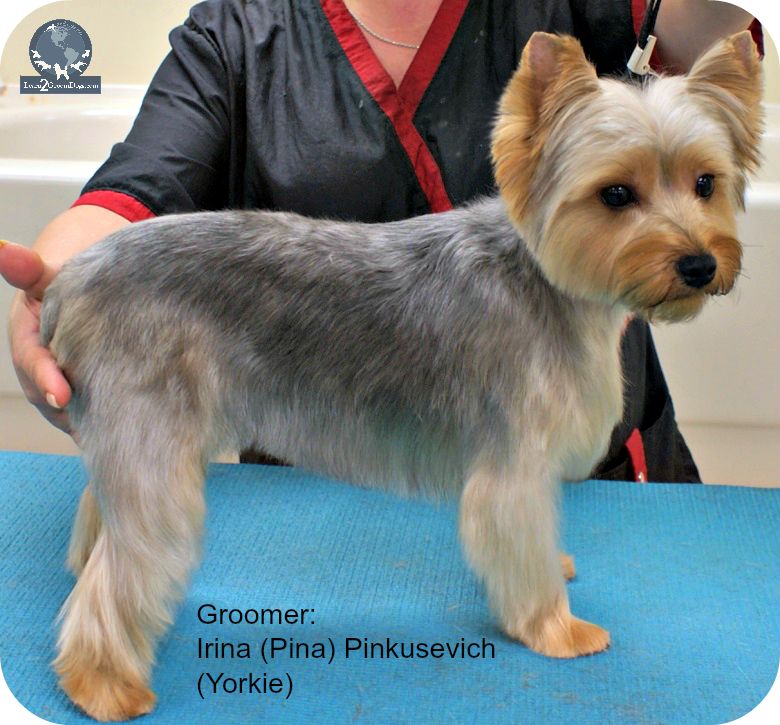
With all these interpretations, there is a wide variance of what each individual dog will look like and what each owner expects their dog to look like. If an owner is requesting this trim for the first time, be prepared to discuss the trim in detail with the owner. DO NOT ASSUME YOU ARE BOTH ON THE SAME PAGE! Communication is the key to a happy customer.

Here is a great tip to remember when talking with clients: whoever is asking the questions controls the conversation. As groomers and pet stylists, we are problem solvers. Uncover the problems in five simple steps.

  1. Observe the pet as the client walks through the door. Let common sense guide your line of questions.
  2. Find the problem. Ask basic questions like, “Were you thinking of a short and smooth style or something a bit fluffier?” Letting the client talk will help uncover problem areas.
  3. Gather clues from what the client tells you and what you observe.
  4. Offer limited choices as you help the client solve the problem.
  5. Guide the questions in five areas of the pet: overall body – head – ears – legs/feet – tail.

Here is a list of talking points when a new client request a “puppy cut.”

  • In general, what is the look they are hoping for? Something smooth and sleek so it’s easy to care for? Or something that makes the dog look slightly fluffy, plush, and super cute?
  • What is the lifestyle of the dog? Active? Sedentary? City dweller? Enjoys outdoor activities?
  • What is the texture and coat density of the dog? Fine, thin coats will looks shorter than dense coated dogs even with the same length clipper blade.
  • How much length do they want left on the body? What about on the legs? Feet?
  • What type of head style would they prefer?
  • Depending on the pet’s ear set, ear styles can change dramatically (dropped ear or pricked and pointed). How do they want them styled? Long? Short? In-between?
  • Do they want a long coat left on the tail or trimmed down to match the body? Or something in-between?

It’s important to have a thorough conversation with the owner when considering this haircut. There are so many variances with a puppy cut. Simply having the client state they want one is not specific enough.

Advise the client about trim options that would work best for their dog. Based on the condition of the coat and your pet’s body structure, you will be able to offer some valuable suggestions. A skilled pet professional will know how to make minor changes to the trim enhancing the pet’s appeal. Maybe the pet’s coat is too tangled to do the longer trim today. You’ll be able to suggest alternatives on how to modify a trim that works best as you discuss options for future trims.

Educating clients on proper pet hygiene is a valuable service most salon offer for free to their clients. In order to keep the dog looking its best, you can advise the client on how to best maintain this haircut between grooming appointments. At home brushing and bathing can make a big difference in how they look and smell, too. You can also make suggestions on how often the trim should be done based on the pet’s life style and coat texture. Maybe you suggest they get a full haircut every 4-6 weeks. Or maybe a maintenance program would be better suited for the client when you see them for weekly or bi weekly appointments.

Always remember, your clients are the lifeblood of your business. Taking a little extra time up front for a warm and welcoming pet consultation will go a long way toward building a solid relationship with them.

There is a good reason why the “puppy cut” is one of the most popular trims in grooming salons around the country. There are many – many variations!

What is YOUR first thought when you hear this term? How do you address this issue?  Jump over to the Learn2GroomDogs.com Facebook page and tell us about it!
Happy trimming,

~Melissa

P.S. You can make this and ALL grooming conversations easier and more successful.

This is a great tool tool for getting the conversation started in a way that is easy for you to explain and for the client to understand. The photos and drawings make it even simpler! Try it the next time you talk to your guests. Even better? Use this as a teaching/training tool for your staff so you are all consistent in the ways you speak to your clients. Once everyone on your team knows how to discuss the essential parts of the pet, they’ll sound more knowledgeable, your clients will feel more comfortable, and you’ll waste less time (and possibly profits) correcting “guess work!”

error: Content is protected !!